Introduction
Welcome to the documentation! This guide provides comprehensive insights into the architecture, setup, usage, and advanced features of ZKsync.
Documentation Structure
-
Guides: The Guides section is designed to help users at every level, from setup and development to advanced configuration and debugging techniques. It covers essential topics, including Docker setup, repository management, and architecture.
-
Specs: This section dives into the technical specifications of our system. Here, you’ll find detailed documentation on data availability, L1 and L2 communication, smart contract interactions, Zero-Knowledge proofs, and more. Each topic includes an in-depth explanation to support advanced users and developers.
-
Announcements: This section highlights important updates, announcements, and committee details, providing essential information to keep users informed on the latest changes.
Getting Started
Feel free to explore each section according to your needs. This documentation is designed to be modular, so you can jump to specific topics or follow through step-by-step.
Thank you for using our documentation!
ZKsync basic guides
This section contains basic guides that aim to explain the ZKsync ecosystem in an easy to grasp way.
Table of Contents
Installing dependencies
TL;DR
This is a shorter version of setup guide to make it easier subsequent initializations. If it’s the first time you’re initializing the workspace, it’s recommended that you read the whole guide below, as it provides more context and tips.
If you run on ‘clean’ Ubuntu on GCP:
# For VMs only! They don't have SSH keys, so we override SSH with HTTPS
git config --global url."https://github.com/".insteadOf git@github.com:
git config --global url."https://".insteadOf git://

# Rust
curl --proto '=https' --tlsv1.2 -sSf https://sh.rustup.rs | sh

# NVM
curl -o- https://raw.githubusercontent.com/nvm-sh/nvm/v0.39.5/install.sh | bash

# All necessary stuff
sudo apt-get update
sudo apt-get install -y build-essential pkg-config cmake clang lldb lld libssl-dev libpq-dev apt-transport-https ca-certificates curl software-properties-common

# Install docker
curl -fsSL https://download.docker.com/linux/ubuntu/gpg | sudo apt-key add -
sudo add-apt-repository "deb [arch=amd64] https://download.docker.com/linux/ubuntu focal stable"
sudo apt install docker-ce
sudo usermod -aG docker ${USER}

# Start docker.
sudo systemctl start docker

## You might need to re-connect (due to usermod change).

# Node & yarn
nvm install 20
# Important: there will be a note in the output to load
# new paths in your local session, either run it or reload the terminal.
npm install -g yarn
yarn set version 1.22.19

# For running unit tests
cargo install cargo-nextest --version 0.9.109 --locked
# SQL tools
cargo install sqlx-cli --version 0.8.1

# Foundry ZKsync
curl -L https://raw.githubusercontent.com/matter-labs/foundry-zksync/main/install-foundry-zksync | bash
foundryup-zksync

# Non CUDA (GPU) setup, can be skipped if the machine has a CUDA installed for provers
# Don't do that if you intend to run provers on your machine. Check the prover docs for a setup instead.
echo "export ZKSYNC_USE_CUDA_STUBS=true" >> ~/.bashrc
# You will need to reload your `*rc` file here

# Clone the repo to the desired location
git clone git@github.com:matter-labs/zksync-era.git
cd zksync-era
git submodule update --init --recursive
Don’t forget to look at tips.
Supported operating systems
ZKsync currently can be launched on any *nix operating system (e.g. any linux distribution or macOS).
If you’re using Windows, then make sure to use WSL 2.
Additionally, if you are going to use WSL 2, make sure that your project is located in the linux filesystem, since accessing NTFS partitions from within WSL is very slow.
If you’re using macOS with an ARM processor (e.g. M1/M2), make sure that you are working in the native environment (e.g., your terminal and IDE don’t run in Rosetta, and your toolchain is native). Trying to work with ZKsync code via Rosetta may cause problems that are hard to spot and debug, so make sure to check everything before you start.
Docker
Install docker. It is recommended to follow the instructions from the
official site.
Note: currently official site proposes using Docker Desktop for Linux, which is a GUI tool with plenty of quirks. If you
want to only have CLI tool, you need the docker-ce package and you can follow
this guide for Ubuntu.
Installing docker via snap or from the default repository can cause troubles.
You need to install both docker and docker compose.
Note: docker compose is installed automatically with Docker Desktop.
Note: On linux you may encounter the following error when you’ll try to work with zksync:
ERROR: Couldn't connect to Docker daemon - you might need to run `docker-machine start default`.
If so, you do not need to install docker-machine. Most probably, it means that your user is not added to
thedocker group. You can check it as follows:
docker-compose up # Should raise the same error.
sudo docker-compose up # Should start doing things.
If the first command fails, but the second succeeds, then you need to add your user to the docker group:
sudo usermod -a -G docker your_user_name
After that, you should logout and login again (user groups are refreshed after the login). The problem should be solved at this step.
If logging out does not resolve the issue, restarting the computer should.
Node.js & Yarn
- Install
Node(requires versionv20). The recommended way is via nvm. - Install
yarn. Can be done vianpm install -g yarn. Make sure to get version 1.22.19 - you can change the version by runningyarn set version 1.22.19.
clang
In order to compile RocksDB, you must have LLVM available. On debian-based linux it can be installed as follows:
On debian-based linux:
sudo apt-get install build-essential pkg-config cmake clang lldb lld
On macOS:
You need to have an up-to-date Xcode. You can install it directly from App Store. With Xcode command line tools, you
get the Clang compiler installed by default. Thus, having XCode you don’t need to install clang.
OpenSSL
Install OpenSSL:
On mac:
brew install openssl
On debian-based linux:
sudo apt-get install libssl-dev
Rust
Install Rust’s toolchain version reported in /rust-toolchain.toml (also a later stable version should work).
Instructions can be found on the official site.
Verify the rust installation:
rustc --version
rustc 1.xx.y (xxxxxx 20xx-yy-zz) # Output may vary depending on actual version of rust
If you are using macOS with ARM processor (e.g. M1/M2), make sure that you use an aarch64 toolchain. For example, when
you run rustup show, you should see a similar input:
rustup show
Default host: aarch64-apple-darwin
rustup home:  /Users/user/.rustup

installed toolchains
--------------------

...

active toolchain
----------------

1.67.1-aarch64-apple-darwin (overridden by '/Users/user/workspace/zksync-era/rust-toolchain')
If you see x86_64 mentioned in the output, probably you’re running (or used to run) your IDE/terminal in Rosetta. If
that’s the case, you should probably change the way you run terminal, and/or reinstall your IDE, and then reinstall the
Rust toolchain as well.
PostgreSQL Client Library
For development purposes, you typically only need the PostgreSQL client library, not the full server installation. Here’s how to install it:
On macOS:
brew install libpq
On Debian-based Linux:
sudo apt-get install libpq-dev
Cargo nextest
cargo-nextest is the next-generation test runner for Rust projects. zkstack dev test rust uses
cargo nextest by default.
cargo install cargo-nextest
SQLx CLI
SQLx is a Rust library we use to interact with Postgres, and its CLI is used to manage DB migrations and support several features of the library.
cargo install --locked sqlx-cli --version 0.8.1
Foundry ZKsync
ZKSync depends on Foundry ZKsync (which is is a specialized fork of Foundry, tailored for ZKsync). Please follow this installation guide to get started with Foundry ZKsync.
Foundry ZKsync can also be used for deploying smart contracts. For commands related to deployment, you can pass flags for Foundry integration.
Non-GPU setup
Circuit Prover requires a CUDA bindings to run. If you still want to be able to build everything locally on non-CUDA setup, you’ll need use CUDA stubs.
For a single run, it’s enough to export it on the shell:
export ZKSYNC_USE_CUDA_STUBS=true
For persistent runs, you can echo it in your ~/.
echo "export ZKSYNC_USE_CUDA_STUBS=true" >> ~/.<SHELL>rc
Note that the same can be achieved with RUSTFLAGS (discouraged). The flag is --cfg=no_cuda. You can either set
RUSTFLAGS as env var, or pass it in config.toml (either project level or global). The config would need the following:
[build]
rustflags = ["--cfg=no_cuda"]
Tips
Tip: mold
Optionally, you may want to optimize the build time with the modern linker, mold.
This linker will speed up the build times, which can be pretty big for Rust binaries.
Follow the instructions in the repo in order to install it and enable for Rust.
If you installed mold to /usr/local/bin/mold, then the quickest way to use it without modifying any files is:
export RUSTFLAGS='-C link-arg=-fuse-ld=/usr/local/bin/mold'
export CARGO_TARGET_X86_64_UNKNOWN_LINUX_GNU_LINKER="clang"
Tip: Speeding up building RocksDB
By default, each time you compile rocksdb crate, it will compile required C++ sources from scratch. It can be avoided
by using precompiled versions of library, and it will significantly improve your build times.
In order to do so, you can put compiled libraries to some persistent location, and add the following to your shell
configuration file (e.g. .zshrc or .bashrc):
export ROCKSDB_LIB_DIR=<library location>
export SNAPPY_LIB_DIR=<library location>
Make sure that compiled libraries match the current version of RocksDB. One way to obtain them, is to compile the
project in the usual way once, and then take built libraries from
target/{debug,release}/build/librocksdb-sys-{some random value}/out.
Development guide
This document outlines the steps for setting up and working with ZKsync.
Prerequisites
If you haven’t already, install the prerequisites as described in Install Dependencies.
Installing the local ZK Stack CLI
To set up local development, begin by installing ZK Stack CLI. From the project’s root directory, run the following commands:
cd ./zkstack_cli/zkstackup
./install --local
This installs zkstackup in your user binaries directory (e.g., $HOME/.local/bin/) and adds it to your PATH.
After installation, open a new terminal or reload your shell profile. From the project’s root directory, you can now run:
zkstackup --local
This command installs zkstack from the current source directory.
You can proceed to verify the installation and start familiarizing with the CLI by running:
zkstack --help
NOTE: Whenever you want to update you local installation with your changes, just rerun:
zkstackup --local
You might find convenient to add this alias to your shell profile:
alias zkstackup='zkstackup --path /path/to/zksync-era'
Configure Ecosystem
The project root directory includes configuration files for an ecosystem with a single chain, era. To initialize the
ecosystem, first start the required containers:
zkstack containers
Next, run:
zkstack ecosystem init
These commands will guide you through the configuration options for setting up the ecosystem.
For local development only. You can also use the development defaults by supplying the --dev flag.
Initialization may take some time, but key steps (such as downloading and unpacking keys or setting up containers) only need to be completed once.
To see more detailed output, you can run commands with the --verbose flag.
Cleanup
To clean up the local ecosystem (e.g., removing containers and clearing the contract cache), run:
zkstack dev clean all
You can then reinitialize the ecosystem as described in the Configure Ecosystem section.
zkstack containers
zkstack ecosystem init
Committing changes
zksync uses pre-commit and pre-push git hooks for basic code integrity checks. Hooks are set up automatically within
the workspace initialization process. These hooks will not allow to commit the code which does not pass several checks.
Currently the following criteria are checked:
- Code must be formatted via
zkstack dev fmt. - Code must be linted via
zkstack dev lint.
Testing
ZKstack CLI offers multiple subcommands to run specific integration and unit test:
zkstack dev test --help
Usage: zkstack dev test [OPTIONS] <COMMAND>

Commands:
  integration   Run integration tests
  fees          Run fees test
  revert        Run revert tests
  recovery      Run recovery tests
  upgrade       Run upgrade tests
  build         Build all test dependencies
  rust          Run unit-tests, accepts optional cargo test flags
  l1-contracts  Run L1 contracts tests
  prover        Run prover tests
  wallet        Print test wallets information
  loadtest      Run loadtest
  help          Print this message or the help of the given subcommand(s)
Running unit tests
Unit tests require preprocessed artifacts from the contracts submodule. These can be prepared by running:
zkstack dev contracts
You can run unit tests for the Rust crates in the project by running:
zkstack dev test rust
Running integration tests
Running integration tests is more complex. Some tests require a running server, while others need the system to be in a specific state. Please refer to our CI scripts ci-core-reusable.yml to have a better understanding of the process.
In simple terms, the integration-test workflow consists of three phases:
-
Initializing the ecosystem
zkstack dev clean all # remove any previous state zkstack containers # start required Docker containers zkstack ecosystem init # set up blockchain and contracts -
Starting the server
zkstack server # spin up the serverThis command starts the server and occupies the current terminal window. Open a new terminal window for any subsequent commands.
-
Running integration tests
zkstack dev test integration # run the integration tests
Note: This is a high-level summary and does not reflect every nuance in
ci-core-reusable.yml.
Running upgrade tests
Similar to integration tests, the whole setup is complicated and it is recommended to refer to our CI scripts ci-core-reusable.yml to have a better understanding of the process.
In simple terms, the upgrade-test workflow consists of three phases:
-
Initializing the ecosystem
Same as for integration tests workflow. -
Starting the server
Same as for integration tests workflow. -
Running integration tests
ZKSYNC_HOME=<path_to_zksync_era> zkstack dev test upgrade # run the upgrade tests
Note: This is a high-level summary and does not reflect every nuance in
ci-core-reusable.yml.
Running load tests
The current load test implementation only supports the legacy bridge. To use it, you need to create a new chain with legacy bridge support:
zkstack chain create --legacy-bridge
zkstack chain init
After initializing the chain with a legacy bridge, you can run the load test against it.
zkstack dev test loadtest
Contracts
Build contracts
Run:
zkstack dev contracts --help
to see all the options.
Publish source code on Etherscan
Verifier Options
Most commands interacting with smart contracts support the same verification options as Foundry’s forge command. Just
double check if the following options are available in the subcommand:
--verifier                  -- Verifier to use
--verifier-api-key          -- Verifier API key
--verifier-url              -- Verifier URL, if using a custom provider
Using Foundry
You can use foundry to verify the source code of the contracts.
forge verify-contract
Verifies a smart contract on a chosen verification provider.
You must provide:
- The contract address
- The contract name or the path to the contract.
- In case of Etherscan verification, you must also provide:
- Your Etherscan API key, either by passing it as an argument or setting
ETHERSCAN_API_KEY
- Your Etherscan API key, either by passing it as an argument or setting
For more information check Foundry’s documentation.
How to generate the genesis.yaml file
To generate the genesis.yaml
file checkout to the desired zksync-era branch, build zkstack from it,
configure ecosystem and run the following command:
zkstack dev generate-genesis
Which runs the genesis_generator
package under the hood and generates the genesis file.
Running the application
This document covers common scenarios for launching ZKsync applications set locally.
Prerequisites
Prepare dev environment prerequisites: see
Setup local dev environment
Run the required containers with:
zkstack containers
Setup:
zkstack ecosystem init
To completely reset the dev environment:
-
Stop services:
zkstack dev clean all -
Repeat the setup procedure above
zkstack containers
zkstack ecosystem init
Advanced local setup with ZKsync Gateway
-
Delete services from any other previous setup:
zkstack dev clean all -
Start default ecosystem with default
erachain config:zkstack ecosystem init --deploy-paymaster --deploy-erc20 \ --deploy-ecosystem --l1-rpc-url=http://localhost:8545 \ --server-db-url=postgres://postgres:notsecurepassword@localhost:5432 \ --server-db-name=zksync_server_localhost_era \ --ignore-prerequisites --observability=false \ --chain era \ --update-submodules false -
Create additional
gatewaychain as rollup:zkstack chain create \ --chain-name gateway \ --chain-id 506 \ --prover-mode no-proofs \ --wallet-creation localhost \ --l1-batch-commit-data-generator-mode rollup \ --base-token-address 0x0000000000000000000000000000000000000001 \ --base-token-price-nominator 1 \ --base-token-price-denominator 1 \ --set-as-default false \ --evm-emulator false \ --ignore-prerequisites -
Initialise
gatewaychain:zkstack chain init \ --deploy-paymaster \ --l1-rpc-url=http://localhost:8545 \ --server-db-url=postgres://postgres:notsecurepassword@localhost:5432 \ --server-db-name=zksync_server_localhost_gateway \ --chain gateway --update-submodules false -
Transform
gatewaychain from rollup to ZKsync Gateway settlement layer:zkstack chain gateway convert-to-gateway --chain gateway --ignore-prerequisites -
Start
gatewaychain server:mkdir zruns zkstack server --ignore-prerequisites --chain gateway &> ./zruns/gateway.log & zkstack server wait --ignore-prerequisites --verbose --chain gateway -
Migrate
erachain to settle ongateway:zkstack chain gateway migrate-to-gateway --chain era --gateway-chain-name gateway -
Start
erachain servers:zkstack server --ignore-prerequisites --chain era &> ./zruns/era.log & -
Your chains will be running on the following ports:
localhost:3050 - chain era (271)
localhost:3150 - chain gateway (506)
Any deposits or withdraws from L1 to era chain will go through gateway.
Run observability stack
If you want to run Dockprom stack (Prometheus, Grafana) alongside other
containers - add --observability parameter during initialisation.
zkstack containers --observability
or select yes when prompted during the interactive execution of the command.
That will also provision Grafana with
era-observability dashboards. You can then
access it at http://127.0.0.1:3000/ under credentials admin/admin.
If you don’t see any data displayed on the Grafana dashboards - try setting the timeframe to “Last 30 minutes”. You will also have to have
jqinstalled on your system.
Ecosystem Configuration
The ecosystem configuration is spread across multiple files and directories:
-
Root level:
ZkStack.yaml: Main configuration file for the entire ecosystem.
-
configs/directory:apps/:portal_config.json: Configuration for the portal application.
contracts.yaml: Defines smart contract settings and addresses.erc20.yaml: Configuration for ERC20 tokens.initial_deployments.yaml: Specifies initial ERC20 token deployments.wallets.yaml: Contains wallet configurations.
-
chains/<chain_name>/directory:artifacts/: Contains build/execution artifacts.configs/: Chain-specific configuration files.contracts.yaml: Chain-specific smart contract settings.external_node.yaml: Configuration for external nodes.general.yaml: General chain configuration.genesis.yaml: Genesis configuration for the chain.secrets.yaml: Secrets and private keys for the chain.wallets.yaml: Wallet configurations for the chain.
db/main/: Database files for the chain.ZkStack.yaml: Chain-specific ZkStack configuration.
These configuration files are automatically generated during the ecosystem initialization (zkstack ecosystem init) and
chain initialization (zkstack chain init) processes. They control various aspects of the ZKsync ecosystem, including:
- Network settings
- Smart contract deployments
- Token configurations
- Database settings
- Application/Service-specific parameters
Note: The execution delay (time L1 batches must wait before execution) is now dynamically read from the ValidatorTimelock contract and is no longer configurable through these files.
It’s important to note that while these files can be manually edited, any changes may be overwritten if the ecosystem or chain is reinitialized. Always back up your modifications and exercise caution when making direct changes to these files.
For specific configuration needs, it’s recommended to use the appropriate zkstack commands or consult the
documentation for safe ways to customize your setup.
Build and run server
Run server:
zkstack server
The server’s configuration files can be found in /chains/<chain_name>/configs directory. These files are created when
running zkstack chain init command.
Modifying configuration files manually
To manually modify configuration files:
- Locate the relevant config file in
/chains/<chain_name>/configs - Open the file in a text editor
- Make necessary changes, following the existing format
- Save the file
- Restart the relevant services for changes to take effect:
zkstack server
Manual changes to configuration files may be overwritten if the ecosystem is reinitialized or the chain is reinitialized.
Some properties, such as ports, may require manual modification across different configuration files to ensure consistency and avoid conflicts.
Running server using Google cloud storage object store instead of default In memory store
Get the service_account.json file containing the GCP credentials from kubernetes secret for relevant
environment(stage2/ testnet2) add that file to the default location ~/gcloud/service_account.json or update
object_store.toml with the file location
zkstack prover init --bucket-base-url={url} --credentials-file={path/to/service_account.json}
Running prover server
Running on a machine with GPU
zkstack prover run --component=prover
Running the verification key generator
# ensure that the setup_2^26.key in the current directory, the file can be download from  https://storage.googleapis.com/matterlabs-setup-keys-us/setup-keys/setup_2\^26.key

# To generate all verification keys
cargo run --release --bin zksync_verification_key_generator
Generating binary verification keys for existing json verification keys
cargo run --release --bin zksync_json_to_binary_vk_converter -- -o /path/to/output-binary-vk
Generating commitment for existing verification keys
cargo run --release --bin zksync_commitment_generator
Running the contract verifier
zkstack contract-verifier run
Troubleshooting
Connection Refused
Problem
error sending request for url (http://127.0.0.1:8545/): error trying to connect: tcp connect error: Connection refused (os error 61)
Description
It appears that no containers are currently running, which is likely the reason you’re encountering this error.
Solution
Ensure that the necessary containers have been started and are functioning correctly to resolve the issue.
zkstack containers
zkstack dev lint --check -t contracts fails
Problem
zkstack dev lint --check -t contracts                                                                                                                                                                                                                                 138ms  13:13:01

┌   ZK Stack CLI
│
●  Running linters for targets: [".contracts"]
│
◒  Running contracts linter..                                                                                                                                                                                                                                                                                    │
■  Command failed to run
│
■    Status:
│      exit status: 2
│    Stdout:
│      yarn run v1.22.22
│      $ yarn lint:md && yarn lint:sol && yarn lint:ts && yarn prettier:check
│      $ markdownlint "**/*.md"
│      $ solhint "**/*.sol"
│      A new version of Solhint is available: 5.0.5
│      Please consider updating your Solhint package.
│
│      system-contracts/contracts/ContractDeployer.sol
│      171:27 warning Avoid to use tx.origin avoid-tx-origin
│
│      ✖ 1 problem (0 errors, 1 warning)
│
│      $ eslint .
│      info Visit https://yarnpkg.com/en/docs/cli/run for documentation about this command.
│      info Visit https://yarnpkg.com/en/docs/cli/run for documentation about this command.
│
│
│    Stderr:
│
│      Oops! Something went wrong! :(
│
│      ESLint: 8.57.0
│
│      EslintPluginImportResolveError: typescript with invalid interface loaded as resolver
│      Occurred while linting /home/evl/code/zksync-era/contracts/system-contracts/scripts/utils.ts:19
│      Rule: "import/default"
│      at requireResolver (/home/evl/code/zksync-era/node_modules/eslint-module-utils/resolve.js:204:17)
│      at fullResolve (/home/evl/code/zksync-era/node_modules/eslint-module-utils/resolve.js:141:22)
│      at Function.relative (/home/evl/code/zksync-era/node_modules/eslint-module-utils/resolve.js:158:10)
│      at remotePath (/home/evl/code/zksync-era/contracts/node_modules/eslint-plugin-import/lib/ExportMap.js:811:381)
│      at captureDependency (/home/evl/code/zksync-era/contracts/node_modules/eslint-plugin-import/lib/ExportMap.js:817:463)
│      at captureDependencyWithSpecifiers
│      (/home/evl/code/zksync-era/contracts/node_modules/eslint-plugin-import/lib/ExportMap.js:817:144)
│      at /home/evl/code/zksync-era/contracts/node_modules/eslint-plugin-import/lib/ExportMap.js:822:42
│      at Array.forEach (<anonymous>)
│      at ExportMap.parse (/home/evl/code/zksync-era/contracts/node_modules/eslint-plugin-import/lib/ExportMap.js:821:427)
│      at ExportMap.for (/home/evl/code/zksync-era/contracts/node_modules/eslint-plugin-import/lib/ExportMap.js:807:201)
│      error Command failed with exit code 2.
│      error Command failed with exit code 2.
│
│
■  Command failed to run: yarn --cwd contracts lint:check
│
│  Oops! Something went wrong! :(
│
│  ESLint: 8.57.0
│
│  EslintPluginImportResolveError: typescript with invalid interface loaded as resolver
│  Occurred while linting /home/evl/code/zksync-era/contracts/system-contracts/scripts/utils.ts:19
│  Rule: "import/default"
│      at requireResolver (/home/evl/code/zksync-era/node_modules/eslint-module-utils/resolve.js:204:17)
│      at fullResolve (/home/evl/code/zksync-era/node_modules/eslint-module-utils/resolve.js:141:22)
│      at Function.relative (/home/evl/code/zksync-era/node_modules/eslint-module-utils/resolve.js:158:10)
│      at remotePath (/home/evl/code/zksync-era/contracts/node_modules/eslint-plugin-import/lib/ExportMap.js:811:381)
│      at captureDependency (/home/evl/code/zksync-era/contracts/node_modules/eslint-plugin-import/lib/ExportMap.js:817:463)
│      at captureDependencyWithSpecifiers (/home/evl/code/zksync-era/contracts/node_modules/eslint-plugin-import/lib/ExportMap.js:817:144)
│      at /home/evl/code/zksync-era/contracts/node_modules/eslint-plugin-import/lib/ExportMap.js:822:42
│      at Array.forEach (<anonymous>)
│      at ExportMap.parse (/home/evl/code/zksync-era/contracts/node_modules/eslint-plugin-import/lib/ExportMap.js:821:427)
│      at ExportMap.for (/home/evl/code/zksync-era/contracts/node_modules/eslint-plugin-import/lib/ExportMap.js:807:201)
│  error Command failed with exit code 2.
│  error Command failed with exit code 2.
│
│
▲    0: Command failed to run: yarn --cwd contracts lint:check
│
└  Failed to run command
Description
npm setup is nested within our codebase. Contracts has it & so does the core codebase. The 2 can be incompatible,
therefore running yarn install in core ends up with a set of dependencies, with yarn install in contracts having a
different set of dependencies.
Solution
cd contracts && yarn install
ZKsync v2 Project Architecture
This document will help you answer the question: where can I find the logic for x? by giving a directory-tree style structure of the physical architecture of the ZKsync Era project.
High-Level Overview
The zksync-era repository has the following main units:
Smart Contracts: All the smart contracts in charge of the protocols on the L1 & L2. Some main contracts:
- L1 & L2 bridge contracts.
- The ZKsync rollup contract on Ethereum.
- The L1 proof verifier contract.
Core App: The execution layer. A node running the ZKsync network in charge of the following components:
- Monitoring the L1 smart contract for deposits or priority operations.
- Maintaining a mempool that receives transactions.
- Picking up transactions from the mempool, executing them in a VM, and changing the state accordingly.
- Generating ZKsync chain blocks.
- Preparing circuits for executed blocks to be proved.
- Submitting blocks and proofs to the L1 smart contract.
- Exposing the Ethereum-compatible web3 API.
Prover App: The prover app takes blocks and metadata generated by the server and constructs a validity zk proof for them.
Storage Layer: The different components and subcomponents don’t communicate with each other directly via APIs, rather via the single source of truth – the db storage layer.
Low-Level Overview
This section provides a physical map of folders & files in this repository. It doesn’t aim to be complete, it only shows the most important parts.
-
/contracts: A submodule with L1, L2, and system contracts. See repository. -
/core-
/bin: Executables for the microservices components comprising ZKsync Core Node./zksync_server: Main sequencer implementation./external_node: A read replica that can sync from the main node./airbender_prover: Implementation of the Airbender prover.
-
/node: Composable node parts./node_framework: Framework used to compose parts of the node./api_server: Implementation of Web3 JSON RPC server./base_token_adjuster: Adaptor to support custom (non-ETH) base tokens./block_reverter: Component for reverting L2 blocks and L1 batches./commitment_generator: Component for calculation of commitments required for ZKP generation./consensus: p2p utilities./consistency_checker: Security component for the external node./da_clients: Clients for different data availability solutions./da_dispatcher: Adaptor for alternative DA solutions./eth_sender: Component responsible for submitting batches to L1 contract./eth_watch: Component responsible for retrieving data from the L1 contract./fee_model: Fee logic implementation./genesis: Logic for performing chain genesis./metadata_calculator: Component responsible for Merkle tree maintenance./node_storage_init: Strategies for the node initialization./node_sync: Node synchronization for the external node./proof_data_handler: Gateway API for interaction with the prover subsystem./reorg_detector: Component responsible for detecting reorgs on the external node./state_keeper: Main part of the sequencer, responsible for forming blocks and L1 batches./vm_runner: Set of components generating various data by re-running sealed L1 batches.
-
/lib: All the library crates used as dependencies of the binary crates above./basic_types: Crate with essential ZKsync primitive types./config: All the configuration values used by the different ZKsync apps./contracts: Contains definitions of commonly used smart contracts./crypto_primitives: Cryptographical primitives used by the different ZKsync crates./dal: Data availability layer/migrations: All the db migrations applied to create the storage layer./src: Functionality to interact with the different db tables.
/db_connection: Generic DB interface./eth_client: Module providing an interface to interact with an Ethereum node./eth_signer: Module to sign messages and txs./mempool: Implementation of the ZKsync transaction pool./merkle_tree: Implementation of a sparse Merkle tree./mini_merkle_tree: In-memory implementation of a sparse Merkle tree./multivm: A wrapper over several versions of VM that have been used by the main node./object_store: Abstraction for storing blobs outside the main data store./queued_job_processor: An abstraction for async job processing/state: A state keeper responsible for handling transaction execution and creating miniblocks and L1 batches./storage: An encapsulated database interface./test_account: A representation of ZKsync account./types: ZKsync network operations, transactions, and common types./utils: Miscellaneous helpers for ZKsync crates./vlog: ZKsync observability stack./vm_interface: Generic interface for ZKsync virtual machine./web3_decl: Declaration of the Web3 API.
-
/tests: Testing infrastructure for ZKsync network./loadnext: An app for load testing the ZKsync server./ts-integration: Integration tests set implemented in TypeScript.
-
-
/prover: ZKsync prover orchestrator application. -
/docker: Project docker files. -
/bin&/infrastructure: Infrastructure scripts that help to work with ZKsync applications. -
/etc: Configuration files./env:.envfiles that contain environment variables for different configurations of ZKsync Server / Prover.
-
/keys: Verification keys forcircuitmodule.
Build docker images
This document explains how to build Docker images from the source code, instead of using prebuilt ones we distribute
Prerequisites
Install prerequisites: see
Build docker files
You may build all images with Makefile located in docker directory in this repository.
All commands should be run from the root directory of the repository
make -C ./docker build-all
You will get those images:
contract-verifier:2.0
server-v2:2.0
prover:2.0
witness-generator:2.0
external-node:2.0
Alternatively, you may build only needed components - available targets are
make -C ./docker build-contract-verifier
make -C ./docker build-server-v2
make -C ./docker build-circuit-prover-gpu
make -C ./docker build-witness-generator
make -C ./docker build-external-node
Building updated images
Simply run
make -C ./docker clean-all
make -C ./docker build-all
Repositories
ZKsync
Core components
| Public repository | Description |
|---|---|
| zksync-era | zk server logic, including the APIs and database accesses |
| zksync-wallet-vue | Wallet frontend |
| era-contracts | L1 & L2 contracts, that are used to manage bridges and communication between L1 & L2. Privileged contracts that are running on L2 (like Bootloader or ContractDeployer) |
Compiler
| Public repository | Description |
|---|---|
| era-compiler-tester | Integration testing framework for running executable tests on zkEVM |
| era-compiler-tests | Collection of executable tests for zkEVM |
| era-compiler-llvm | zkEVM fork of the LLVM framework |
| era-compiler-solidity | Solidity Yul/EVMLA compiler front end |
| era-compiler-vyper | Vyper LLL compiler front end |
| era-compiler-llvm-context | LLVM IR generator logic shared by multiple front ends |
| era-compiler-common | Common compiler constants |
| era-compiler-llvm-builder | Tool for building our fork of the LLVM framework |
zkEVM / crypto
| Public repository | Description |
|---|---|
| era-zkevm_opcode_defs | Opcode definitions for zkEVM - main dependency for many other repos |
| era-zk_evm | EVM implementation in pure rust, without circuits |
| era-sync_vm | EVM implementation using circuits |
| era-zkEVM-assembly | Code for parsing zkEVM assembly |
| era-zkevm_test_harness | Tests that compare the two implementation of the zkEVM - the non-circuit one (zk_evm) and the circuit one (sync_vm) |
| era-zkevm_tester | Assembly runner for zkEVM testing |
| era-boojum | New proving system library - containing gadgets and gates |
| era-shivini | Cuda / GPU implementation for the new proving system |
| era-zkevm_circuits | Circuits for the new proving system |
| franklin-crypto | Gadget library for the Plonk / plookup |
| rescue-poseidon | Library with hash functions used by the crypto repositories |
| snark-wrapper | Circuit to wrap the final FRI proof into snark for improved efficiency |
Old proving system
| Public repository | Description |
|---|---|
| era-bellman-cuda | Cuda implementations for cryptographic functions used by the prover |
| era-heavy-ops-service | Main circuit prover that requires GPU to run |
| era-circuit_testing | ?? |
Tools & contract developers
| Public repository | Description |
|---|---|
| era-test-node | In memory node for development and smart contract debugging |
| local-setup | Docker-based zk server (together with L1), that can be used for local testing |
| zksync-cli | Command line tool to interact with ZKsync |
| block-explorer | Online blockchain browser for viewing and analyzing ZKsync chain |
| dapp-portal | ZKsync Wallet + Bridge DApp |
| hardhat-zksync | ZKsync Hardhat plugins |
| zksolc-bin | solc compiler binaries |
| zkvyper-bin | vyper compiler binaries |
Examples & documentation
| Public repository | Description |
|---|---|
| zksync-web-era-docs | Public ZKsync documentation, API descriptions etc. |
| zksync-contract-templates | Quick contract deployment and testing with tools like Hardhat on Solidity or Vyper |
| zksync-frontend-templates | Rapid UI development with templates for Vue, React, Next.js, Nuxt, Vite, etc. |
| zksync-scripting-templates | Automated interactions and advanced ZKsync operations using Node.js |
| tutorials | Tutorials for developing on ZKsync |
ZKsync Lite
| Public repository | Description |
|---|---|
| zksync | ZKsync Lite implementation |
| ZKsync-lite-docs | Public ZKsync Lite documentation |
| zksync-dapp-checkout | Batch payments DApp |
ZKsync advanced guides
This section contains more advanced guides that aim to explain complex internals of ZKsync ecosystem in an easy to grasp way.
Table of Contents
- Local initialization
- Deposits
- Withdrawals
- Contracts
- Calls
- Transactions
- Fee model
- L2 messaging
- Pubdata
- Pubdata with blobs
- Bytecode compression
- EraVM intro
- ZK intuition
- ZK deeper overview
- Prover keys
- Decentralization
- L1 Batch reversion
- Allowlist
- Interop basics
Additionally, there are a few articles that cover specific topics that may be useful for developers actively working on
zksync-era repo:
ZKsync Deeper Dive
The goal of this doc is to show you some more details on how ZKsync works internally.
Please do the dev_setup.md and development.md (these commands do all the heavy lifting on starting the components of the system).
Now let’s take a look at what’s inside:
Initialization
Let’s take a deeper look into what zkstack ecosystem init does.
ZK Stack CLI
zkstack itself is implemented in Rust (you can see the code in /zkstack_cli directory). If you change anything
there, make sure to run zkstackup --local from the root folder (that compiles and installs this code), before
re-running any zkstack command.
Containers
The first step to initialize a ZK Stack ecosystem is to run the command zkstack containers. This command gets the
docker images for postgres and reth. If the --observability option is passed to the command, or the corresponding
option is selected in the interactive prompt, then Prometheus, Grafana and other observability-related images are
downloaded and run.
Reth (one of the Ethereum clients) will be used to setup our own copy of L1 chain (that our local ZKsync would use).
Postgres is one of the two databases, that is used by ZKsync (the other one is RocksDB). Currently most of the data is stored in postgres (blocks, transactions etc) - while RocksDB is only storing the state (Tree & Map) - and it used by VM.
Ecosystem
The next step is to run the command zkstack ecosystem init.
This command:
- Collects and finalize the ecosystem configuration.
- Builds and deploys L1 & L2 contracts.
- Initializes each chain defined in the
/chainsfolder. (Currently, a single chainerais defined there, but you can create your own chains runningzkstack chain create). - Sets up observability.
- Runs the genesis process.
- Initializes the database.
Postgres
First - postgres database: you’ll be able to see something like
DATABASE_URL = postgres://postgres:notsecurepassword@localhost/zksync_local
After which we setup the schema (lots of lines with Applied XX).
You can try connecting to postgres now, to see what’s inside:
psql postgres://postgres:notsecurepassword@localhost/zksync_local
(and then commands like \dt to see the tables, \d TABLE_NAME to see the schema, and select * from XX to see the
contents).
As our network has just started, the database would be quite empty.
You can see the schema for the database in dal/README.md TODO: add the link to the document with DB schema.
Docker
We’re running two things in a docker:
- a postgres (that we’ve covered above)
- a reth (that is the L1 Ethereum chain).
Let’s see if they are running:
docker container ls
and then we can look at the Reth logs:
docker logs zksync-era-reth-1
Where zksync-era-reth-1 is the container name, that we got from the first command.
If everything goes well, you should see that L1 blocks are being produced.
Server
Now we can start the main server:
zkstack server
This will actually run a cargo binary (zksync_server).
The server will wait for the new transactions to generate the blocks (these can either be sent via JSON RPC, but it also listens on the logs from the L1 contract - as things like token bridging etc comes from there).
Currently we don’t send any transactions there (so the logs might be empty).
But you should see some initial blocks in postgres:
select * from miniblocks;
Our L1 (reth)
Let’s finish this article, by taking a look at our L1:
We will use the web3 tool to communicate with the L1, have a look at 02_deposits.md for installation
instructions. You can check that you’re a (localnet) crypto trillionaire, by running:
./web3 --rpc-url http://localhost:8545 balance 0x36615Cf349d7F6344891B1e7CA7C72883F5dc049
This is one of the “rich wallets” we predefined for local L1.
Note: This reth shell is running official Ethereum JSON RPC with Reth-specific extensions documented at reth docs
In order to communicate with L2 (our ZKsync) - we have to deploy multiple contracts onto L1 (our local reth created
Ethereum). You can look on the deployL1.log file - to see the list of contracts that were deployed and their accounts.
First thing in the file, is the deployer/governor wallet - this is the account that can change, freeze and unfreeze the
contracts (basically the owner). You can verify the token balance using the getBalance method above.
Then, there are a bunch of contracts (CRATE2_FACTOR, DIAMOND_PROXY, L1_ALLOW_LIST etc etc) - for each one, the file contains the address.
You can quickly verify that they were really deployed, by calling:
./web3 --rpc-url http://localhost:8545 address XXX
Where XXX is the address in the file.
The most important one of them is CONTRACTS_DIAMOND_PROXY_ADDR (which acts as ‘loadbalancer/router’ for others - and this is the contract that our server is ‘listening’ on).
Summary
Ok - so let’s sum up what we have:
- a postgres running in docker (main database)
- a local instance of ethereum (reth running in docker)
- which also has a bunch of ‘magic’ contracts deployed
- and two accounts with lots of tokens
- and a server process
In the next article, we’ll start playing with the system (bridging tokens etc).
ZK-Sync deeper dive - bridging & deposits
In the first article, we’ve managed to setup our system on local machine and verify that it works. Now let’s actually start using it.
Seeing the status of the accounts
Let’s use a small command line tool (web3 - https://github.com/mm-zk/web3) to interact with our blockchains.
git clone https://github.com/mm-zk/web3
make build
Then let’s create the keypair for our temporary account:
./web3 account create
It will produce a public and private key (for example):
Private key: 0x5090c024edb3bdf4ce2ebc2da96bedee925d9d77d729687e5e2d56382cf0a5a6
Public address: 0x618263CE921F7dd5F4f40C29f6c524Aaf97b9bbd
NOTE: Keep track of this key and address, as they will be constantly used throughout these articles
Now, let’s see how many tokens we have:
// This checks the tokens on 'L1' (reth)
./web3 --rpc-url http://localhost:8545 balance  0x618263CE921F7dd5F4f40C29f6c524Aaf97b9bbd

// This checks the tokens on 'L2' (ZKsync)
./web3 --rpc-url http://localhost:3050 balance  0x618263CE921F7dd5F4f40C29f6c524Aaf97b9bbd
Unsurprisingly we have 0 on both - let’s fix it by first transferring some tokens on L1:
./web3 --rpc-url http://localhost:8545 transfer --pk 0x7726827caac94a7f9e1b160f7ea819f172f7b6f9d2a97f992c38edeab82d4110 7.4 to 0x618263CE921F7dd5F4f40C29f6c524Aaf97b9bbd
And now when we check the balance, we should see:
./web3 --rpc-url http://localhost:8545 balance 0x618263CE921F7dd5F4f40C29f6c524Aaf97b9bbd
that we have 7.4 ETH.
and now let’s bridge it over to L2.
Bridging over to L2
For an easy way to bridge we’ll use ZKsync CLI
npx zksync-cli bridge deposit --chain=dockerized-node --amount 3 --pk=0x5090c024edb3bdf4ce2ebc2da96bedee925d9d77d729687e5e2d56382cf0a5a6 --to=0x618263CE921F7dd5F4f40C29f6c524Aaf97b9bbd
# Amount of ETH to deposit: 3
# Private key of the sender: 0x5090c024edb3bdf4ce2ebc2da96bedee925d9d77d729687e5e2d56382cf0a5a6
# Recipient address on L2: 0x618263CE921F7dd5F4f40C29f6c524Aaf97b9bbd
If everything goes well, you should be able to see 3 tokens transferred:
./web3 --rpc-url http://localhost:3050 balance 0x618263CE921F7dd5F4f40C29f6c524Aaf97b9bbd
Diving deeper - what exactly happened
Let’s take a deeper look at what the ‘deposit’ call actually did.
If we look at what ‘deposit’ command has printed, we’ll see something like this:
Transaction submitted 💸💸💸
[...]/tx/0xe27dc466c36ad2046766e191017e7acf29e84356465feef76e821708ff18e179
Let’s use the web3 tool and see the details:
./web3 --rpc-url http://localhost:8545 tx --input hex 0xe27dc466c36ad2046766e191017e7acf29e84356465feef76e821708ff18e179
returns
Hash: 0xe27dc466c36ad2046766e191017e7acf29e84356465feef76e821708ff18e179
From: 0x618263CE921F7dd5F4f40C29f6c524Aaf97b9bbd
To: 0xa6Bcd8124d42293D3DDFAE6003940A62D8C280F2
Value: 3.000120034768750000 GO
Nonce: 0
Gas Limit: 134871
Gas Price: 1.500000001 gwei
Block Number: 100074
Block Hash: 0x5219e6fef442b4cfd38515ea7119dd6d2e12df82b4d95b1f75fd3650c012f133
Input: 0xeb672419000000000000000000000000618263ce921f7dd5f4f40c29f6c524aaf97b9bbd00000000000000000000000000000000000000000000000029a2241af62c000000000000000000000000000000000000000000000000000000000000000000e0000000000000000000000000000000000000000000000000000000000006d0b100000000000000000000000000000000000000000000000000000000000003200000000000000000000000000000000000000000000000000000000000000100000000000000000000000000618263ce921f7dd5f4f40c29f6c524aaf97b9bbd00000000000000000000000000000000000000000000000000000000000000000000000000000000000000000000000000000000000000000000000000000000
The deposit command has called the contract on address 0xa6B (which is exactly the CONTRACTS_DIAMOND_PROXY_ADDR from
deployL1.log), and it has called the method 0xeb672419 - which is the requestL2Transaction from
Mailbox.sol
Quick note on our L1 contracts
We’re using the DiamondProxy setup, that allows us to have a fixed immutable entry point (DiamondProxy) - that forwards the requests to different contracts (facets) that can be independently updated and/or frozen.

You can find more detailed description in Contract docs
requestL2Transaction Function details
You can use some of the online tools (like https://calldata-decoder.apoorv.xyz/) and pass the input data to it - and get the nice result:
"function": "requestL2Transaction(address,uint256,bytes,uint256,uint256,bytes[],address)",
"params": [
    "0x618263CE921F7dd5F4f40C29f6c524Aaf97b9bbd",
    "3000000000000000000",
    "0x",
    "641858",
    "800",
    [],
    "0x618263CE921F7dd5F4f40C29f6c524Aaf97b9bbd"
  ]
This means that we requested that the 3 ETH (2nd argument) is transferred to 0x6182 (1st argument). The Calldata being 0x0 - means that we’re talking about ETH (this would be a different value for other ERC tokens). Then we also specify a gas limit (641k) and set the gas per pubdata byte limit to 800. (TODO: explain what these values mean.)
What happens under the hood
The call to requestL2Transaction, is adding the transaction to the priorityQueue and then emits the NewPriorityRequest.
The zk server (that you started with zk server command) is listening on events that are emitted from this contract
(via the eth_watcher component) and adds
them to the postgres database (into transactions table).
You can actually check it - by running the psql and looking at the contents of the table - then you’ll notice that transaction was successfully inserted, and it was also marked as ‘priority’ (as it came from L1) - as regular transactions that are received by the server directly are not marked as priority.
You can verify that this is your transaction, by looking at the l1_block_number column (it should match the
block_number from the web3 tx call above).
Notice that the hash of the transaction in the postgres will be different from the one returned by web3 tx. This is
because the postgres keeps the hash of the ‘L2’ transaction (which was ‘inside’ the L1 transaction that web3 tx
returned).
Summary
In this article, we’ve learned how ETH gets bridged from L1 to L2. In the next article, we’ll look at the other direction - how we transmit messages (and ETH) from L2 to L1.
ZKsync deeper dive bridging stuff back (a.k.a withdrawals)
Assuming that you have completed part 1 and part 2 already, we can bridge the tokens back by simply calling the zksync-cli:
npx zksync-cli bridge withdraw --chain=dockerized-node
And providing the account name (public address) and private key.
Afterward, by using web3 tools, we can quickly check that funds were transferred back to L1. And you discover that
they didn’t - what happened?
Actually we’ll have to run one additional step:
npx zksync-cli bridge withdraw-finalize --chain=dockerized-node
and pass the transaction that we received from the first call, into the withdraw-finalize call.
Note: This is not needed on testnet - as we (MatterLabs) - are running an automatic tool that confirms withdrawals.
Looking deeper
But let’s take a look what happened under the hood.
Let’s start by looking at the output of our zksync-cli:
Withdrawing 7ETH to 0x618263CE921F7dd5F4f40C29f6c524Aaf97b9bbd on localnet
Transaction submitted 💸💸💸
L2: tx/0xe2c8a7beaf8879cb197555592c6eb4b6e4c39a772c3b54d1b93da14e419f4683
Your funds will be available in L1 in a couple of minutes.
important - your transaction id will be different - make sure that you use it in the methods below.
The tool created the withdraw transaction and it sent it directly to our server (so this is a L2 transaction). The zk
server has received it, and added it into its database. You can check it by querying the transactions table:
# select * from transactions where hash = '\x<YOUR_L2_TRANSACTION_ID_FROM_ABOVE>`
select * from transactions where hash = '\xe2c8a7beaf8879cb197555592c6eb4b6e4c39a772c3b54d1b93da14e419f4683';
This will print a lot of columns, but let’s start by looking at the data column:
{
  "value": "0x6124fee993bc0000",
  "calldata": "0x51cff8d9000000000000000000000000618263ce921f7dd5f4f40c29f6c524aaf97b9bbd",
  "factoryDeps": null,
  "contractAddress": "0x000000000000000000000000000000000000800a"
}
We can use the ABI decoder tool https://calldata-decoder.apoorv.xyz/ to see what this call data means:
{
  "function": "withdraw(address)",
  "params": ["0x618263CE921F7dd5F4f40C29f6c524Aaf97b9bbd"]
}
(and the 0x6124fee993bc0000 in the value is 7000000000000000000 == 7 ETH that we wanted to send).
So the last question is – what is the ‘magic’ contract address: 0x800a ?
/// @dev The address of the eth token system contract
address constant L2_BASE_TOKEN_SYSTEM_CONTRACT_ADDR = address(0x800a);
System contracts (on L2)
This is a good opportunity to talk about system contracts that are automatically deployed on L2. You can find the full list here in github
This is the place where we specify that bootloader is at address 0x8001, NonceHolder at 0x8003 etc.
This brings us to L2BaseToken.sol that has the implementation of the L2 Eth.
When we look inside, we can see:
// Send the L2 log, a user could use it as proof of the withdrawal
bytes memory message = _getL1WithdrawMessage(_l1Receiver, amount);
L1_MESSENGER_CONTRACT.sendToL1(message);
And L1MessengerContract (that is deployed at 0x8008).
Committing to L1
And how do these messages get into the L1? The eth_sender class from our server is taking care of this. You can see
the details of the transactions that it posts to L1 in our database in eth_txs table.
If you look at the tx_type column (in psql), you can see that we have 3 different transaction types:
zksync_local=# select contract_address, tx_type from eth_txs;
              contract_address              |          tx_type
--------------------------------------------+---------------------------
 0x54e8159f006750466084913d5bd288d4afb1ee9a | CommitBlocks
 0x54e8159f006750466084913d5bd288d4afb1ee9a | PublishProofBlocksOnchain
 0x54e8159f006750466084913d5bd288d4afb1ee9a | ExecuteBlocks
 0x54e8159f006750466084913d5bd288d4afb1ee9a | CommitBlocks
 0x54e8159f006750466084913d5bd288d4afb1ee9a | PublishProofBlocksOnchain
 0x54e8159f006750466084913d5bd288d4afb1ee9a | ExecuteBlocks
BTW - all the transactions are sent to the 0x54e address - which is the DiamondProxy deployed on L1 (this address will
be different on your local node - see previous tutorial for more info) .
And inside, all three methods above belong to Executor.sol facet and you can look at README to see the details of what each method does.
The short description is:
- ‘CommitBlocks’ - is verifying the block metadata and stores the hash into the L1 contract storage.
- ‘PublishProof’ - gets the proof, checks that the proof is correct and that it is a proof for the block hash that was stored in commit blocks. (IMPORTANT: in testnet/localnet we allow empty proofs - so that you don’t have to run the full prover locally)
- ‘ExecuteBlocks’ - is the final call, that stores the root hashes in L1 storage. This allows other calls (like finalizeWithdrawal) to work.
So to sum it up - after these 3 calls, the L1 contract has a root hash of a merkle tree, that contains the ‘message’ about the withdrawal.
Final step - finalizing withdrawal
Now we’re ready to actually claim our ETH on L1. We do this by calling a finalizeEthWithdrawal function on the
DiamondProxy contract (Mailbox.sol to be exact).
To prove that we actually can withdraw the money, we have to say in which L2 block the withdrawal happened, and provide the merkle proof from our withdrawal log, to the root that is stored in the L1 contract.
ZKsync contracts
Now that we know how to bridge tokens back and forth, let’s talk about running things on ZKsync.
We have a bunch of great tutorials (like this one https://docs.zksync.io/build/tooling/hardhat/getting-started) that you can follow to get the exact code & command line calls to create the contracts - so in this article, let’s focus on how things differ between ZKsync and Ethereum.
Note Before reading this article, I’d recommend doing the hardhat tutorial above.
Ethereum flow
In case of Ethereum, you start by writing a contract code in solidity, then you compile it with solc, and you get the
EVM bytecode, deployment bytecode (which is a function that should return the bytecode itself) and ABI (interface).
Afterwards, you send the deployment bytecode to the 0x000 address on Ethereum, which does some magic (executes the deployment bytecode, that should contain the constructor etc) and puts the contract under the address that is generated based on your account id and a nonce.
From this moment on, you can send the transactions to this new address (and most of the tools would ask you to provide the ABI, so that they can set the proper function arguments).
All the bytecode will be run on the EVM (Ethereum Virtual Machine) - that has a stack, access to memory and storage, and a bunch of opcodes.
ZKsync flow
The main part (and the main cost) of the ZKsync is the proving system. In order to make proof as fast as possible, we’re running a little bit different virtual machine (zkEVM) - that has a slightly different set of opcodes, and also contains a bunch of registers. More details on this will be written in the future articles.
Having a different VM means that we must have a separate compiler zk-solc - as the bytecode that is produced by this compiler has to use the zkEVM specific opcodes.
While having a separate compiler introduces a bunch of challenges (for example, we need a custom hardhat plugins ), it brings a bunch of benefits too: for example it allows us to move some of the VM logic (like new contract deployment) into System contracts - which allows faster & cheaper modifications and increased flexibility.
ZKsync system contracts
Small note on system contracts: as mentioned above, we moved some of the VM logic into system contracts, which allows us to keep VM simpler (and with this - keep the proving system simpler).
You can see the full list (and codes) of the system contracts here: https://github.com/matter-labs/era-system-contracts.
While some of them are not really visible to the contract developer (like the fact that we’re running a special
Bootleader to package a bunch of transactions together - more info in a future article) - some others are very
visible - like our ContractDeployer
ContractDeployer
Deploying a new contract differs on Ethereum and ZKsync.
While on Ethereum - you send the transaction to 0x00 address - on ZKsync you have to call the special ContractDeployer
system contract.
If you look on your hardhat example, you’ll notice that your deploy.ts is actually using a Deployer class from the
hardhat-zksync-deploy plugin.
Which inside uses the ZKsync’s web3.js, that calls the contract deployer here
override getDeployTransaction(..) {
    ...
    txRequest.to = CONTRACT_DEPLOYER_ADDRESS;
    ...
}
Also ContractDeployer adding a special prefix for all the new contract addresses. This means that contract addresses
WILL be different on ZKsync and Ethereum (and also leaves us the possibility of adding Ethereum addresses in the
future if needed).
You can look for CREATE2_PREFIX and CREATE_PREFIX in the code.
Gas costs
Another part, where ZKsync differs from Ethereum is gas cost. The best example for this are storage slots.
If you have two transactions that are updating the same storage slot - and they are in the same ‘batch’ - only the first one would be charged (as when we write the final storage to ethereum, we just write the final diff of what slots have changed - so updating the same slot multiple times doesn’t increase the amount of data that we have to write to L1).
Account abstraction and some method calls
As ZKsync has a built-in Account Abstraction (more on this in a separate article) - you shouldn’t depend on some of
the solidity functions (like ecrecover - that checks the keys, or tx.origin) - in all the cases, the compiler will
try to warn you.
Summary
In this article, we looked at how contract development & deployment differs on Ethereum and ZKsync (looking at differences in VMs, compilers and system contracts).
Life of a ‘call’
This article will show you how the call method works in our backend. The call method is a ‘read-only’ operation,
which means it doesn’t change anything on the blockchain. This will give you a chance to understand the system,
including the bootloader and VM.
For this example, let’s assume that the contract is already deployed, and we will use the call method to interact with
it.
Since the ‘call’ method is only for reading data, all the calculations will happen in the api_server.
Calling the ‘call’ method
If you need to make calls quickly, you can use the ‘cast’ binary from the Foundry ZKsync suite:
cast call 0x23DF7589897C2C9cBa1C3282be2ee6a938138f10 "myfunction()()" --rpc-url http://localhost:3050
The address of your contract is represented by 0x23D…
Alternatively, you can make an RPC call directly, but this can be complicated as you will have to create the correct payload, which includes computing the ABI for the method, among other things.
An example of an RPC call would be:
curl --location 'http://localhost:3050' \
--header 'Content-Type: application/json' \
--data '{
    "jsonrpc": "2.0",
    "id": 2,
    "method": "eth_call",
    "params": [
        {
            "from": "0x0000000000000000000000000000000000000000",
            "data": "0x0dfe1681",
            "to": "0x2292539b1232A0022d1Fc86587600d86e26396D2"
        }

    ]
}'
As you can see, using the RPC call directly is much more complex. That’s why I recommend using the ‘cast’ tool instead.
What’s happening in the server
Under the hood, the ‘cast’ tool calls the eth_call RPC method, which is part of the official Ethereum API set. You can
find the definition of these methods in the namespaces/eth.rs file in our code.
Afterward, it goes to the implementation, which is also in the namespaces/eth.rs file but in a different parent directory.
The server then executes the function in a VM sandbox. Since this is a call function, the VM only runs this function
before shutting down. This is handled by the execute_tx_eth_call method, which fetches metadata like block number and
timestamp from the database, and the execute_tx_in_sandbox method, which takes care of the execution itself. Both of
these functions are in the api_server/execution_sandbox.rs file.
Finally, the transaction is pushed into bootloader memory, and the VM executes it until it finishes.
VM
Before we look at the bootloader, let’s briefly examine the VM itself.
The zkEVM is a state machine with a heap, stack, 16 registers, and state. It executes zkEVM assembly, which has many opcodes similar to EVM, but operates on registers rather than a stack. We have two implementations of the VM: one is in ‘pure rust’ without circuits (in the zk_evm repository), and the other has circuits (in the sync_vm repository). In this example, the api server uses the ‘zk_evm’ implementation without circuits.
Most of the code that the server uses to interact with the VM is in core/lib/multivm/src/versions/vm_latest/implementation/execution.rs.
In this line, we’re calling self.state.cycle(), which executes a single VM instruction. You can see that we do a lot of things around this, such as executing multiple tracers after each instruction. This allows us to debug and provide additional feedback about the state of the VM.
Bootloader & transaction execution
The Bootloader is a large ‘quasi’ system contract, written in Yul and located in system_contracts/bootloader/bootloader.yul .
It’s a ‘quasi’ contract because it isn’t actually deployed under any address. Instead, it’s loaded directly into the VM by the binary in the constructor init_vm_inner.
So why do we still need a bootloader if we have the call data, contract binary, and VM? There are two main reasons:
- It allows us to ‘glue’ transactions together into one large transaction, making proofs a lot cheaper.
- It allows us to handle some system logic (checking gas, managing some L1-L2 data, etc.) in a provable way. From the circuit/proving perspective, this behaves like contract code.
- You’ll notice that the way we run the bootloader in the VM is by first ‘kicking it off’ and cycling step-by-step until it’s ready to accept the first transaction. Then we ‘inject’ the transaction by putting it in the right place in VM memory and start iterating the VM again. The bootloader sees the new transaction and simply executes its opcodes.
This allows us to ‘insert’ transactions one by one and easily revert the VM state if something goes wrong. Otherwise, we’d have to start with a fresh VM and re-run all the transactions again.
Final steps
Since our request was just a ‘call’, after running the VM to the end, we can collect the result and return it to the caller. Since this isn’t a real transaction, we don’t have to do any proofs, witnesses, or publishing to L1.
Summary
In this article, we covered the ‘life of a call’ from the RPC to the inner workings of the system, and finally to the ‘out-of-circuit’ VM with the bootloader.
Life of transaction
In this article, we will explore the lifecycle of a transaction, which is an operation that is stored permanently in the blockchain and results in a change of its overall state.
To better understand the content discussed here, it is recommended that you first read the life of a call.
L1 vs L2 transactions
There are two main methods through which transactions can enter the system. The most common approach involves making a
call to the RPC (Remote Procedure Call), where you send what is known as an L2Tx transaction.
The second method involves interacting with Ethereum directly by sending a ‘wrapped’ transaction to our Ethereum
contract. These transactions are referred to as L1Tx or Priority transactions, and the process of sending
transactions in this manner is called the ‘priority queue’.
Transaction types
We provide support for five different types of transactions.
Here’s a simplified table of the transaction types:
| Type id | Transaction type | Features | Use cases | % of transactions (mainnet/testnet) |
|---|---|---|---|---|
| 0x0 | ‘Legacy’ | Only includes gas price | These are traditional Ethereum transactions. | 60% / 82% |
| 0x1 | EIP-2930 | Contains a list of storage keys/addresses the transaction will access | At present, this type of transaction is not enabled. | |
| 0x2 | EIP-1559 | Includes max_priority_fee_per_gas, max_gas_price | These are Ethereum transactions that provide more control over the gas fee. | 35% / 12% |
| 0x71 | EIP-712 (specific to ZKsync) | Similar to EIP-1559, but also adds max_gas_per_pubdata, custom signatures, and Paymaster support | This is used by those who are using ZKsync specific Software Development Kits (SDKs). | 1% / 2% |
| 0xFF | L1 transactions also known as priority transactions L1Tx | Originating from L1, these have more custom fields like ‘refund’ addresses etc | Mainly used to transfer funds/data between L1 & L2 layer. | 4% / 3% |
Here’s the code that does the parsing: TransactionRequest::from_bytes
Transactions lifecycle
Priority queue (L1 Tx only)
L1 transactions are first ‘packaged’ and then sent to our Ethereum contract. After this, the L1 contract records this
transaction in L1 logs. The eth_watcher component constantly monitors these logs and then adds them to
the database (mempool).
RPC & validation (L2 Tx only)
Transactions are received via the eth_sendRawTransaction method. These are then parsed and validated using the
submit_tx method on the API server.
The validations ensure that the correct amount of gas has been assigned by the user and that the user’s account has sufficient gas, among other things.
As part of this validation, we also perform a validation_check to ensure that if account abstraction / paymaster is
used, they are prepared to cover the fees. Additionally, we perform a ‘dry_run’ of the transaction for a better
developer experience, providing almost immediate feedback if the transaction fails.
Please note, that transaction can still fail in the later phases, even if it succeeded in the API, as it is going to be executed in the context of a different block.
Once validated, the transaction is added to the mempool for later execution. Currently, the mempool is stored in the
transactions table in postgres (see the insert_transaction_l2() method).
Batch executor & State keeper
The State Keeper’s job is to take transactions from the mempool and place them into an L1 batch. This is done using the
process_l1_batch() method.
This method takes the next transaction from the mempool (which could be either an L1Tx or L2Tx - but L1Tx are always given the priority and they are taken first), executes it, and checks if the L1 batch is ready to be sealed (for more details on when we finalize L1 batches, see the ‘Blocks & Batches’ article).
Once the batch is sealed, it’s ready to be sent for proof generation and have this proof committed into L1. More details on this will be covered in a separate article.
The transaction can have three different results in state keeper:
- Success
- Failure (but still included in the block, and gas was charged)
- Rejection - when it fails validation, and cannot be included in the block. This last case should (in theory) never happen - as we cannot charge the fee in such scenario, and it opens the possibility for the DDoS attack.
Fees (a.k.a gas)
What is the L2 gas price? It’s 0.1 Gwei (and as we improve our provers/VM we hope it will go down). However, it can vary at times. Please see further information below.
What do you pay for
The gas fee covers the following expenses:
- Calculation and storage (related to most operations)
- Publishing data to L1 (a significant cost for many transactions, with the exact amount depending on L1)
- Sending ‘bytecode’ to L1 (if not already there) - typically a one-time cost when deploying a new contract
- Closing the batch and handling proofs - This aspect also relies on L1 costs (since proof publication must be covered).
Price configuration
We have two pricing models (old and new):
- the
L1Pegged- until protocol version 19 - the
PubdataIndependent- from protocol version 20 (release 1.4.1)
L1 pegged (‘old’ fee model)
Under this fee model, operator was providing FeeParamsV1, which contained:
- l1_gas_price
- minimal_l2_gas_price
then, the system was computing L1PeggedBatchFeeModelInput, that contained
- l1_gas_price
- ‘fair’ l2 gas price - which in 99% of cases was equal to minimal_gas_price, and was greater from it only if l1 gas price was huge, to guarantee that we can publish enough data in each transaction (see table below for details).
Many other values, were ‘hardcoded’ within the system (for example how to compute the pubdata price based on l1 gas price, how much committing the proof to L1 costs etc).
PubdataIndependent (‘new’ fee model)
This method is called PubdataIndependent and the change was done to allow more flexibility in pubdata costs (for
example if pubdata is published to another Data Availability layer, or if not published at all - in case of validium).
In this model, there are 8 config options, let’s walk through them:
FeeParamsV2 contains 2 dynamic prices:
l1_gas_price- which is used to compute the cost of submitting the proofs on L1l1_pubdata_price- which is the cost of submitting a single byte of pubdata
And config options (FeeModelConfigV2) contain:
minimal_l2_gas_price- similar meaning to the one in the previous model - this should cover the $ costs of running the machines (node operator costs).
2 fields around the maximum capacity of the batch (note - that these are used only for the fee calculation, the actual sealing criteria are specified in different configuration):
max_gas_per_batch- expected maximum amount of gas in a batchmax_pubdata_per_batch- expected maximum amount of pubdata that we can put in a single batch - due to Ethereum limitations (usually it is around 128kb when using calldata, and 250 when using 2 blobs)
the actual cost of the batch:
batch_overhead_l1_gas- how much gas operator will have to pay to handle the proof on L1 (this should include commitBatch, proveBatch and executeBatch costs). This should NOT include any cost that is related to pubdata.
And 2 fields about who contributed to closing the batch:
pubdata_overhead_part- from 0 - 1compute_overhead_part- from 0 - 1
Cost distribution between transactions
Batches are closed, when we either run out of circuits (a.k.a gas / computation), or run out of pubdata capacity (too much data to publish to L1 in one transaction), or run out of transactions slots (which should be a rare event with recent improvements)
Closing each batch, has some cost for the operator - especially the one related to L1 costs - where operator has to
submit a bunch of transactions, including the one to verify the proof (these costs are counted in
batch_overhead_l1_gas).
Now the problem that operator is facing is, who should pay for closing of the batch. In a perfect world, we’d look at the reason for batch closure (for example pubdata) - and then charge the transactions proportionally to the amount of pubdata that they used. Unfortunately this is not feasible, as we have to charge the transactions as we go, rather than at the end of the batch (that can have 1000s of transactions).
That’s why we have the logic of pubdata_overhead_part and compute_overhead_part. These represent the ‘odds’ whether
pubdata or compute were the reason for the batch closure - and based on this information, we distribute the costs to
transactions:
cost_of_closing_the_batch = (compute_overhead_part * TX_GAS_USED / MAX_GAS_IN_BLOCK + pubdata_overhead_part * PUBDATA_USED / MAX_PUBDATA_IN_BLOCK)
Custom base token configurations
When running a system based on a custom token, all the gas values above, should refer to YOUR custom token.
Example, if you’re running USDC as base token, and ETH currently costs 2000$, and current L1 gas price is 30 Gwei.
l1_gas_priceparam should be set to 30 * 2000 == 60’000 Gweil1_pubdata_priceshould be also updated accordingly (also multiplied by 2’000). (note: currently bootloader has a cap of 1M gwei per pubdata price - and we’re working on removing this limitation)minimal_l2_gas_priceshould be set in such way, thatminimal_l2_gas_price * max_gas_per_batch / 10**18 $is enough to pay for your CPUs and GPUs
Validium / Data-availability configurations
If you’re running a system with validium without any DA, you can just set the l1_pubdata_price to 0,
max_pubdata_per_batch to some large value, and set pubdata_overhead_part to 0, and compute_overhead_part to 1.
If you’re running alternative DA, you should adjust the l1_pubdata_price to roughly cover the cost of writing one byte
to the DA, and set max_pubdata_per_batch to the DA limits.
Note: currently system still requires operator to keep the data in memory and compress it, which means that setting huge
values of max_pubdata_per_batch might not work. This will be fixed in the future.
Assumption: ETH costs 2’000$, L1 gas cost is 30 Gwei, blob costs 2Gwei (per byte), and DA allows 1MB payload that cost 1 cent.
| flag | rollup with calldata | rollup with 4844 (blobs) | value for validium | value for DA |
|---|---|---|---|---|
l1_pubdata_price | 510’000’000’000 | 2’000’000’000 | 0 | 5’000 |
max_pubdata_per_batch | 120’000 | 250’000 | 1’000’000’000’000 | 1’000’000 |
pubdata_overhead_part | 0.7 | 0.4 | 0 | 0.1 |
compute_overhead_part | 0.5 | 0.7 | 1 | 1 |
batch_overhead_l1_gas | 1’000’000 | 1’000’000 | 1’000’000 | 1’400’000 |
The cost of l1 batch overhead is higher for DA, as it has to cover the additional costs of checking on L1 if DA actually got the data.
L1 vs L2 pricing
Here is a simplified table displaying various scenarios that illustrate the relationship between L1 and L2 fees:
| L1 gas price | L2 ‘minimal price’ | L2 ‘gas price’ | L2 gas per pubdata | Note |
|---|---|---|---|---|
| 0.25 Gwei | 0.25 Gwei | 0.25 Gwei | 17 | Gas prices are equal, so the charge is 17 gas, just like on L1. |
| 10 Gwei | 0.25 Gwei | 0.25 Gwei | 680 | L1 is 40 times more expensive, so we need to charge more L2 gas per pubdata byte to cover L1 publishing costs. |
| 250 Gwei | 0.25 Gwei | 0.25 Gwei | 17000 | L1 is now very expensive (1000 times more than L2), so each pubdata costs a lot of gas. |
| 10000 Gwei | 0.25 Gwei | 8.5 Gwei | 20000 | L1 is so expensive that we have to raise the L2 gas price, so the gas needed for publishing doesn’t exceed the 20k limit, ensuring L2 remains usable. |
Why is there a 20k gas per pubdata limit? - We want to make sure every transaction can publish at least 4kb of data to L1. The maximum gas for a transaction is 80 million (80M/4k = 20k).
L2 Fair price
The L2 fair gas price is currently determined by the StateKeeper/Sequencer configuration and is set at 0.10 Gwei (see
fair_l2_gas_price in the config). This price is meant to cover the compute costs (CPU + GPU) for the sequencer and
prover. It can be changed as needed, with a safety limit of 10k Gwei in the bootloader. Once the system is
decentralized, more deterministic rules will be established for this price.
L1 Gas price
The L1 gas price is fetched by querying L1 every 20 seconds. This is managed by the GasAdjuster, which
calculates the median price from recent blocks and enables more precise price control via the config (for example,
adjusting the price with internal_l1_pricing_multiplier or setting a specific value using
internal_enforced_l1_gas_price).
Overhead gas
As mentioned earlier, fees must also cover the overhead of generating proofs and submitting them to L1. While the detailed calculation is complex, the short version is that a full proof of an L1 batch costs around 1 million L2 gas, plus 1M L1 gas (roughly equivalent of 60k published bytes). In every transaction, you pay a portion of this fee proportional to the part of the batch you are using.
Transactions
| Transaction Field | Conditions | Note |
|---|---|---|
| gas_limit | <= max_allowed_l2_tx_gas_limit | The limit (4G gas) is set in the StateKeeper config; it’s the limit for the entire L1 batch. |
| gas_limit | <= MAX_GAS_PER_TRANSACTION | This limit (80M) is set in bootloader. |
| gas_limit | > l2_tx_intrinsic_gas | This limit (around 14k gas) is hardcoded to ensure that the transaction has enough gas to start. |
| max_fee_per_gas | >= fair_l2_gas_price | Fair L2 gas price (0.1 Gwei on Era) is set in the StateKeeper config |
<=validation_computational_gas_limit | There is an additional, stricter limit (300k gas) on the amount of gas that a transaction can use during validation. |
Why do we have two limits: 80M and 4G
The operator can set a custom transaction limit in the bootloader. However, this limit must be within a specific range, meaning it cannot be less than 80M or more than 4G.
Why validation is special
In Ethereum, there is a fixed cost for verifying a transaction’s correctness by checking its signature. However, in ZKsync, due to Account Abstraction, we may need to execute some contract code to determine whether it’s ready to accept the transaction. If the contract rejects the transaction, it must be dropped, and there’s no one to charge for that process.
Therefore, a stricter limit on validation is necessary. This prevents potential DDoS attacks on the servers, where people could send invalid transactions to contracts that require expensive and time-consuming verifications. By imposing a stricter limit, the system maintains stability and security.
Actual gas calculation
From the Virtual Machine (VM) point of view, there is only a bootloader. When executing transactions, we insert the transaction into the bootloader memory and let it run until it reaches the end of the instructions related to that transaction (for more details, refer to the ‘Life of a Call’ article).
To calculate the gas used by a transaction, we record the amount of gas used by the VM before the transaction execution and subtract it from the remaining gas after the execution. This difference gives us the actual gas used by the transaction.
#![allow(unused)]
fn main() {
let gas_remaining_before = vm.gas_remaining();
execute_tx();
let gas_used = gas_remaining_before - vm.gas_remaining();
}
Gas estimation
Before sending a transaction to the system, most users will attempt to estimate the cost of the request using the
eth_estimateGas call.
To estimate the gas limit for a transaction, we perform a binary search (between 0 and the MAX_L2_TX_GAS_LIMIT of 80M)
to find the smallest amount of gas under which the transaction still succeeds.
For added safety, we include some ‘padding’ by using two additional config options: gas_price_scale_factor (currently
1.5) and estimate_gas_scale_factor (currently 1.3). These options are used to increase the final estimation.
The first option simulates the volatility of L1 gas (as mentioned earlier, high L1 gas can affect the actual gas cost of data publishing), and the second one serves as a ‘safety margin’.
You can find this code in get_txs_fee_in_wei function.
Q&A
Is ZKsync really cheaper
In short, yes. As seen in the table at the beginning, the regular L2 gas price is set to 0.25 Gwei, while the standard Ethereum price is around 60-100 Gwei. However, the cost of publishing to L1 depends on L1 prices, meaning that the actual transaction costs will increase if the L1 gas price rises.
Why do I hear about large refunds
There are a few reasons why refunds might be ‘larger’ on ZKsync (i.e., why we might be overestimating the fees):
- We must assume (pessimistically) that you’ll have to pay for all the slot/storage writes. In practice, if multiple transactions touch the same slot, we only charge one of them.
- We have to account for larger fluctuations in the L1 gas price (using gas_price_scale_factor mentioned earlier) - this might cause the estimation to be significantly higher, especially when the L1 gas price is already high, as it then impacts the amount of gas used by pubdata.
How L2 to L1 messaging works
In this article, we will explore the workings of Layer 2 (L2) to Layer 1 (L1) messaging in ZKsync Era.
If you’re uncertain about why messaging is necessary in the first place, please refer to our user documentation.
For ease of understanding, here’s a quick visual guide. We will unpack each part in detail as we progress.

Part 1 - User Generates a Message
Consider the following contract. Its main function is to forward any received string to L1:
contract Messenger {
  function sendMessage(string memory message) public returns (bytes32 messageHash) {
    messageHash = L1_MESSENGER_CONTRACT.sendToL1(bytes(message));
  }
}
From a developer’s standpoint, you only need to invoke the sendToL1 method, and your task is complete.
It’s worth noting, however, that transferring data to L1 typically incurs high costs. These costs are associated with the ‘pubdata cost’ that is charged for each byte in the message. As a workaround, many individuals choose to send the hash of the message instead of the full message, as this helps to conserve resources.
Part 2 - System Contract Execution
The previously mentioned sendToL1 method executes a call to the L1Messenger.sol system contract
here. This system contract performs tasks such as computing the appropriate gas cost and hashes, and
then it broadcasts an Event carrying the complete message.
function sendToL1(bytes calldata _message) external override returns (bytes32 hash) {
  // ...
  SystemContractHelper.toL1(true, bytes32(uint256(uint160(msg.sender))), hash);
  emit L1MessageSent(msg.sender, hash, _message);
}
As depicted in the leading image, this stage is where the message data splits. The full body of the message is emitted for retrieval in Part 5 by the StateKeeper, while the hash of the message proceeds to be added to the Virtual Machine (VM) - as it has to be included in the proof.
The method then sends the message’s hash to the SystemContractHelper, which makes an internal call:
function toL1(
  bool _isService,
  bytes32 _key,
  bytes32 _value
) internal {
  // ...
  address callAddr = TO_L1_CALL_ADDRESS;
  assembly {
    call(_isService, callAddr, _key, _value, 0xFFFF, 0, 0)
  }
}
Following the TO_L1_CALL_ADDRESS, we discover that it’s set to a placeholder value. So what exactly is occurring here?
Part 3 - Compiler Tricks and the EraVM
Our VM features special opcodes designed to manage operations that aren’t possible in the Ethereum Virtual Machine (EVM), such as publishing data to L1. But how can we make these features accessible to Solidity?
We could expand the language by introducing new Solidity opcodes, but that would require modifying the solc compiler, among other things. Hence, we’ve adopted a different strategy.
To access these unique eraVM opcodes, the Solidity code simply executes a call to a specific address (the full list can be seen here). This call is compiled by the solc frontend, and then on the compiler backend, we intercept it and replace it with the correct eraVM opcode call here.
#![allow(unused)]
fn main() {
match simulation_address {
  Some(compiler_common::ADDRESS_TO_L1) => {
    return crate::zkevm::general::to_l1(context, is_first, in_0, in_1);
  }
}
}
This method allows your message to reach the VM.
Part 4 - Inside the Virtual Machine
The zkEVM assembly translates these opcodes into LogOpcodes.
#![allow(unused)]
fn main() {
pub const ALL_CANONICAL_MODIFIERS: [&'static str; 5] =
    ["sread", "swrite", "event", "to_l1", "precompile"];
let variant = match idx {
  0 => LogOpcode::StorageRead,
  1 => LogOpcode::StorageWrite,
  2 => LogOpcode::Event,
  3 => LogOpcode::ToL1Message,
  4 => LogOpcode::PrecompileCall,
}
}
Each opcode is then converted into the corresponding LogOpcode and written into the Log here, which is handled by the EventSink oracle.
Part 5 - The Role of the State Keeper
At this stage, the state keeper needs to collect all the messages generated by the VM execution and append them to the calldata it transmits to Ethereum.
This process is divided into two steps:
- Retrieval of the ‘full’ messages
- Extraction of all the message hashes.
Why are these steps kept separate?
To avoid overwhelming our circuits with the content of entire messages, we relay them through Events, sending only their hash to the VM. In this manner, the VM only adds to the proof the information that a message with a specific hash was sent.
Retrieving Full Message Contents
We go through all the Events generated during the run here and identify those coming from the
L1_MESSENGER_ADDRESS that corresponds to the L1MessageSent topic. These Events represent the ‘emit’ calls executed
in Part 2.
Retrieving Message Hashes
Message hashes are transmitted alongside the other l2_to_l1_logs within the VmExecutionResult.
The StateKeeper collects them from the LogQueries that the VM creates (these log queries also contain information about storage writes, so we use the AUX_BYTE filter to determine which ones contain L1 messages. The entire list can be found here). The StateKeeper employs the VM’s EventSink to filter them out here.
Part 6 - Interaction with Ethereum (L1)
After the StateKeeper has collected all the required data, it invokes the CommitBlocks method from the
Executor.sol contract.
Inside the processL2Blocks method, we iterate through the list of L2 message hashes, ensuring that the appropriate
full text is present for each:
// show preimage for hashed message stored in log
if (logSender == L2_TO_L1_MESSENGER_SYSTEM_CONTRACT_ADDR) {
    (bytes32 hashedMessage, ) = UnsafeBytes.readBytes32(emittedL2Logs, i + 56);
    // check that the full message body matches the hash.
    require(keccak256(l2Messages[currentMessage]) == hashedMessage, "k2");
Currently, the executor is deployed on Ethereum mainnet at 0x389a081BCf20e5803288183b929F08458F1d863D.
You can view an example of our contract execution from Part 1, carrying the message “My sample message”, in this Sepolia transaction: 0x18c2a113d18c53237a4056403047ff9fafbf772cb83ccd44bb5b607f8108a64c.
Part 7 - Verifying Message Inclusion
We’ve now arrived at the final stage — how L1 users and contracts can confirm a message’s presence in L1.
This is accomplished through the ProveL2MessageInclusion function call in Mailbox.sol.
Users supply the proof (merkle path) and the message, and the contract verifies that the merkle path is accurate and matches the root hash.
bytes32 calculatedRootHash = Merkle.calculateRoot(_proof, _index, hashedLog);
bytes32 actualRootHash = s.l2LogsRootHashes[_blockNumber];

return actualRootHash == calculatedRootHash;
Summary
In this article, we’ve traveled through a vast array of topics: from a user contract dispatching a message to L1 by invoking a system contract, to this message’s hash making its way all the way to the VM via special opcodes. We’ve also explored how it’s ultimately included in the execution results (as part of QueryLogs), gathered by the State Keeper, and transmitted to L1 for final verification.
Overview
Pubdata in ZKsync can be divided up into 4 different categories:
- L2 to L1 Logs
- L2 to L1 Messages
- Smart Contract Bytecodes
- Storage writes
Using data corresponding to these 4 facets, across all executed batches, we’re able to reconstruct the full state of L2. One thing to note is that the way that the data is represented changes in a pre-boojum and post-boojum zkEVM. At a high level, in a pre-boojum era these are represented as separate fields while in boojum they are packed into a single bytes array.
When the 4844 was integrated this bytes array was moved from being part of the calldata to blob data.
While the structure of the pubdata changes, we can use the same strategy to pull the relevant information. First, we
need to filter all of the transactions to the L1 ZKsync contract for only the commitBlocks/commitBatches transactions
where the proposed block has been referenced by a corresponding executeBlocks/executeBatches call (the reason for this
is that a committed or even proven block can be reverted but an executed one cannot). Once we have all the committed
blocks that have been executed, we then will pull the transaction input and the relevant fields, applying them in order
to reconstruct the current state of L2.
One thing to note is that in both systems some of the contract bytecode is compressed into an array of indices where
each 2 byte index corresponds to an 8 byte word in a dictionary. More on how that is done here.
Once the bytecode has been expanded, the hash can be taken and checked against the storage writes within the
AccountCodeStorage contract which connects an address on L2 with the 32 byte code hash:
function _storeCodeHash(address _address, bytes32 _hash) internal {
  uint256 addressAsKey = uint256(uint160(_address));
  assembly {
    sstore(addressAsKey, _hash)
  }
}
Pre-Boojum Era
In pre-boojum era the superset of pubdata fields and input to the commitBlocks function follows the following format:
/// @notice Data needed to commit new block
/// @param blockNumber Number of the committed block
/// @param timestamp Unix timestamp denoting the start of the block execution
/// @param indexRepeatedStorageChanges The serial number of the shortcut index that's used as a unique identifier for storage keys that were used twice or more
/// @param newStateRoot The state root of the full state tree
/// @param numberOfLayer1Txs Number of priority operations to be processed
/// @param l2LogsTreeRoot The root hash of the tree that contains all L2 -> L1 logs in the block
/// @param priorityOperationsHash Hash of all priority operations from this block
/// @param initialStorageChanges Storage write access as a concatenation key-value
/// @param repeatedStorageChanges Storage write access as a concatenation index-value
/// @param l2Logs concatenation of all L2 -> L1 logs in the block
/// @param l2ArbitraryLengthMessages array of hash preimages that were sent as value of L2 logs by special system L2 contract
/// @param factoryDeps (contract bytecodes) array of L2 bytecodes that were deployed
struct CommitBlockInfo {
  uint64 blockNumber;
  uint64 timestamp;
  uint64 indexRepeatedStorageChanges;
  bytes32 newStateRoot;
  uint256 numberOfLayer1Txs;
  bytes32 l2LogsTreeRoot;
  bytes32 priorityOperationsHash;
  bytes initialStorageChanges;
  bytes repeatedStorageChanges;
  bytes l2Logs;
  bytes[] l2ArbitraryLengthMessages;
  bytes[] factoryDeps;
}
The 4 main fields to look at here are:
initialStorageChanges: Storage slots being written to for the first time and the corresponding value- Structure:
num entries as u32 || for each entry: (32 bytes key, 32 bytes final value)
- Structure:
repeatedStorageChanges: ids of the slots being written to and the corresponding value- Structure:
num entries as u32 || for each entry: (8 byte id, 32 bytes final value)
- Structure:
factoryDeps: An array of uncompressed bytecodesl2ArbitraryLengthMessages: L2 → L1 Messages- We don’t need them all, we are just concerned with messages sent from the
Compressor/BytecodeCompressorcontract - These messages will follow the compression algorithm outline here
- We don’t need them all, we are just concerned with messages sent from the
For the ids on the repeated writes, they are generated as we process the first time keys. For example: if we see
[<key1, val1>, <key2, val2>] (starting from an empty state) then we can assume that the next time a write happens to
key1 it will be encoded as <1, new_val> and so on and so forth. There is a little shortcut here where the last new
id generated as part of a batch will be in the indexRepeatedStorageChanges field.
Post-Boojum Era
/// @notice Data needed to commit new batch
/// @param batchNumber Number of the committed batch
/// @param timestamp Unix timestamp denoting the start of the batch execution
/// @param indexRepeatedStorageChanges The serial number of the shortcut index that's used as a unique identifier for storage keys that were used twice or more
/// @param newStateRoot The state root of the full state tree
/// @param numberOfLayer1Txs Number of priority operations to be processed
/// @param priorityOperationsHash Hash of all priority operations from this batch
/// @param bootloaderHeapInitialContentsHash Hash of the initial contents of the bootloader heap. In practice it serves as the commitment to the transactions in the batch.
/// @param eventsQueueStateHash Hash of the events queue state. In practice it serves as the commitment to the events in the batch.
/// @param systemLogs concatenation of all L2 -> L1 system logs in the batch
/// @param pubdataCommitments Packed pubdata commitments/data.
/// @dev pubdataCommitments format: This will always start with a 1 byte pubdataSource flag. Current allowed values are 0 (calldata) or 1 (blobs)
///                             kzg: list of: opening point (16 bytes) || claimed value (32 bytes) || commitment (48 bytes) || proof (48 bytes) = 144 bytes
///                             calldata: pubdataCommitments.length - 1 - 32 bytes of pubdata
///                                       and 32 bytes appended to serve as the blob commitment part for the aux output part of the batch commitment
/// @dev For 2 blobs we will be sending 288 bytes of calldata instead of the full amount for pubdata.
/// @dev When using calldata, we only need to send one blob commitment since the max number of bytes in calldata fits in a single blob and we can pull the
///     linear hash from the system logs
struct CommitBatchInfo {
  uint64 batchNumber;
  uint64 timestamp;
  uint64 indexRepeatedStorageChanges;
  bytes32 newStateRoot;
  uint256 numberOfLayer1Txs;
  bytes32 priorityOperationsHash;
  bytes32 bootloaderHeapInitialContentsHash;
  bytes32 eventsQueueStateHash;
  bytes systemLogs;
  bytes pubdataCommitments;
}
The main difference between the two CommitBatchInfo and CommitBlockInfo structs is that we have taken a few of the
fields and merged them into a single bytes array called pubdataCommitments. In the calldata mode, the pubdata is
being passed using that field. In the blobs mode, that field is used to store the KZG commitments and proofs. More on
EIP-4844 blobs here. In the Validium mode, the field will either be empty or store the
inclusion proof for the DA blob.
The 2 main fields needed for state reconstruction are the bytecodes and the state diffs. The bytecodes follow the same structure and reasoning in the old system (as explained above). The state diffs will follow the compression illustrated below.
Compression of State Diffs in Post-Boojum Era
Keys
Keys will be packed in the same way as they were before boojum. The only change is that we’ll avoid using the 8-byte enumeration index and will pack it to the minimal necessary number of bytes. This number will be part of the pubdata. Once a key has been used, it can already use the 4 or 5 byte enumeration index and it is very hard to have something cheaper for keys that has been used already. The opportunity comes when remembering the ids for accounts to spare some bytes on nonce/balance key, but ultimately the complexity may not be worth it.
There is some room for the keys that are being written for the first time, however, these are rather more complex and achieve only a one-time effect (when the key is published for the first time).
Values
Values are much easier to compress, since they usually contain only zeroes. Also, we can leverage the nature of how those values are changed. For instance if nonce has been increased only by 1, we do not need to write the entire 32-byte new value, we can just tell that the slot has been increased and then supply only 1-byte value of the size by which it was increased. This way instead of 32 bytes we need to publish only 2 bytes: first byte to denote which operation has been applied and the second by to denote the size by which the addition has been made.
If we decide to have just the following 4 types of changes: Add, Sub, Transform, NoCompression where:
Adddenotes that the value has been increased. (modulo 2^256)Subdenotes that the value has been decreased. (modulo 2^256)Transformdenotes the value just has been changed (i.e. we disregard any potential relation between the previous and the new value, though the new value might be small enough to save up on the number of bytes).NoCompressiondenotes that the whole 32 byte value will be used.
Where the byte size of the output can be anywhere from 0 to 31 (also 0 makes sense for Transform, since it denotes
that it has been zeroed out). For NoCompression the whole 32 byte value is used.
So the format of the pubdata will be the following:
Part 1. Header
<version = 1 byte>— this will enable easier automated unpacking in the future. Currently, it will be only equal to1.<total_logs_len = 3 bytes>— we need only 3 bytes to describe the total length of the L2→L1 logs.<the number of bytes used for derived keys = 1 byte>. At the beginning it will be equal to4, but then it will automatically switch to5when needed.
Part 2. Initial writes
<num_of_initial_writes = 2 bytes>(since each initial write publishes at least 32 bytes for key, then2^16 * 32 = 2097152will be enough for a lot of time (right now with the limit of 120kb it will take more than 15 L1 txs to use up all the space there).- Then for each
<key, value>pair for each initial write:- print key as 32-byte derived key.
- packing type as a 1 byte value, which consists of 5 bits to denote the length of the packing and 3 bits to denote
the type of the packing (either
Add,Sub,TransformorNoCompression). More on it below. - The packed value itself.
Part 3. Repeated writes
Note, that there is no need to write the number of repeated writes, since we know that until the end of the pubdata, all the writes will be repeated ones.
- For each
<key, value>pair for each repeated write:- print key as either 4 or 5 byte derived key.
- packing type as a 1 byte value, which consists of 5 bits to denote the length of the packing and 3 bits to denote
the type of the packing (either
Add,Sub,TransformorNoCompression). - The packed value itself.
Pubdata Post 4844
Motivation
EIP-4844, commonly known as Proto-Danksharding, is an upgrade to the ethereum protocol that introduces a new data availability solution embedded in layer 1. More information about it can be found here. With proto-danksharding we can utilize the new blob data availability for cheaper storage of pubdata when we commit batches resulting in more transactions per batch and cheaper batches/transactions. We want to ensure we have the flexibility at the contract level to process both pubdata via calldata, as well as pubdata via blobs. A quick callout here, while 4844 has introduced blobs as new DA layer, it is the first step in full Danksharding. With full Danksharding ethereum will be able to handle a total of 64 blobs per block unlike 4844 which supports just 6 per block.
💡 Given the nature of 4844 development from a solidity viewpoint, we’ve had to create a temporary contract
BlobVersionedHash.yulwhich acts in place of the eventualBLOBHASHopcode.
Technical Approach
The approach spans both L2 system contracts and L1 ZKsync contracts (namely Executor.sol). When a batch is sealed on
L2 we will chunk it into blob-sized pieces (4096 elements * 31 bytes per what is required by our circuits), take the
hash of each chunk, and send them to L1 via system logs. Within Executor.sol , when we are dealing with blob-based
commitments, we verify that the blob contains the correct data with the point evaluation precompile. If the batch
utilizes calldata instead, the processing should remain the same as in a pre-4844 ZKsync. Regardless of if pubdata is in
calldata or blobs are used, the batch’s commitment changes as we include new data within the auxiliary output.
Given that this is the first step to a longer-term solution, and the restrictions of proto-danksharding that get lifted for full danksharding, we impose the following constraints:
- we will support a maximum of 2 blobs per batch
- only 1 batch will be committed in a given transaction
- we will always send 2 system logs (one for each potential blob commitment) even if the batch only uses 1 blob.
This simplifies the processing logic on L1 and stops us from increasing the blob base fee (increases when there 3 or more blobs in a given block).
Backward-compatibility
While some of the parameter formatting changes, we maintain the same function signature for commitBatches and still
allow for pubdata to be submitted via calldata:
struct StoredBatchInfo {
  uint64 batchNumber;
  bytes32 batchHash;
  uint64 indexRepeatedStorageChanges;
  uint256 numberOfLayer1Txs;
  bytes32 priorityOperationsHash;
  bytes32 l2LogsTreeRoot;
  uint256 timestamp;
  bytes32 commitment;
}

struct CommitBatchInfo {
  uint64 batchNumber;
  uint64 timestamp;
  uint64 indexRepeatedStorageChanges;
  bytes32 newStateRoot;
  uint256 numberOfLayer1Txs;
  bytes32 priorityOperationsHash;
  bytes32 bootloaderHeapInitialContentsHash;
  bytes32 eventsQueueStateHash;
  bytes systemLogs;
  bytes pubdataCommitments;
}

function commitBatches(StoredBatchInfo calldata _lastCommittedBatchData, CommitBatchInfo[] calldata _newBatchesData)
  external;
Implementation
Bootloader Memory
With the increase in the amount of pubdata due to blobs, changes can be made to the bootloader memory to facilitate more
l2 to l1 logs, compressed bytecodes, and pubdata. We take the naive approach for l2 to l1 logs and the compressed
bytecode, doubling their previous constraints from 2048 logs and 32768 slots to 4096 logs and 65536 slots
respectively. We then increase the number of slots for pubdata from 208000 to 411900. Copying the comment around
pubdata slot calculation from our code:
One of "worst case" scenarios for the number of state diffs in a batch is when 240kb of pubdata is spent
on repeated writes, that are all zeroed out. In this case, the number of diffs is 240k / 5 = 48k. This means that they will have
accommodate 13056000 bytes of calldata for the uncompressed state diffs. Adding 120k on top leaves us with
roughly 13176000 bytes needed for calldata. 411750 slots are needed to accommodate this amount of data.
We round up to 411900 slots just in case.
The overall bootloader max memory is increased from 24000000 to 30000000 bytes to accommodate the increases.
L2 System Contracts
We introduce a new system contract PubdataChunkPublisher that takes the full pubdata, creates chunks that are each 126,976 bytes in length (this is calculated as 4096 elements per blob each of which has 31 bytes), and commits them in the form of 2 system logs. We have the following keys for system logs:
enum SystemLogKey {
  L2_TO_L1_LOGS_TREE_ROOT_KEY,
  TOTAL_L2_TO_L1_PUBDATA_KEY,
  STATE_DIFF_HASH_KEY,
  PACKED_BATCH_AND_L2_BLOCK_TIMESTAMP_KEY,
  PREV_BATCH_HASH_KEY,
  CHAINED_PRIORITY_TXN_HASH_KEY,
  NUMBER_OF_LAYER_1_TXS_KEY,
  BLOB_ONE_HASH_KEY,
  BLOB_TWO_HASH_KEY,
  EXPECTED_SYSTEM_CONTRACT_UPGRADE_TX_HASH_KEY
}
In addition to the blob commitments, the hash of the total pubdata is still sent and is used if a batch is committed
with pubdata as calldata vs as blob data. As stated earlier, even when we only have enough pubdata for a single blob, 2
system logs are sent. The hash value in the second log in this case will bytes32(0) .
One important thing is that we don’t try to reason about the data here, that is done in the L1Messenger and Compressor contracts. The main purpose of this is to commit to blobs and have those commitments travel to L1 via system logs.
L1 Executor Facet
While the function signature for commitBatches and the structure of CommitBatchInfo stays the same, the format of
CommitBatchInfo.pubdataCommitments changes. Before 4844, this field held a byte array of pubdata, now it can hold
either the total pubdata as before or it can hold a list of concatenated info for kzg blob commitments. To differentiate
between the two, a header byte is prepended to the byte array. At the moment we only support 2 values:
/// @dev Enum used to determine the source of pubdata. At first we will support calldata and blobs but this can be extended.
enum PubdataSource {
    Calldata = 0,
    Blob = 1
}
We reject all other values in the first byte.
Calldata Based Pubdata Processing
When using calldata, we want to operate on pubdataCommitments[1:pubdataCommitments.length - 32] as this is the full
pubdata that was committed to via system logs. The reason we don’t operate on the last 32 bytes is that we also include
what the blob commitment for this data would be as a way to make our witness generation more generic. Only a single blob
commitment is needed for this as the max size of calldata is the same size as a single blob. When processing the system
logs in this context, we will check the hash of the supplied pubdata without the 1 byte header for pubdata source
against the value in the corresponding system log with key TOTAL_L2_TO_L1_PUBDATA_KEY. We still require logs for the 2
blob commitments, even if these logs contain values we will substitute them for bytes32(0) when constructing the batch
commitment.
Blob Based Pubdata Processing
The format for pubdataCommitments changes when we send pubdata as blobs, containing data we need to verify the blob
contents via the newly introduced point evaluation precompile. The data is pubdataCommitments[1:] is the concatenation
of opening point (16 bytes) || claimed value (32 bytes) || commitment (48 bytes) || proof (48 bytes) for each blob
attached to the transaction, lowering our calldata from N → 144 bytes per blob. More on how this is used later on.
Utilizing blobs causes us to process logs in a slightly different way. Similar to how it’s done when pubdata is sent via
calldata, we require a system log with a key of the TOTAL_L2_TO_L1_PUBDATA_KEY , although the value is ignored and
extract the 2 blob hashes from the BLOB_ONE_HASH_KEY and BLOB_TWO_HASH_KEY system logs to be used in the batch
commitment.
While calldata verification is simple, comparing the hash of the supplied calldata versus the value in the system log,
we need to take a few extra steps when verifying the blobs attached to the transaction contain the correct data. After
processing the logs and getting the 2 blob linear hashes, we will have all the data we need to call the
point evaluation precompile. Recall that the
contents of pubdataCommitments have the opening point (in its 16 byte form), claimed value, the commitment, and the
proof of this claimed value. The last piece of information we need is the blob’s versioned hash (obtained via BLOBHASH
opcode).
There are checks within _verifyBlobInformation that ensure that we have the correct blob linear hashes and that if we
aren’t expecting a second blob, the linear hash should be equal to bytes32(0). This is how we signal to our circuits
that we didn’t publish any information in the second blob.
Verifying the commitment via the point evaluation precompile goes as follows (note that we assume the header byte for pubdataSource has already been removed by this point):
// The opening point is passed as 16 bytes as that is what our circuits expect and use when verifying the new batch commitment
// PUBDATA_COMMITMENT_SIZE = 144 bytes
pubdata_commitments <- [opening point (16 bytes) || claimed value (32 bytes) || commitment (48 bytes) || proof (48 bytes)] from calldata
opening_point = bytes32(pubdata_commitments[:16])
versioned_hash <- from BLOBHASH opcode

// Given that we needed to pad the opening point for the precompile, append the data after.
point_eval_input = versioned_hash || opening_point || pubdataCommitments[16: PUBDATA_COMMITMENT_SIZE]

// this part handles the following:
// verify versioned_hash == hash(commitment)
// verify P(z) = y
res <- point_valuation_precompile(point_eval_input)

assert uint256(res[32:]) == BLS_MODULUS
Where correctness is validated by checking the latter 32 bytes of output from the point evaluation call is equal to
BLS_MODULUS.
Batch Commitment and Proof of Equivalence
With the contents of the blob being verified, we need to add this information to the batch commitment so that it can further be part of the verification of the overall batch by our proof system. Our batch commitment is the hashing of a few different values: passthrough data (holding our new state root, and next enumeration index to be used), meta parameters (flag for if zk porter is available, bootloader bytecode hash, and default account bytecode hash), and auxiliary output. The auxiliary output changes with 4844, adding in 4 new fields and the new corresponding encoding:
- 2
bytes32fields for linear hashes- These are the hashes of the blob’s preimages
- 2
bytes32for 4844 output commitment hashes- These are
(versioned hash || opening point || evaluation value) - The format of the opening point here is expected to be the 16 byte value passed by calldata
- These are
- We encode an additional 28
bytes32(0)at the end because with the inclusion of vm 1.5.0, our circuits support a total of 16 blobs that will be used once the total number of blobs supported by ethereum increase.
abi.encode(
    l2ToL1LogsHash,
    _stateDiffHash,
    _batch.bootloaderHeapInitialContentsHash,
    _batch.eventsQueueStateHash,
    _blob1LinearHash,
    _blob1OutputCommitment,
    _blob2LinearHash,
    _blob2OutputCommitment,
    _encode28Bytes32Zeroes()
);
There are 3 different scenarios that change the values posted here:
- We submit pubdata via calldata
- We only utilize a single blob
- We use both blobs
When we use calldata, the values _blob1LinearHash, _blob1OutputCommitment, _blob2LinearHash, and
_blob2OutputCommitment should all be bytes32(0). If we are using blobs but only have a single blob,
_blob1LinearHash and _blob1OutputCommitment should correspond to that blob, while _blob2LinearHash and
_blob2OutputCommitment will be bytes32(0). Following this, when we use both blobs, the data for these should be
present in all of the values.
Our circuits will then handle the proof of equivalence, following a method similar to the moderate approach mentioned here, verifying that the total pubdata can be repackaged as the blobs we submitted and that the commitments in fact evaluate to the given value at the computed opening point.
Pubdata Contents and Blobs
Given how data representation changes on the consensus layer (where blobs live) versus on the execution layer (where calldata is found), there is some preprocessing that takes place to make it compatible. When calldata is used for pubdata, we keep it as is and no additional processing is required to transform it. Recalling the above section when pubdata is sent via calldata it has the format: source byte (1 bytes) || pubdata || blob commitment (32 bytes) and so we must first trim it of the source byte and blob commitment before decoding it. A more detailed guide on the format can be found in our documentation. Using blobs requires a few more steps:
ZKSYNC_BLOB_SIZE = 31 * 4096

# First we pad the pubdata with the required amount of zeroes to fill
# the nearest blobs
padding_amount = ZKSYNC_BLOB_SIZE - len(pubdata) % ZKSYNC_BLOB_SIZE)
padded_pubdata = pad_right_with_zeroes(pubdata, padding_amount)

# We then chunk them into `ZKSYNC_BLOB_SIZE` sized arrays
blobs = chunk(padded_pubdata, ZKSYNC_BLOB_SIZE)

# Each blob is then encoded to be compatible with the CL
for blob in blobs:
    encoded_blob = zksync_pubdata_into_ethereum_4844_data(blob)
Now we can apply the encoding formula, with some of the data from the blob commit transaction to move from encoded blobs back into decodable zksync pubdata:
# opening point (16 bytes) || claimed value (32 bytes) || commitment (48 bytes) || proof (48 bytes)
BLOB_PUBDATA_COMMITMENT_SIZE = 144

# Parse the kzg commitment from the commit calldata
commit_calldata_without_source = commit_calldata[1:]
for i in range(0, len(commit_calldata_without_source), BLOB_PUBDATA_COMMITMENT_SIZE):
    # We can skip the opening point and claimed value, ignoring the proof
    kzg_commitment = commit_calldata_without_source[48:96]

# We then need to pull the blobs in the correct order, this can be found by matching
# each blob with their kzg_commitment keeping the order from the calldata
encoded_blobs = pull_blob_for_each_kzg_commitment(kzg_commitments)

# Decode each blob into the zksync specific format
for encoded_blob in encoded_blobs:
    decoded_blob = ethereum_4844_data_into_zksync_pubdata(encoded_blob)

reconstructed_pubdata = concat(decoded_blobs)
The last thing to do depends on the strategy taken, the two approaches are:
- Remove all trailing zeroes after concatenation
- Parse the data and ignore the extra zeroes at the end
The second option is a bit messier so going with the first, we can then decode the pubdata and when we get to the last state diff, if the number of bytes is less than specified we know that the remaining data are zeroes. The needed functions can be found within the zkevm_circuits code.
Bytecode Compression
Overview
As we are a rollup - all the bytecodes that contracts used in our chain must be copied into L1 (so that the chain can be reconstructed from L1 if needed).
Given the want/need to cutdown on space used, bytecode is compressed prior to being posted to L1. At a high level bytecode is chunked into opcodes (which have a size of 8 bytes), assigned a 2 byte index, and the newly formed byte sequence (indexes) are verified and sent to L1. This process is split into 2 different parts: (1) the server side operator handling the compression and (2) the system contract verifying that the compression is correct before sending to L1.
Example
Original bytecode:
0x000000000000000A000000000000000D000000000000000A000000000000000C000000000000000B000000000000000A000000000000000D000000000000000A000000000000000D000000000000000A000000000000000B000000000000000B
Split to 8-byte chunks:
000000000000000A 000000000000000D 000000000000000A 000000000000000C
000000000000000B 000000000000000A 000000000000000D 000000000000000A
000000000000000D 000000000000000A 000000000000000B 000000000000000B
Dictionary would be:
0 -> 0xA (count: 5)
1 -> 0xD (count: 3, first seen: 1)
2 -> 0xB (count: 3, first seen: 4)
3 -> 0xC (count: 1)
Note that 1 maps to 0xD, as it occurs three times, and first occurrence is earlier than first occurrence of 0xB,
that also occurs three times.
Compressed bytecode:
0x0004000000000000000A000000000000000D000000000000000B000000000000000C000000010000000300020000000100000001000000020002
Split into three parts:
length_of_dictis stored in the first 2 bytes- dictionary entries are stored in the next
8 * length_of_dictbytes - 2-byte indices are stored in the rest of the bytes
0004

000000000000000A 000000000000000D 000000000000000B 000000000000000C

0000 0001 0000 0003
0002 0000 0001 0000
0001 0000 0002 0002
Server Side Operator
This is the part that is responsible for taking bytecode, that has already been chunked into 8 byte words, performing validation, and compressing it.
Validation Rules
For bytecode to be considered valid it must satisfy the following:
- Bytecode length must be at most 2097120 ((2^16 - 1) * 32) bytes
- Bytecode length must be a multiple of 32.
- Number of words cannot be even.
Compression Algorithm
At a high level, each 8 byte word from the chunked bytecode is assigned a 2 byte index (constraint on size of dictionary of chunk → index is 2^16 + 1 elements). The length of the dictionary, dictionary entries (index assumed through order), and indexes are all concatenated together to yield the final compressed version.
The following is a simplified version of the algorithm:
statistic: Map[chunk, (count, first_pos)]
dictionary: Map[chunk, index]
encoded_data: List[index]

for position, chunk in chunked_bytecode:
    if chunk is in statistic:
        statistic[chunk].count += 1
    else:
        statistic[chunk] = (count=1, first_pos=pos)

statistic.sort(primary=count, secondary=first_pos, order=desc)

for chunk in sorted_statistic:
    dictionary[chunk] = len(dictionary) # length of dictionary used to keep track of index

for chunk in chunked_bytecode:
    encoded_data.append(dictionary[chunk])

return [len(dictionary), dictionary.keys(order=index asc), encoded_data]
System Contract Compression Verification & Publishing
The Bytecode Compressor contract performs validation on the compressed bytecode generated on the server side. At the current moment, publishing bytecode to L1 may only be called by the bootloader but in the future anyone will be able to publish compressed bytecode with no change to the underlying algorithm.
Verification & Publication
The function publishCompressBytecode takes in both the original _bytecode and the _rawCompressedData , the latter
of which comes from the server’s compression algorithm output. Looping over the encoded data, derived from
_rawCompressedData , the corresponding chunks are retrieved from the dictionary and compared to the original byte
code, reverting if there is a mismatch. After the encoded data has been verified, it is published to L1 and marked
accordingly within the KnownCodesStorage contract.
Pseudo-code implementation:
length_of_dict = _rawCompressedData[:2]
dictionary = _rawCompressedData[2:2 + length_of_dict * 8] # need to offset by bytes used to store length (2) and multiply by 8 for chunk size
encoded_data = _rawCompressedData[2 + length_of_dict * 8:]

assert(len(dictionary) % 8 == 0) # each element should be 8 bytes
assert(num_entries(dictionary) <= 2^16)
assert(len(encoded_data) * 4 == len(_bytecode)) # given that each chunk is 8 bytes and each index is 2 bytes they should differ by a factor of 4

for index in encoded_data:
    encoded_chunk = dictionary[index]
    real_chunk = _bytecode.readUint64(index * 4) # need to pull from index * 4 to account for difference in element size
    verify(encoded_chunk == real_chunk)

sendToL1(_rawCompressedBytecode)
markPublished(hash(_bytecode), hash(_rawCompressedData), len(_rawCompressedData))
zkEVM internals
zkEVM clarifier
The ZKsync zkEVM plays a fundamentally different role in the zkStack than the EVM does in Ethereum. The EVM is used to execute code in Ethereum’s state transition function. This STF needs a client to implement and run it. Ethereum has a multi-client philosophy, there are multiple clients, and they are written in Go, Rust, and other traditional programming languages, all running and verifying the same STF.
We have a different set of requirements, we need to produce a proof that some client executed the STF correctly. The first consequence is that the client needs to be hard-coded, we cannot have the same multi-client philosophy. This client is the zkEVM, it can run the STF efficiently, including execution of smart contracts similarly to the EVM. The zkEVM was also designed to be proven efficiently.
For efficiency reasons it the zkEVM is similar to the EVM. This makes executing smart programs inside of it easy. It also has special features that are not in the EVM but are needed for the rollup’s STF, storage, gas metering, precompiles and other things. Some of these features are implemented as system contracts while others are built into the VM. System Contracts are contracts with special permissions, deployed at predefined addresses. Finally, we have the bootloader, which is also a contract, although it is not deployed at any address. This is the STF that is ultimately executed by the zkEVM, and executes the transaction against the state.
Full specification of the zkEVM is beyond the scope of this document. However, this section will give you most of the details needed for understanding the L2 system smart contracts & basic differences between EVM and zkEVM. Note also that usually understanding the EVM is needed for efficient smart contract development. Understanding the zkEVM goes beyond this, it is needed for developing the rollup itself.
Registers and memory management
On EVM, during transaction execution, the following memory areas are available:
memoryitself.calldatathe immutable slice of parent memory.returndatathe immutable slice returned by the latest call to another contract.stackwhere the local variables are stored.
Unlike EVM, which is stack machine, zkEVM has 16 registers. Instead of receiving input from calldata, zkEVM starts by
receiving a pointer in its first register (basically a packed struct with 4 elements: the memory page id, start and
length of the slice to which it points to) to the calldata page of the parent. Similarly, a transaction can receive
some other additional data within its registers at the start of the program: whether the transaction should invoke the
constructor
more about deployments here,
whether the transaction has isSystem flag, etc. The meaning of each of these flags will be expanded further in this
section.
Pointers are separate type in the VM. It is only possible to:
- Read some value within a pointer.
- Shrink the pointer by reducing the slice to which pointer points to.
- Receive the pointer to the
returndataas a calldata. - Pointers can be stored only on stack/registers to make sure that the other contracts can not read
memory/returndataof contracts they are not supposed to. - A pointer can be converted to the u256 integer representing it, but an integer can not be converted to a pointer to prevent unallowed memory access.
- It is not possible to return a pointer that points to a memory page with id smaller than the one for the current page.
What this means is that it is only possible to
returnonly pointer to the memory of the current frame or one of the pointers returned by the subcalls of the current frame.
Memory areas in zkEVM
For each frame, the following memory areas are allocated:
- Heap (plays the same role as
memoryon Ethereum). - AuxHeap (auxiliary heap). It has the same properties as Heap, but it is used for the compiler to encode
calldata/copy the
returndatafrom the calls to system contracts to not interfere with the standard Solidity memory alignment. - Stack. Unlike Ethereum, stack is not the primary place to get arguments for opcodes. The biggest difference between stack on zkEVM and EVM is that on ZKsync stack can be accessed at any location (just like memory). While users do not pay for the growth of stack, the stack can be fully cleared at the end of the frame, so the overhead is minimal.
- Code. The memory area from which the VM executes the code of the contract. The contract itself can not read the code page, it is only done implicitly by the VM.
Also, as mentioned in the previous section, the contract receives the pointer to the calldata.
Managing returndata & calldata
Whenever a contract finishes its execution, the parent’s frame receives a pointer as returndata. This pointer may
point to the child frame’s Heap/AuxHeap or it can even be the same returndata pointer that the child frame received
from some of its child frames.
The same goes with the calldata. Whenever a contract starts its execution, it receives the pointer to the calldata.
The parent frame can provide any valid pointer as the calldata, which means it can either be a pointer to the slice of
parent’s frame memory (heap or auxHeap) or it can be some valid pointer that the parent frame has received before as
calldata/returndata.
Contracts simply remember the calldata pointer at the start of the execution frame (it is by design of the compiler) and remembers the latest received returndata pointer.
Some important implications of this is that it is now possible to do the following calls without any memory copying:
A → B → C
where C receives a slice of the calldata received by B.
The same goes for returning data:
A ← B ← C
There is no need to copy returned data if the B returns a slice of the returndata returned by C.
Note, that you can not use the pointer that you received via calldata as returndata (i.e. return it at the end of the
execution frame). Otherwise, it would be possible that returndata points to the memory slice of the active frame and
allow editing the returndata. It means that in the examples above, C could not return a slice of its calldata without
memory copying.
Some of these memory optimizations can be seen utilized in the EfficientCall library that allows to perform a call while reusing the slice of calldata that the frame already has, without memory copying.
Returndata & precompiles
Some of the operations which are opcodes on Ethereum, have become calls to some of the system contracts. The most
notable examples are Keccak256, SystemContext, etc. Note, that, if done naively, the following lines of code would
work differently on ZKsync and Ethereum:
pop(call(...))
keccak(...)
returndatacopy(...)
Since the call to keccak precompile would modify the returndata. To avoid this, our compiler does not override the
latest returndata pointer after calls to such opcode-like precompiles.
zkEVM specific opcodes
While some Ethereum opcodes are not supported out of the box, some of the new opcodes were added to facilitate the development of the system contracts.
Note, that this lists does not aim to be specific about the internals, but rather explain methods in the SystemContractHelper.sol
Only for kernel space
These opcodes are allowed only for contracts in kernel space (i.e. system contracts). If executed in other places they
result in revert(0,0).
mimic_call. The same as a normalcall, but it can alter themsg.senderfield of the transaction.to_l1. Sends a system L2→L1 log to Ethereum. The structure of this log can be seen here.event. Emits an L2 log to ZKsync. Note, that L2 logs are not equivalent to Ethereum events. Each L2 log can emit 64 bytes of data (the actual size is 88 bytes, because it includes the emitter address, etc). A single Ethereum event is represented with multipleeventlogs constitute. This opcode is only used byEventWritersystem contract.precompile_call. This is an opcode that accepts two parameters: the uint256 representing the packed parameters for it as well as the ergs to burn. Besides the price for the precompile call itself, it burns the provided ergs and executes the precompile. The action that it does depend onthisduring execution:- If it is the address of the
ecrecoversystem contract, it performs the ecrecover operation - If it is the address of the
sha256/keccak256system contracts, it performs the corresponding hashing operation. - It does nothing (i.e. just burns ergs) otherwise. It can be used to burn ergs needed for L2→L1 communication or publication of bytecodes onchain.
- If it is the address of the
setValueForNextFarCallsetsmsg.valuefor the nextcall/mimic_call. Note, that it does not mean that the value will be really transferred. It just sets the correspondingmsg.valuecontext variable. The transferring of ETH should be done via other means by the system contract that uses this parameter. Note, that this method has no effect ondelegatecall, sincedelegatecallinherits themsg.valueof the previous frame.increment_tx_counterincrements the counter of the transactions within the VM. The transaction counter used mostly for the VM’s internal tracking of events. Used only in bootloader after the end of each transaction.
Note, that currently we do not have access to the tx_counter within VM (i.e. for now it is possible to increment it
and it will be automatically used for logs such as events as well as system logs produced by to_l1, but we can not
read it). We need to read it to publish the user L2→L1 logs, so increment_tx_counter is always accompanied by the
corresponding call to the
SystemContext
contract.
More on the difference between system and user logs can be read
here. -
set_pubdata_price sets the price (in gas) for publishing a single byte of pubdata.
Generally accessible
Here are opcodes that can be generally accessed by any contract. Note that while the VM allows to access these methods, it does not mean that this is easy: the compiler might not have convenient support for some use-cases yet.
near_call. It is basically a “framed” jump to some location of the code of your contract. The difference between thenear_calland ordinary jump are:- It is possible to provide an ergsLimit for it. Note, that unlike “
far_call”s (i.e. calls between contracts) the 63/64 rule does not apply to them. - If the near call frame panics, all state changes made by it are reversed. Please note, that the memory changes will not be reverted.
- It is possible to provide an ergsLimit for it. Note, that unlike “
getMeta. Returns an u256 packed value of ZkSyncMeta struct. Note that this is not tight packing. The struct is formed by the following rust code.getCodeAddress— receives the address of the executed code. This is different fromthis, since in case of delegatecallsthisis preserved, butcodeAddressis not.
Flags for calls
Besides the calldata, it is also possible to provide additional information to the callee when doing call ,
mimic_call, delegate_call. The called contract will receive the following information in its first 12 registers at
the start of execution:
- r1 — the pointer to the calldata.
- r2 — the pointer with flags of the call. This is a mask, where each bit is set only if certain flags have been set
to the call. Currently, two flags are supported: 0-th bit:
isConstructorflag. This flag can only be set by system contracts and denotes whether the account should execute its constructor logic. Note, unlike Ethereum, there is no separation on constructor & deployment bytecode. More on that can be read here. 1-st bit:isSystemflag. Whether the call intends a system contracts’ function. While most of the system contracts’ functions are relatively harmless, accessing some with calldata only may break the invariants of Ethereum, e.g. if the system contract usesmimic_call: no one expects that by calling a contract some operations may be done out of the name of the caller. This flag can be only set if the callee is in kernel space. - The rest r3..r12 registers are non-empty only if the
isSystemflag is set. There may be arbitrary values passed, which we callextraAbiParams.
The compiler implementation is that these flags are remembered by the contract and can be accessed later during execution via special simulations.
If the caller provides inappropriate flags (i.e. tries to set isSystem flag when callee is not in the kernel space),
the flags are ignored.
onlySystemCall modifier
Some of the system contracts can act on behalf of the user or have a very important impact on the behavior of the
account. That’s why we wanted to make it clear that users can not invoke potentially dangerous operations by doing a
simple EVM-like call. Whenever a user wants to invoke some of the operations which we considered dangerous, they must
provide “isSystem” flag with them.
The onlySystemCall flag checks that the call was either done with the “isSystemCall” flag provided or the call is done
by another system contract (since Matter Labs is fully aware of system contracts).
Simulations via our compiler
In the future, we plan to introduce our “extended” version of Solidity with more supported opcodes than the original
one. However, right now it was beyond the capacity of the team to do, so in order to represent accessing ZKsync-specific
opcodes, we use call opcode with certain constant parameters that will be automatically replaced by the compiler with
zkEVM native opcode.
Example:
function getCodeAddress() internal view returns (address addr) {
  address callAddr = CODE_ADDRESS_CALL_ADDRESS;
  assembly {
    addr := staticcall(0, callAddr, 0, 0xFFFF, 0, 0)
  }
}
In the example above, the compiler will detect that the static call is done to the constant CODE_ADDRESS_CALL_ADDRESS
and so it will replace it with the opcode for getting the code address of the current execution.
Full list of opcode simulations can be found here.
We also use verbatim-like statements to access ZKsync-specific opcodes in the bootloader.
All the usages of the simulations in our Solidity code are implemented in the SystemContractHelper library and the SystemContractsCaller library.
Simulating near_call (in Yul only)
In order to use near_call i.e. to call a local function, while providing a limit of ergs (gas) that this function can
use, the following syntax is used:
The function should contain ZKSYNC_NEAR_CALL string in its name and accept at least 1 input parameter. The first input
parameter is the packed ABI of the near_call. Currently, it is equal to the number of ergs to be passed with the
near_call.
Whenever a near_call panics, the ZKSYNC_CATCH_NEAR_CALL function is called.
Important note: the compiler behaves in a way that if there is a revert in the bootloader, the
ZKSYNC_CATCH_NEAR_CALL is not called and the parent frame is reverted as well. The only way to revert only the
near_call frame is to trigger VM’s panic (it can be triggered with either invalid opcode or out of gas error).
Important note 2: The 63/64 rule does not apply to near_call. Also, if 0 gas is provided to the near call, then
actually all of the available gas will go to it.
Notes on security
To prevent unintended substitution, the compiler requires --system-mode flag to be passed during compilation for the
above substitutions to work.
Bytecode hashes
On ZKsync the bytecode hashes are stored in the following format:
- The 0th byte denotes the version of the format. Currently the only version that is used is “1”.
- The 1st byte is
0for deployed contracts’ code and1for the contract code that is being constructed. - The 2nd and 3rd bytes denote the length of the contract in 32-byte words as big-endian 2-byte number.
- The next 28 bytes are the last 28 bytes of the sha256 hash of the contract’s bytecode.
The bytes are ordered in little-endian order (i.e. the same way as for bytes32 ).
Bytecode validity
A bytecode is valid if it:
- Has its length in bytes divisible by 32 (i.e. consists of an integer number of 32-byte words).
- Has a length of less than 2^16 words (i.e. its length in words fits into 2 bytes).
- Has an odd length in words (i.e. the 3rd byte is an odd number).
Note, that it does not have to consist of only correct opcodes. In case the VM encounters an invalid opcode, it will simply revert (similar to how EVM would treat them).
A call to a contract with invalid bytecode can not be proven. That is why it is essential that no contract with invalid bytecode is ever deployed on ZKsync. It is the job of the KnownCodesStorage to ensure that all allowed bytecodes in the system are valid.
Intuition guide to ZK in zkEVM
WARNING: This guide simplifies the complex details of how we use ZK in our systems, just to give you a better understanding. We’re leaving out a lot of details to keep things brief.
What is the ‘Zero Knowledge’
In our case, the prover takes public input and witness (which is huge - you’ll see below), and produces a proof, but the verifier takes (public input, proof) only, without witness. This means that the huge witness doesn’t have to be submitted to L1. This property can be used for many things, like privacy, but here we use it to implement an efficient rollup that publishes the least required amount of data to L1.
Basic overview
Let’s break down the basic steps involved when a transaction is made within our ZK system:
- Execute transaction in State Keeper & Seal the block: This part has been discussed in other articles.
- Generate witness: What’s that? Let’s find out below!
- Generate proof: This is where some fancy math and computing power comes in.
- Verify proof on L1: This means checking that the fancy math was done right on the Ethereum network (referred to as L1).
What It Means to Generate a Witness
When our State Keeper processes a transaction, it carries out a bunch of operations and assumes certain conditions without openly stating them. However, when it comes to ZK, we need to show clear evidence that these conditions hold.
Take this simple example where we have a command that retrieves some data from storage and assigns it to a variable.
a := SLOAD(0x100)
In normal circumstances, the system would just read the data from storage and assign it. But in ZK, we need to provide evidence of what specific data was fetched and that it was indeed present in the storage beforehand.
From the ZK point of view, this looks like:
circuit inputs:
* current_state_hash = 0x1234;
* read_value: 44
* merkle_path proving that (0x100, 44) exists in tree with storage hash 0x1234
circuit outputs:
* new state hash (that includes the leaf saying that variable 'a' has value 44)
Note: In reality, we also use multiple Queues with hashes (together with merkle trees), to track all the memory & storage accesses.
So, in our example, what seems like a simple action actually requires us to create a bunch of hashes and merkle paths. This is precisely what the Witness Generator does. It processes the transactions, one operation at a time, and generates the necessary data that will be used later in circuits.
A Closer Look
Now let’s dive into a specific example witness_example:
#![allow(unused)]
fn main() {
pub fn compute_decommitter_circuit_snapshots<
    E: Engine,
    R: CircuitArithmeticRoundFunction<E, 2, 3>,
>(
...
) -> (
    Vec<CodeDecommitterCircuitInstanceWitness<E>>,
    CodeDecommitmentsDeduplicatorInstanceWitness<E>,
)
}
In this code snippet, we’re looking at a function named compute_decommitter_circuit_snapshots. It uses some technical
terms and concepts that may seem daunting, but let’s break them down:
Engine: This is a trait that specifically handles complex mathematical curves, called Elliptic curves. It’s like your uint64 on steroids!
CircuitArithmeticRoundFunction: This is a special kind of hashing function that’s more suited for the circuits we are using than the regular ones like keccak. In our case, we use Franklin and Rescue from franklin repo.
The function returns Witness classes, that contain queues such as FixedWidthEncodingSpongeLikeQueueWitness which hold
the hashes we mentioned earlier. This is similar merkle paths that we discussed above.
Where is the Code
The job of generating witnesses, which we discussed earlier, is handled by the witness generator. Initially, this was located in a module zksync core witness. However, for the new proof system, the team began to shift this function to a new location called separate witness binary.
Inside this new location, after the necessary data is fetched from storage, the witness generator calls another piece of
code from zkevm_test_harness witness named run_with_fixed_params. This code is responsible for creating the witnesses
themselves (which can get really HUGE).
Generating the Proof
Once we have the witness data lined up, it’s time to crunch the numbers and create the proofs.
The main goal of this step is to take an operation (for example, a calculation called ecrecover) and break it down
into smaller pieces. Then, we represent this information as a special mathematical expression called a polynomial.
To construct these polynomials, we use something called a ConstraintSystem. The specific type that we use is called
zkSNARK, and our custom version of it is named bellman. You can find our code for this in the bellman repo. Additionally,
we have an optimized version that’s designed to run faster on certain types of hardware (using CUDA technology), which you
can find in the bellman cuda repo.
An example ecrecover circuit might give you a clearer picture of what this looks like in practice.
The proof itself is generated by evaluating this polynomial expression at many different points. Because this involves heavy calculations, we use GPUs to speed things up.
Where is the Code
The main code that utilizes the GPUs to create proofs is located in a repository named heavy_ops_service repo. This code combines elements from the bellman cuda repo that we mentioned earlier, along with a huge amount of data generated by the witness, to produce the final proofs.
What Does “Verify Proof on L1” Mean
Finally, we reach the stage where we have to verify the proof on L1. But what does that really mean?
We need to ensure that four specific values match:
- C: This is a value that represents our circuits, also known as verification keys. It’s like a fingerprint of the circuit code and is hard-coded into the contract. Whenever the circuit changes, this value changes too.
- In: This represents the root hash before the transaction block.
- Out: This represents the root hash after the transaction block.
- P: This is the proof provided by the prover.
The logic behind this is that there can only be a matching proof ‘P’ if C(In) == Out. In simple terms, it means that
the proof ‘P’ will only make sense if the values before and after the transaction block are consistent according to the
circuit represented by ‘C’.
If you’re eager to dive into the nitty-gritty, you can find the code in the verifier repository. Also, if you’re interested in learning even more, you can look up KZG commitments.
A Heads-Up About Code Versions
Please be aware that there are multiple versions of the proving systems, such as v1.3.1, v1.3.2, and so on. When you’re looking through the code, make sure you’re checking the version that’s relevant to what you’re working on. At the time this guide was written, the latest version was 1.3.4, but there was also ongoing development on a new proof system in version 1.4.0.
Proof System Deeper Overview
The purpose of this section is to explain our new proof system from an engineering standpoint. We will examine the code examples and how the libraries communicate.
Let’s begin by discussing our constraint system. In the previous prover, we utilized the Bellman repository. However, in the new prover, the constraint system is implemented in Boojum.
Constraint system
If you look at boojum repo (src/cs/traits/cs.rs):
#![allow(unused)]
fn main() {
pub trait ConstraintSystem<F: SmallField>: Send + Sync {

    ...
    fn alloc_variable() -> Variable;
    fn alloc_witness_without_value(&mut self) -> Witness;
    fn place_gate<G: Gate<F>>(&mut self, gate: &G, row: usize);
    ...
}
}
We have three main components: Variable, Witness, and Gate.
To understand the constraint system, imagine it as a list of “placeholders” called Variables. We define rules, referred to as “gates” for these Variables. The Witness represents a specific assignment of values to these Variables, ensuring that the rules still hold true.
Conceptually, this is similar to how we implement functions. Consider the following example:
fn fun(x) {
  y = x + A;
  z = y * B;
  w = if y { z } else { y }
}
In this code snippet, A, B, y, z, and w are Variables (with A and B being constants). We establish rules,
or gates, specifying that the Variable z must equal y multiplied by the Variable B.
Example Witness assignment would be:
x = 1; A = 3; y = 3; B = 0; z = 0; w = 3;
Gates can become more complex. For instance, the w case demonstrates a “selection” gate, which chooses one of two
options depending on a condition.
Now, let’s delve into this gate for a more detailed examination:
Selection gate
The code is in boojum/src/cs/gates/selection_gate.rs
Let’s delve deeper into the concept. Our goal is to create a gate that implements the logic
result = if selector == true a else b;. To accomplish this, we will require four variables.
#![allow(unused)]
fn main() {
pub struct SelectionGate {
    pub a: Variable,
    pub b: Variable,
    pub selector: Variable,
    pub result: Variable,
}
}
Internally the Variable object is pub struct Variable(pub(crate) u64); - so it is an index to the position within
the constraint system object.
And now let’s see how we can add this gate into the system.
#![allow(unused)]
fn main() {
pub fn select<F: SmallField, CS: ConstraintSystem<F>>(
    cs: &mut CS,
    a: Variable,
    b: Variable,
    selector: Variable,
) -> Variable {
  //  First, let's allocate the output variable:
  let output_variable = cs.alloc_variable_without_value();
  ...
}
}
And then there is a block of code for witness evaluation (let’s skip it for now), and the final block that adds the gate
to the constraint system cs:
#![allow(unused)]
fn main() {
    if <CS::Config as CSConfig>::SetupConfig::KEEP_SETUP {
        let gate = Self {
            a,
            b,
            selector,
            result: output_variable,
        };
        gate.add_to_cs(cs);
    }

    output_variable
}
So to recap - we took 3 ‘Variables’, created the output one, created a SelectionGate object out of them, which we
added to the system (by calling add_to_cs) - and the finally returned the output variable.
But where is the ‘logic’? Where do we actually enforce the constraint?
For this, we have to look at the Evaluator:
#![allow(unused)]
fn main() {
impl<F: SmallField> Gate<F> for SelectionGate {
    type Evaluator = SelectionGateConstraitEvaluator;

    #[inline]
    fn evaluator(&self) -> Self::Evaluator {
        SelectionGateConstraitEvaluator
    }
}
}
#![allow(unused)]
fn main() {
impl<F: PrimeField> GateConstraitEvaluator<F> for SelectionGateConstraitEvaluator {
  fn evaluate_once{
    let a = trace_source.get_variable_value(0);
    let b = trace_source.get_variable_value(1);
    let selector = trace_source.get_variable_value(2);
    let result = trace_source.get_variable_value(3);

    // contribution = a * selector
    let mut contribution = a;
    contribution.mul_assign(&selector, ctx);

    // tmp = 1 - selector
    let mut tmp = P::one(ctx);
    tmp.sub_assign(&selector, ctx);

    // contribution += tmp * b
    // So:
    // contribution = a*selector + (1-selector) * b
    P::mul_and_accumulate_into(&mut contribution, &tmp, &b, ctx);

    // contribution = a*selector + (1-selector) * b - result
    contribution.sub_assign(&result, ctx);

    // And if we're successful, the contribution == 0.
    // Because result == a * selector + (1-selector) * b
    destination.push_evaluation_result(contribution, ctx);
    }
}
}
This evaluator is actually operating on top of the Field objects, trying to build & evaluate the correct polynomials.
The details of it will be covered in a separate article.
Congratulations, you hopefully understood the code for the first gate. To recap - we created the ‘output’ Variable, and added the Gate to the CS system. Later when CS system ‘computes’ all the dependencies, it will run the constraint evaluator, to add the ‘raw’ dependency (which is basically an equation) to the list.
You can look into other files in src/cs/gates to see other examples.
Structures
Now, that we handled the basic variables, let’s see what we can do with more complex structures. Boojum has added a bunch of derive macros, to make development easier.
Let’s look at the example:
#![allow(unused)]
fn main() {
#[derive(Derivative, CSSelectable, CSAllocatable, CSVarLengthEncodable, WitnessHookable)]
pub struct VmLocalState<F: SmallField> {
    pub previous_code_word: UInt256<F>,
    pub registers: [VMRegister<F>; REGISTERS_COUNT],
    pub flags: ArithmeticFlagsPort<F>,
    pub timestamp: UInt32<F>,
    pub memory_page_counter: UInt32<F>,
}
First - all the UInt that you see above, are actually implemented in Boojum:
#![allow(unused)]
fn main() {
pub struct UInt32<F: SmallField> {
    pub(crate) variable: Variable,
}
impl<F: SmallField> CSAllocatable<F> for UInt32<F> {
    // So the 'witness' type (concrete value) for U32 is u32 - no surprises ;-)
    type Witness = u32;
    ...
}

pub struct UInt256<F: SmallField> {
    pub inner: [UInt32<F>; 8],
}
}
WitnessHookable
In the example above, the Witness type for U32, was u32 - easy. But what should we do, when we have more complex struct (like VmLocalState)?
This derive will automatically create a new struct named XXWitness (in example above VmLocalStateWitness), that can be
filled with concrete values.
CsAllocatable
Implements CsAllocatable - which allows you to directly ‘allocate’ this struct within constraint system (similarly to how we were operating on regular ‘Variables’ above).
CSSelectable
Implements the Selectable trait - that allows this struct to participate in operations like conditionally select (so
it can be used as ‘a’ or ‘b’ in the Select gate example above).
CSVarLengthEncodable
Implements CircuitVarLengthEncodable - which allows encoding the struct into a vector of variables (think about it as serializing to Bytes).
Summary
Now with the tools above, we can do operations on our constraint system using more complex structures. So we have gates as ‘complex operators’ and structures as complex object. Now we’re ready to start taking it to the next level: Circuits.
Circuits
Circuit’s definitions are spread across 2 separate repositories: zkevm_circuits and zkevm_test_harness.
While we have around 9 different circuits (log_sorter, ram_permutation etc) - in this article we’ll focus only on the one: MainVM - which is responsible for handling almost all of the VM operations (other circuits are used to handle some of the precompiles, and operations that happen after VM was run - like preparing pubdata etc).
Looking at zkevm_test_harness, we can see the definition:
#![allow(unused)]
fn main() {
pub type VMMainCircuit<F, W, R> =
    ZkSyncUniformCircuitInstance<F, VmMainInstanceSynthesisFunction<F, W, R>>;
}
So what is a circuit
#![allow(unused)]
fn main() {
pub struct ZkSyncUniformCircuitInstance<F: SmallField, S: ZkSyncUniformSynthesisFunction<F>> {
    // Assignment of values to all the Variables.
    pub witness: AtomicCell<Option<S::Witness>>,

    // Configuration - that is circuit specific, in case of MainVM - the configuration
    // is simply the amount of opcodes that we put within 1 circuit.
    pub config: std::sync::Arc<S::Config>,

    // Circuit 'friendly' hash function.
    pub round_function: std::sync::Arc<S::RoundFunction>,

    // Inputs to the circuits.
    pub expected_public_input: Option<[F; INPUT_OUTPUT_COMMITMENT_LENGTH]>,
}
}
Notice - that circuit doesn’t have any ‘explicit’ outputs.
Where ZkSyncUniformCircuitInstance is a proxy, so let’s look deeper, into the main function:
#![allow(unused)]
fn main() {
impl VmMainInstanceSynthesisFunction {
    fn synthesize_into_cs_inner<CS: ConstraintSystem<F>>(
        cs: &mut CS,
        witness: Self::Witness,
        round_function: &Self::RoundFunction,
        config: Self::Config,
    ) -> [Num<F>; INPUT_OUTPUT_COMMITMENT_LENGTH] {
        main_vm_entry_point(cs, witness, round_function, config)
    }
}

}
This is the main logic, that takes the witness (remember - Witness is a concrete assignment of values to Variables) - and returns the public input.
If we look deeper into ‘main_vm_entry_point’ (which is already in zkevm_circuits repo), we can see:
pub fn main_vm_entry_point(
    cs: &mut CS,
    witness: VmCircuitWitness<F, W>,
    round_function: &R,
    limit: usize,
) -> [Num<F>; INPUT_OUTPUT_COMMITMENT_LENGTH]
And in this function we do following operations:
#![allow(unused)]
fn main() {
    // Prepare current 'state'
    //
    // First - unpack the witness
    let VmCircuitWitness {
        closed_form_input,
        witness_oracle,
    } = witness;

    // And add it to the constraint system
    let mut structured_input =
        VmCircuitInputOutput::alloc_ignoring_outputs(cs, closed_form_input.clone());

    let mut state =
        VmLocalState::conditionally_select(cs, start_flag, &bootloader_state, &hidden_fsm_input);

    // Notice, that now state is a VmLocalState object -- which contains 'Variables' inside.

    // And now run the cycles
    for _cycle_idx in 0..limit {
        state = vm_cycle(
            cs,
            state,
            &synchronized_oracle,
            &per_block_context,
            round_function,
        );
    }
}
The vm_cycle method is where the magic is - it takes a given opcode, and creates all the necessary gates, temporary
Variables etc inside the Constraint system. This method is around 800 lines long, so I’d encourage you to take a sneak
peek if you’re interested.
Now that we’ve added all the constraints for the ‘limit’ number of opcodes, we have to do some additional housekeeping - like storing the Queue hashes (for memory, code decommitment etc).
And then we’re ready to prepare the result of this method (input_commitment).
#![allow(unused)]
fn main() {
    // Prepare compact form (that contains just the hashes of values, rather than full values).
    let compact_form =
        ClosedFormInputCompactForm::from_full_form(cs, &structured_input, round_function);

    // And serialize it.
    let input_commitment: [_; INPUT_OUTPUT_COMMITMENT_LENGTH] =
        commit_variable_length_encodable_item(cs, &compact_form, round_function);
    input_commitment
}
And now putting it all together
Now let’s look at the zkevm_test_harness repo, ‘/src/external_calls.rs’ run method. This is used in many tests, and tries to execute the whole flow end to end.
And while the signature is quite scary - let’s walk through this together:
#![allow(unused)]
fn main() {
pub fn run<
    F: SmallField,
    R: BuildableCircuitRoundFunction<F, 8, 12, 4> + AlgebraicRoundFunction<F, 8, 12, 4> + serde::Serialize + serde::de::DeserializeOwned,
    H: RecursiveTreeHasher<F, Num<F>>,
    EXT: FieldExtension<2, BaseField = F>,
    S: Storage
>(
caller: Address, // for real block must be zero
entry_point_address: Address, // for real block must be the bootloader
entry_point_code: Vec<[u8; 32]>, // for read lobkc must be a bootloader code
initial_heap_content: Vec<u8>, // bootloader starts with non-deterministic heap
    zk_porter_is_available: bool,
    default_aa_code_hash: U256,
used_bytecodes: std::collections::HashMap<U256, Vec<[u8; 32]>>, // auxiliary information to avoid passing a full set of all used codes
ram_verification_queries: Vec<(u32, U256)>, // we may need to check that after the bootloader's memory is filled
    cycle_limit: usize,
round_function: R, // used for all queues implementation
    geometry: GeometryConfig,
    storage: S,
    tree: &mut impl BinarySparseStorageTree<256, 32, 32, 8, 32, Blake2s256, ZkSyncStorageLeaf>,
) -> (
    BlockBasicCircuits<F, R>,
    BlockBasicCircuitsPublicInputs<F>,
    BlockBasicCircuitsPublicCompactFormsWitnesses<F>,
    SchedulerCircuitInstanceWitness<F, H, EXT>,
    BlockAuxilaryOutputWitness<F>,
)
    where [(); <crate::zkevm_circuits::base_structures::log_query::LogQuery<F> as CSAllocatableExt<F>>::INTERNAL_STRUCT_LEN]:,
    [(); <crate::zkevm_circuits::base_structures::memory_query::MemoryQuery<F> as CSAllocatableExt<F>>::INTERNAL_STRUCT_LEN]:,
    [(); <crate::zkevm_circuits::base_structures::decommit_query::DecommitQuery<F> as CSAllocatableExt<F>>::INTERNAL_STRUCT_LEN]:,
    [(); <crate::boojum::gadgets::u256::UInt256<F> as CSAllocatableExt<F>>::INTERNAL_STRUCT_LEN]:,
    [(); <crate::boojum::gadgets::u256::UInt256<F> as CSAllocatableExt<F>>::INTERNAL_STRUCT_LEN + 1]:,
    [(); <crate::zkevm_circuits::base_structures::vm_state::saved_context::ExecutionContextRecord<F> as CSAllocatableExt<F>>::INTERNAL_STRUCT_LEN]:,
    [(); <crate::zkevm_circuits::storage_validity_by_grand_product::TimestampedStorageLogRecord<F> as CSAllocatableExt<F>>::INTERNAL_STRUCT_LEN]:,

}
The first section, is adding some decommitments (explain later).
Then we create a vm:
#![allow(unused)]
fn main() {
    let mut out_of_circuit_vm =
        create_out_of_circuit_vm(&mut tools, &block_properties, caller, entry_point_address);
}
And we’ll run it over all the operands:
#![allow(unused)]
fn main() {
    for _cycle in 0..cycle_limit {

        out_of_circuit_vm
            .cycle(&mut tracer)
            .expect("cycle should finish successfully");
    }
}
While doing it, we collect ‘snapshots’ - the detailed information of the state of the system between each operand.
Then we create a Vec<VmInstanceWitness> - let’s see what’s inside:
#![allow(unused)]
fn main() {
pub struct VmInstanceWitness<F: SmallField, O: WitnessOracle<F>> {
    // we need everything to start a circuit from this point of time

    // initial state (state of registers etc)
    pub initial_state: VmLocalState,
    pub witness_oracle: O,
    pub auxilary_initial_parameters: VmInCircuitAuxilaryParameters<F>,
    pub cycles_range: std::ops::Range<u32>,

    // final state for test purposes
    pub final_state: VmLocalState,
    pub auxilary_final_parameters: VmInCircuitAuxilaryParameters<F>,
}
}
With this, let’s finally start creating circuits (via create_leaf_level_circuits_and_scheduler_witness)
#![allow(unused)]

fn main() {
    for (instance_idx, vm_instance) in vm_instances_witness.into_iter().enumerate() {
         let instance = VMMainCircuit {
            witness: AtomicCell::new(Some(circuit_input)),
            config: Arc::new(geometry.cycles_per_vm_snapshot as usize),
            round_function: round_function.clone(),
            expected_public_input: Some(proof_system_input),
        };

        main_vm_circuits.push(instance);
    }
}
Prover and keys
You might have come across terms like “prover”, “keys”, and phrases like “regenerating the verification key” or “why is the key 8GB in size?” or even “the proof failed because the verification key hash was different.” It can all seem a bit complex, but don’t worry, we’re here to make it simple.
In this article, we’re going to break down the different types of keys, explain their purposes, and show you how they are created.
Our main focus will be on the boojum, a new proof system. But if you’re familiar with the old proof system, the principles we’ll discuss apply there as well.
Circuits

We offer 13 distinct types of ‘base’ circuits, including Vm, Decommitter, and others, which you can view in the full list here. In addition, there are 15 ‘recursive’ circuits. Out of these, 13 are ‘leaves,’ each corresponding to a basic type, while one is a ‘node,’ and another is a ‘scheduler’ that oversees all others. You can find more details in the full list here.
In our new proof system, there’s also a final steps known as the compressor and snark wrapper, representing an additional type of circuit.
It’s essential to note that each circuit type requires its unique set of keys.
Also, the base circuits, leaves, node and scheduler are STARK based with FRI commitments, while the snark wrapper is SNARK based with KZG commitment. This results in slightly different contents of the keys, but their role stays the same. More info about commitment schemes can be found here.
Keys
Setup keys (big, >700MB each)
The following link provides the GCS buckets containing the latest setup keys.
The primary key for a given circuit is called setup key. These keys can be substantial in size - approximately 700MB
for our circuits. Due to their size, we don’t store them directly on GitHub; instead, they need to be generated.
If you’re wondering what these setup keys contain, think of them as the ‘source code of the circuit.’
This implies that any modifications to a circuit necessitate the regeneration of the setup keys to align with the changes made.
Verification key (small, 8kb)
To generate the proof, we need the setup key. However, to verify the proof, a much smaller key, known as the
verification key, is required.
These verification keys are available on GitHub, and you can view them here. Each verification
key is stored in a separate file. They are named in the format verification_X_Y_key.json, for example,
verification_basic_4_key.json.
Comparing these files with the list of circuits mentioned earlier, you’ll notice there are 13 files named
verification_basic_Y, 15 files for leaf, one each for node and scheduler, and an additional one for wrapper.
In simpler terms, each verification key contains multiple ‘hashes’ or commitments, derived from different sections of the setup key. These hashes enable the proof verification process.
Verification key hash (very small, 32 bytes)
The hash of the verification key serves a quick reference to ensure that both parties involved are using the same keys. For instance:
- Our state keeper uses this hash to confirm that the L1 contract possesses the correct key.
- The witness generator refers to this hash to determine which jobs it should take on.
Typically, we embed these hashes directly into an environment variable for easy access. You can find an example of this here for SNARK_WRAPPER_VK_HASH.
CRS files (setup_2^26.key, 8GB files)
These keys, also referred to as Common Reference Strings (CRS), are essential for KZG commitments and were a crucial part of our old proving system.
With the introduction of the new prover, CRS is only utilized in the final step, specifically during the snark_wrapper phase. However, since the computational requirements in this stage are significantly reduced compared to the past, we can rely on a smaller CRS file, namely the setup_2^24.key.
Advanced
What’s inside the key
Setup key
Setup keys house the ProverSetupData object, which in turn contains the full Merkle tree. This is part of the reason why setup keys can be quite large in size.
To put it in simpler terms, if we consider the circuits as a massive collection of linear equations, the setup key essentially contains all the parameters for these equations. Every detail that defines and regulates these equations is stored within the setup key, making it a comprehensive and crucial component in the proving process.
Verification key
Verification keys are stored in a more accessible format, as JSON files, making it relatively easy to explore their contents.
Inside, you’ll find numerous configuration fields related to the circuit. These include the size of the circuit, the number of columns, the locations of constants, where to insert the public input, and the size of the public input, among other details.
Additionally, at the end of the file, there’s a Merkle tree hash. In our case, there are actually 16 hashes because our proving system utilizes a ‘Cap’ Merkle tree. Imagine a Merkle tree with 16 roots instead of just one; this design ensures that each Merkle path is slightly shorter, improving efficiency.
Verification key hash
As previously stated, the verification key hash is derived from hash function applied to the data contained in the verification key. You can view the exact process of how the keccak hash is computed in the Verifier.sol file.
For SNARK circuits (like snark_wrapper), we use keccak as hash function. For START based circuits, we use more circuit friendly hash function (currently Poseidon2).
Decentralization
To enable support for synchronization over p2p network, the main node needs to have the “consensus” component configured and enabled as follows:
Generating the consensus secrets
Run the following to generate consensus secrets:
docker run --entrypoint /usr/bin/zksync_external_node "matterlabs/external-node:2.0-v25.0.0" generate-secrets
That will output something like this (but with different keys obviously):
#validator:public:bls12_381:84fe19a96b6443ca7ce...98dec0870f6d8aa95c8164102f0d62e4c47e3566c4e5c32354d
validator_key: validator:secret:bls12_381:1de85683e6decbfcf6c12aa42a5c8bfa98d7ae796dee068ae73dc784a58f5213
# node:public:ed25519:acb7e350cf53e3b4c2042e2c8044734384cee51f58a0fa052fd7e0c9c3f4b20d
node_key: node:secret:ed25519:0effb1d7c335d23606f656ca1ba87566144d5af2984bd7486379d4f83a204ba2
You then have two different paths depending if your main node is using file-based or env-based configuration.
Configuring consensus
File-based configuration
If you are using the recommended file-based configuration then you’ll need to add the following information to your
general.yaml config file (see Ecosystem Configuration):
consensus:
  server_addr: '0.0.0.0:3054'
  public_addr:
    '???'
    # Address under which the node is accessible to the other nodes.
    # It can be a public domain, like `example.com:3054`, in case the main node is accessible from the internet,
    # or it can be a kubernetes cluster domain, like `server-v2-core.<cluster name>.svc.cluster.local:3054` in
    # case the main node should be only accessible within the cluster.
  debug_page_addr: '0.0.0.0:5000'
  max_payload_size: 3200000
  gossip_dynamic_inbound_limit: 10
  genesis_spec:
    chain_id: ??? # chain id
    protocol_version: 1 # consensus protocol version
    validators:
      - key: validator:public:??? # validator public key of the main node (copy this PUBLIC key from the secrets you generated)
        weight: 1
    leader: validator:public:??? # same as above - main node will be the only validator and the only leader.
    seed_peers:
      - key: 'node:public:ed25519:...' # node public key of the main node (copy this PUBLIC key from the secrets you generated)
        addr: '???' # same as public_addr above
And the secrets you generated to your secrets.yaml config file:
consensus:
  validator_key: validator:secret:???
  node_key: node:secret:???
Env-based configuration
If you are using the env-based configuration you’ll need to create a consensus_config.yaml file with the following
content:
server_addr: '0.0.0.0:3054'
public_addr:
  '???'
  # Address under which the node is accessible to the other nodes.
  # It can be a public domain, like `example.com:3054`, in case the main node is accessible from the internet,
  # or it can be a kubernetes cluster domain, like `server-v2-core.<cluster name>.svc.cluster.local:3054` in
  # case the main node should be only accessible within the cluster.
debug_page_addr: '0.0.0.0:5000'
max_payload_size: 3200000
gossip_dynamic_inbound_limit: 10
genesis_spec:
  chain_id: ??? # chain id
  protocol_version: 1 # consensus protocol version
  validators:
    - key: validator:public:??? # validator public key of the main node (copy this PUBLIC key from the secrets you generated)
      weight: 1
  leader: validator:public:??? # same as above - main node will be the only validator and the only leader.
  seed_peers:
    - key: 'node:public:ed25519:...' # node public key of the main node (copy this PUBLIC key from the secrets you generated)
      addr: '???' # same as public_addr above
And a consensus_secrets.yaml file with the with the secrets you generated previously:
validator_key: validator:secret:???
node_key: node:secret:???
Don’t forget to set secure permissions to it:
chmod 600 consensus_secrets.yaml
Then you’ll need to pass the paths to these files as env vars CONSENSUS_CONFIG_PATH and CONSENSUS_SECRETS_PATH.
Running the zksync_server
Finally, to enable the consensus component for the main node you just need to append
--components=<whatever components you were running until now>,consensus to the zksync_server command line arguments.
Gitops repo config
If you are using the matterlabs gitops repo to configure the main node, you’ll need to add this information to your
kubernetes config for the core server, server-v2-core.yaml file (see
example):
spec:
  values:
    args:
      - --components=state_keeper,consensus
    service:
      main:
        ports:
          consensus:
            enabled: true
            port: 3054
Then again you have two paths depending if the deployment is using file-based or env-based configuration. Although by default you should be using file-based configuration.
File-based configuration
Just like before you’ll add the consensus config information to the general.yaml config file (see
example).
And the secrets you generated to your whatever secrets managing system you are using (see an example here using SOPS).
consensus:
  validator_key: validator:secret:???
  node_key: node:secret:???
Env-based configuration
It is even more complicated because the consensus_config.yaml file is rendered from a helm chart. See the
example,
to see where you have to paste the content of the consensus_config.yaml file.
You also need to add the following sections to your server-v2-core.yaml file:
spec:
  values:
    persistence:
      consensus-secrets-volume:
        name: consensus-secrets # this is the name of the secret kubernetes object we defined above
        enabled: true
        type: secret
        mountPath: '/etc/consensus_secrets/'
    configMap:
      consensus:
        enabled: true
        data:
          consensus_config.yaml: <here goes the content of the consensus_config.yaml file>
    env:
      - name: CONSENSUS_CONFIG_PATH
        value: /etc/consensus_config.yaml # this is the location rendered by the helm chart, you can't change it
      - name: CONSENSUS_SECRETS_PATH
        value: /etc/consensus_secrets/.consensus_secrets.yaml
You need to embed the consensus_secrets.yaml file into a kubernetes config (see how to do it
here
and
here):
apiVersion: v1
kind: Secret
metadata:
  name: consensus-secrets
type: Opaque
stringData:
  .consensus_secrets.yaml: <here goes the content of the consensus_secrets.yaml file>
L1 Batch reversion
Motivation
In extremly rare circumstances due to an operator mistake or a bug zksync-era you may revert unexecuted L1 batches. This could be usefull if an unprovable batch would be committed or a commit tranasction failed due to mismatch between server and blockchain state.
Overview
The purpose of block reverter is to revert all stateful components state and uncommit the L1 batch/-es.
Block reverter performs following operations:
rollback-dbcommand:- revert state keeper cache
- revert vm runners’ caches
- revert all the trees
- revert Postgres state
send-eth-transactioncommand: revert L1 commitclear-failed-transactionscommand: removing failed L1 transaction from DB
Note: this doesn’t cover reverting the prover subsystem.
Procedure
- Verify that
stuck_tx_timeoutis high enough that the relevant transactions are not deleted - Stop
state_keeper,tree, all vm runners (protective-reads-writer,bwip,vm-playground) and snapshot creator - We’ll have to connect to the machines that have RocksDB local state (
treeandstate_keeper). But their components cannot function. One way to achieve this is to run respective containers with-components=http_api(-components=won’t work - we have to set something) instead of the normal components (e.g.state_keeper) - connect to the server/container that is running the tree
- Run
print-suggested-valuespay attention to log message - committed ≠ verified ≠ executed**
root@server-0:/# RUST_LOG=info ./usr/bin/block_reverter print-suggested-values \
--operator-address CHANGE_ME \
--genesis-path=/config/genesis/genesis.yaml \
--wallets-path=/config/wallets/wallets.yaml \
--config-path=/config/general/general.yaml \
--contracts-config-path=/config/contracts/contracts.yaml \
--secrets-path=/config/server/secrets.yaml

{"timestamp":"2024-04-15T17:42:40.913018741Z","level":"INFO","fields":{"message":"Last L1 batch numbers on contract: committed 517339, verified 516945, executed 516945"},"target":"zksync_core::block_reverter","filename":"core/lib/zksync_core/src/block_reverter/mod.rs","line_number":446}
Suggested values for rollback: SuggestedRollbackValues {
 last_executed_l1_batch_number: L1BatchNumber(
  516945,
 ),
 nonce: 575111,
 priority_fee: 1000000000,
}
- Rollback blocks on contract: run
send-eth-transaction(Only if revert on L1 is needed). Note: here and later--l1-batch-numberis the number of latest batch remining after revert.
root@server-0:/# RUST_LOG=info ETH_SENDER_SENDER_OPERATOR_PRIVATE_KEY=CHANGE_ME ./usr/bin/block_reverter send-eth-transaction \
--genesis-path=/config/genesis/genesis.yaml \
--wallets-path=/config/wallets/wallets.yaml \
--config-path=/config/general/general.yaml \
--contracts-config-path=/config/contracts/contracts.yaml \
--secrets-path=/config/server-v2-secrets/server-v2-secrets.yaml \
--l1-batch-number CHANGE_ME_LAST_TO_KEEP \
--nonce CHANGE_ME
Mar 27 11:50:36.347  INFO zksync_eth_client::ethereum_gateway: Operator address: 0x01239bb69d0c5f795de5c86fd00d25f9cd3b9deb
waiting for L1 transaction confirmation...
revert transaction has completed
- Run
print-suggested-valuesagain to make sure the contract has updated values: pay attention to log - now it should say thatcommittedequalsverifiedthat equalsexecuted:
{"timestamp":"2024-04-15T18:38:36.015134635Z","level":"INFO","fields":{"message":"Last L1 batch numbers on contract: committed 516945, verified 516945, executed 516945 516945"},"target":"zksync_core::block_reverter","filename":"core/lib/zksync_core/src/block_reverter/mod.rs","line_number":446}
- Rollback tree: run
rollback-dbwith--rollback-treeflag
root@server-0:/# RUST_LOG=info ./usr/bin/block_reverter rollback-db \
--genesis-path=/config/genesis/genesis.yaml \
--wallets-path=/config/wallets/wallets.yaml \
--config-path=/config/general/general.yaml \
--contracts-config-path=/config/contracts/contracts.yaml \
--secrets-path=/config/server/secrets.yaml \
--l1-batch-number CHANGE_ME_LAST_TO_KEEP \
--rollback-tree

{"timestamp":"2022-08-30T10:32:11.312280583Z","level":"INFO","fields":{"message":"Operator address: 0x85b7b2fcfd6d3e5c063e7a5063359f4e6b3fec29"},"target":"zksync_eth_client::clients::http_client"}
getting logs that should be applied to rollback state...
{"timestamp":"2022-08-30T10:32:11.554904678Z","level":"INFO","fields":{"message":"fetching keys that were changed after given block number"},"target":"zksync_dal::storage_logs_dedup_dal"}
{"timestamp":"2022-08-30T10:32:11.608430505Z","level":"INFO","fields":{"message":"loaded 2844 keys"},"target":"zksync_dal::storage_logs_dedup_dal"}
{"timestamp":"2022-08-30T10:32:12.933738644Z","level":"INFO","fields":{"message":"processed 1000 values"},"target":"zksync_dal::storage_logs_dedup_dal"}
{"timestamp":"2022-08-30T10:32:14.243366764Z","level":"INFO","fields":{"message":"processed 2000 values"},"target":"zksync_dal::storage_logs_dedup_dal"}
rolling back merkle tree...
checking match of the tree root hash and root hash from Postgres...
saving tree changes to disk...
- connect to the server/container that is running the state keeper
- Rollback state keeper cache: run
rollback-dbwith--rollback-sk-cache
root@server-0:/# RUST_LOG=info ./usr/bin/block_reverter rollback-db \
--genesis-path=/config/genesis/genesis.yaml \
--wallets-path=/config/wallets/wallets.yaml \
--config-path=/config/general/general.yaml \
--contracts-config-path=/config/contracts/contracts.yaml \
--secrets-path=/config/server/secrets.yaml \
--l1-batch-number CHANGE_ME_LAST_TO_KEEP \
--rollback-sk-cache

{"timestamp":"2022-08-30T10:37:17.99102197Z","level":"INFO","fields":{"message":"Operator address: 0x85b7b2fcfd6d3e5c063e7a5063359f4e6b3fec29"},"target":"zksync_eth_client::clients::http_client"}
getting logs that should be applied to rollback state...
{"timestamp":"2022-08-30T10:37:18.364586826Z","level":"INFO","fields":{"message":"fetching keys that were changed after given block number"},"target":"zksync_dal::storage_logs_dedup_dal"}
{"timestamp":"2022-08-30T10:37:18.386431879Z","level":"INFO","fields":{"message":"loaded 2844 keys"},"target":"zksync_dal::storage_logs_dedup_dal"}
{"timestamp":"2022-08-30T10:37:19.107738185Z","level":"INFO","fields":{"message":"processed 1000 values"},"target":"zksync_dal::storage_logs_dedup_dal"}
{"timestamp":"2022-08-30T10:37:19.823963293Z","level":"INFO","fields":{"message":"processed 2000 values"},"target":"zksync_dal::storage_logs_dedup_dal"}
opening DB with state keeper cache...
getting contracts and factory deps that should be removed...
rolling back state keeper cache...
- Rollback vm runners’ caches: connect to each vm-runner instance and run command
./usr/bin/block_reverter rollback-db \
--genesis-path=/config/genesis/genesis.yaml \
--wallets-path=/config/wallets/wallets.yaml \
--config-path=/config/general/general.yaml \
--contracts-config-path=/config/contracts/contracts.yaml \
--secrets-path=/config/server/secrets.yaml \
--l1-batch-number CHANGE_ME_LAST_TO_KEEP \
--rollback-vm-runners-cache
- Rollback postgres:
root@server-0:/# ./r/bin/block_reverter rollback-db \
--genesis-path=/config/genesis/genesis.yaml \
--wallets-path=/config/wallets/wallets.yaml \
--config-path=/config/general/general.yaml \
--contracts-config-path=/config/contracts/contracts.yaml \
--secrets-path=/config/server/secrets.yaml \
--l1-batch-number CHANGE_ME_LAST_TO_KEEP \
--rollback-postgres
-
Clear failed l1 txs
root@server-0:/# ./usr/bin/block_reverter clear-failed-transactions \ --genesis-path=/config/genesis/genesis.yaml \ --wallets-path=/config/wallets/wallets.yaml \ --config-path=/config/general/general.yaml \ --contracts-config-path=/config/contracts/contracts.yaml \ --secrets-path=/config/server/secrets.yaml \ --l1-batch-number CHANGE_ME_LAST_TO_KEEP \ -
Resume deployments for the relevant components
-
Restart API nodes to clear cache
-
⚠️ Check external nodes to see whether they have performed blocks rollback. If it they did not - do it manually
ISSUES
- If you faced issues with bootloader e.g:
The bootloader failed to set previous block hash. Reason: The provided block number is not correct
You have to remove State Keeper cache. Run server-core in a safe regime. (see the first steps of this document). Login to the server and remove state-keeper files
root@server-0:/# rm -rf /db/state_keeper/
Contract Deployment Allowlist
This module restricts contract deployments on zkSync Era to a predefined list of approved addresses.
Configuration
Configure via api.web3_json_rpc.deployment_allowlist in your node’s YAML:
api:
  web3_json_rpc:
    deployment_allowlist:
      http_file_url: "https://example.com/allowlist.json"
      refresh_interval_secs: 60
http_file_url(required): HTTP(S) URL to the allowlist JSON.refresh_interval_secs(optional): Refresh interval in seconds (default: 300).
To disable, set:
api:
  web3_json_rpc:
    deployment_allowlist: {}
Allowlist Format
The JSON served at the specified URL file must contain:
{
  "addresses": [
    "0x1234...abcd",
    "0xbeef...dead"
  ]
}
- Served as
application/json. - ETag headers supported (optional).
How Allowlist Enforcement Works
When a transaction is submitted, the WhitelistedDeployPoolSink inspects the virtual machine (VM) execution output to
determine if it includes any contract deployments.
Detection Flow
-
The VM emits an event for each contract deployment:
ContractDeployed(address deployer, bytes32 bytecodeHash, address contractAddress)
-
These events are parsed from the
execution_output.eventsfield. -
The transaction initiator is checked:
If the initiator is in the allowlist, all deployments in the transaction are allowed.
This enables nested deployments of any depth from allowlisted addresses.
The transaction is forwarded to the mempool via
MasterPoolSink. -
If the initiator is not allowlisted and deployment events are found:
- The deployer address (from topic[1]) is extracted.
- The address is checked against the current in-memory allowlist (
SharedAllowList).
A. If the deployer is not in the allowlist:
- The transaction is rejected with a
DeployerNotInAllowListerror. - A log is written with the deployer address and transaction hash.
B. If all deployments are allowed:
- The transaction is forwarded to the mempool via
MasterPoolSink.
Example Check (Simplified)
-
If transaction initiator is allowlisted → allow all deployments
-
Otherwise, for each deployment event detected → extract deployer address
- Check:
allowlist.contains(deployer_address) - If not found → reject transaction
- Otherwise → forward to mempool
- Check:
Behavior
- On tx submission:
- If tx initiator is allowlisted, all deployments are permitted regardless of nested depth
- Otherwise, each contract deployer must be individually allowlisted
- If not permited → tx is rejected.
- On refresh: allowlist is reloaded via HTTP. Skipped if
304 Not Modified.
ETag Support
To reduce unnecessary network usage, the allowlist fetcher supports HTTP ETag headers:
-
When the allowlist is first fetched, the response’s
ETagheader is cached. -
On subsequent requests, the client includes the header:
If-None-Match: “
” -
If the allowlist has not changed, the server responds with:
304 Not Modified
and the in-memory list remains unchanged.
Notes
- ETag support is optional but recommended.
- If the server does not return an
ETag, the allowlist will be re-fetched and re-parsed every interval. - The ETag value is stored in memory only (not persisted across restarts).
Interop basics
This guide explains the basic process of using the InteropMessage interface from protocol version v29. With this interface, a message is sent from one chain (chain A) and then verified on another chain (chain B).
Note: This interface only broadcasts messages. It does not include features such as specifying a destination or replay protection, which are available in higher-level interfaces.
Preparation
Setup chains
Follow the instructions at: launch doc
This will help you set up the Era chain and the associated gateway. In this example, we will send and verify the message on Era. If you prefer to test on another chain (like era2), launch a new chain following the guide above and migrate it to the gateway.
Fund an Account
Give funds to an account on your local Era using the following commands:
zkstack dev rich-account
ACCOUNT="0x36615Cf349d7F6344891B1e7CA7C72883F5dc049"
PRIVATE_KEY="0x7726827caac94a7f9e1b160f7ea819f172f7b6f9d2a97f992c38edeab82d4110"
Sending a Message
While messages are usually sent by contracts, you can send one directly using:
cast send -r http://localhost:3050 0x0000000000000000000000000000000000008008 "sendToL1(bytes)" "0x1234" --private-key $PRIVATE_KEY
Here, 0x...8008 is the L1Messenger, a special system contract. Remember the transaction hash, as we’ll use it in
commands below.
Next, retrieve the interop proof from the sequencer (replace the transaction hash with your own). If you keep getting ‘null’ answers, please wait a while, as the sequencer has to seal and commit the batch before this data can be returned.
curl --request POST \
    --url http://localhost:3050/ \
    --header 'Content-Type: application/json' \
    --data '{
            "jsonrpc": "2.0",
            "id": 1,
            "method": "zks_getL2ToL1LogProof",
            "params": [
                "0xc9f09ef3cf6c31fe9f1376845a2900da7b68e6f31db1c10c90d965ec8a8a76d2", 0, "proof_based_gw"
            ]
        }'
The command returns a proof, that will look like this:
{
  "jsonrpc": "2.0",
  "id": 1,
  "result": {
    "proof": [
      "0x010f050000000000000000000000000000000000000000000000000000000000",
      "0x72abee45b59e344af8a6e520241c4744aff26ed411f4c4b00f8af09adada43ba",
      "0xc3d03eebfd83049991ea3d3e358b6712e7aa2e2e63dc2d4b438987cec28ac8d0",
      "0xe3697c7f33c31a9b0f0aeb8542287d0d21e8c4cf82163d0c44c7a98aa11aa111",
      "0x199cc5812543ddceeddd0fc82807646a4899444240db2c0d2f20c3cceb5f51fa",
      "0xe4733f281f18ba3ea8775dd62d2fcd84011c8c938f16ea5790fd29a03bf8db89",
      "0x1798a1fd9c8fbb818c98cff190daa7cc10b6e5ac9716b4a2649f7c2ebcef2272",
      "0x66d7c5983afe44cf15ea8cf565b34c6c31ff0cb4dd744524f7842b942d08770d",
      "0xb04e5ee349086985f74b73971ce9dfe76bbed95c84906c5dffd96504e1e5396c",
      "0xac506ecb5465659b3a927143f6d724f91d8d9c4bdb2463aee111d9aa869874db",
      "0x124b05ec272cecd7538fdafe53b6628d31188ffb6f345139aac3c3c1fd2e470f",
      "0xc3be9cbd19304d84cca3d045e06b8db3acd68c304fc9cd4cbffe6d18036cb13f",
      "0xfef7bd9f889811e59e4076a0174087135f080177302763019adaf531257e3a87",
      "0xa707d1c62d8be699d34cb74804fdd7b4c568b6c1a821066f126c680d4b83e00b",
      "0xf6e093070e0389d2e529d60fadb855fdded54976ec50ac709e3a36ceaa64c291",
      "0xe4ed1ec13a28c40715db6399f6f99ce04e5f19d60ad3ff6831f098cb6cf75944",
      "0x0000000000000000000000000000000000000000000000000000000000000015",
      "0x156467afe10e8eb1dcac04cca213c53d4bade9d73edfe9410ea45c86ebd9804e",
      "0xcc4c41edb0c2031348b292b768e9bac1ee8c92c09ef8a3277c2ece409c12d86a",
      "0x183a40fea23b03351928919261dfc02e45b94b564e263d339a601b9740112ccc",
      "0x4cd95f8962e2e3b5f525a0f4fdfbbf0667990c7159528a008057f3592bcb2c06",
      "0x112038ecbdf21c5fc2ef97d9ec047402bba05d6ff2aa1b304dcfac974ebaa109",
      "0x0000000000000000000000000000001900000000000000000000000000000003",
      "0x00000000000000000000000000000000000000000000000000000000000001fa",
      "0x0102000100000000000000000000000000000000000000000000000000000000",
      "0xf84927dc03d95cc652990ba75874891ccc5a4d79a0e10a2ffdd238a34a39f828",
      "0x2c21d37d09509f7ccb3d7d93c86ff4d7b29246113b0032dec9688c9e119d6872"
    ],
    "id": 0,
    "root": "0xeb6861fa2f2fd60c93dba1343bf85e2312811fd23549b3df2b8017102430f086"
  }
}
getL2toL1LogProof can return different proof types depending on the interop mode specified. Currently, only “proof_based_gw” is supported.
The second argument (0) is the index of the message - if your transaction created multiple interop messages, you have to select the correct one. You can figure out the correct one, by looking at the event logs from the transaction. In our case, we published just 1 interop transation from this method, so we can keep it at 0th.
Receiving a Message
On the destination chain, a contract usually calls the L2_MESSAGE_VERIFICATION_ADDRESS (at 0x...10009) with the
proof. You can also call the method manually:
cast call 0x0000000000000000000000000000000000010009 \
    "proveL2MessageInclusionShared(uint256,uint256,uint256,(uint16,address,bytes),bytes32[])" \
    271 \
    22 \
    0 \
    "(0,0x36615Cf349d7F6344891B1e7CA7C72883F5dc049,0x1234)" \
    "["0x010f050000000000000000000000000000000000000000000000000000000000","0x72abee45b59e344af8a6e520241c4744aff26ed411f4c4b00f8af09adada43ba","0xc3d03eebfd83049991ea3d3e358b6712e7aa2e2e63dc2d4b438987cec28ac8d0","0xe3697c7f33c31a9b0f0aeb8542287d0d21e8c4cf82163d0c44c7a98aa11aa111","0x199cc5812543ddceeddd0fc82807646a4899444240db2c0d2f20c3cceb5f51fa","0xe4733f281f18ba3ea8775dd62d2fcd84011c8c938f16ea5790fd29a03bf8db89","0x1798a1fd9c8fbb818c98cff190daa7cc10b6e5ac9716b4a2649f7c2ebcef2272","0x66d7c5983afe44cf15ea8cf565b34c6c31ff0cb4dd744524f7842b942d08770d","0xb04e5ee349086985f74b73971ce9dfe76bbed95c84906c5dffd96504e1e5396c","0xac506ecb5465659b3a927143f6d724f91d8d9c4bdb2463aee111d9aa869874db","0x124b05ec272cecd7538fdafe53b6628d31188ffb6f345139aac3c3c1fd2e470f","0xc3be9cbd19304d84cca3d045e06b8db3acd68c304fc9cd4cbffe6d18036cb13f","0xfef7bd9f889811e59e4076a0174087135f080177302763019adaf531257e3a87","0xa707d1c62d8be699d34cb74804fdd7b4c568b6c1a821066f126c680d4b83e00b","0xf6e093070e0389d2e529d60fadb855fdded54976ec50ac709e3a36ceaa64c291","0xe4ed1ec13a28c40715db6399f6f99ce04e5f19d60ad3ff6831f098cb6cf75944","0x0000000000000000000000000000000000000000000000000000000000000015","0x156467afe10e8eb1dcac04cca213c53d4bade9d73edfe9410ea45c86ebd9804e","0xcc4c41edb0c2031348b292b768e9bac1ee8c92c09ef8a3277c2ece409c12d86a","0x183a40fea23b03351928919261dfc02e45b94b564e263d339a601b9740112ccc","0x4cd95f8962e2e3b5f525a0f4fdfbbf0667990c7159528a008057f3592bcb2c06","0x112038ecbdf21c5fc2ef97d9ec047402bba05d6ff2aa1b304dcfac974ebaa109","0x0000000000000000000000000000003100000000000000000000000000000001","0x00000000000000000000000000000000000000000000000000000000000001fa","0x0101000100000000000000000000000000000000000000000000000000000000","0xf84927dc03d95cc652990ba75874891ccc5a4d79a0e10a2ffdd238a34a39f828"]" \
    --rpc-url http://localhost:3050
A successful verification will return a “true” value (or 0x00...01), confirming that the InteropMessage was correctly
received.
The parameters used in the above call are as follows:
- First argument (271): Chain ID of the source chain.
- Second argument (22): Batch number from the source chain.
- Third argument (0): Transaction index within the batch.
- Fourth argument: A tuple containing the index in the batch (again), the interop sender, and the interop payload.
- Fifth argument: The proof obtained from
zks_getL2ToL1LogProof.
To determine the batch number and transaction index, fetch the receipt of your original transaction with:
cast receipt -r http://localhost:3050 0xc9f09ef3cf6c31fe9f1376845a2900da7b68e6f31db1c10c90d965ec8a8a76d2
Look for the following details in the receipt output:
blockNumber             43
...
l1BatchNumber           "0x16"    (which is 22 in decimal)
l1BatchTxIndex          "0x0"
Debugging
If the proveL2MessageInclusionShared method returns false (or 0x0), consider the following checks:
1. Message Not Propagated Yet
-
Sender:
The message might not have been sent to the gateway if the transaction is still pending (messages are queued until execution). Verify using the batch number. For instance, using the batch number (0x16 == 22):curl --request POST \ --url localhost:3050 \ --header 'Content-Type: application/json' \ --data '{ "jsonrpc": "2.0", "id": 1, "method": "zks_getL1BatchDetails", "params": [22] }'Look for the
executeTxHashfield. If it exists, the message was sent to the gateway. If it’s missing or zero, the sequencer has not finalized the batch. -
Receiver:
On the destination chain, check theInteropRootStoragecontract to see if the latest gateway batch has been fetched:cast call -r http://localhost:3050 0x0000000000000000000000000000000000010008 "interopRoots(uint256,uint256)" 506 49Here, 506 is the gateway’s chain ID and 49 is the gateway’s block number. A return value of 0 indicates the block root was not fetched yet.
2. Message Propagated but Proof Failing
If you are certain the message was propagated, ensure the following:
- You are using the correct indexes when there are multiple transactions in a batch or multiple messages within a transaction.
- Use the helper tool available at: zksync tools
This tool helps you view and prove interop messages with the following commands:
cargo run show-interop-message --source-rpc http://localhost:3050 --source-tx $TX_ID
cargo run prove-interop-message --source-rpc http://localhost:3050 --source-tx $TX_ID --target-rpc http://localhost:3050
These steps should help you troubleshoot and verify that the interop messages are sent and received correctly.
Advanced debugging
Debugging backend in vscode
Our backend takes configuration from environment variables, so before starting the debugging, we must make sure that they are properly set.
You should create the following file in your $workspaceFolder/.vscode/ called prelaunch.py:
import os
import lldb

# Read the .env file and store the key-value pairs in a array with format ["key=value"]
env_array = []
with open(os.path.join("etc/env/l2-inits/dev.init.env")) as f:
    for line in f:
        if line.strip() and line.strip()[0] != "#":
            env_array.append(line.strip())

with open(os.path.join("etc/env/targets/dev.env")) as f:
    for line in f:
        if line.strip() and line.strip()[0] != "#":
            env_array.append(line.strip())

target = lldb.debugger.GetSelectedTarget()

launch_info = target.GetLaunchInfo()
launch_info.SetEnvironmentEntries(env_array, True)
target.SetLaunchInfo(launch_info)
This file will load environment variables from dev.init.env and dev.env before starting the binary (notice that we
do this in a particular order, as values in dev.env should be overwriting the ones in dev.init.env).
Afterwards you need to add something like this to your launch.json:
 "configurations": [
        {
            "type": "lldb",
            "request": "launch",
            "name": "Debug executable 'zksync_server' DEV ENV",
            "cargo": {
                "args": [
                    "build",
                    "--bin=zksync_server",
                    "--package=zksync_core"
                ],
                "filter": {
                    "name": "zksync_server",
                    "kind": "bin"
                }
            },
            "args": [],
            "cwd": "${workspaceFolder}",
            "preRunCommands": [
                "command script import ${workspaceFolder}/.vscode/prelaunch.py"
            ]
        },
        ...
    ]
Debugging contracts in vscode (using hardhat)
Assuming that you created project in hardhat, that you’d normally test with hardhat test - you also also test it with
vscode (which is super powerful - especially as you can have both binaries’ debug sessions running in VSCode at the same
time).
in package.json, make sure to have:
"scripts": {
        //...
        "test": "hardhat test",
        //...
    }
and then in VSCode’s launch.json:
{
  "version": "0.2.0",
  "configurations": [
    {
      "type": "node",
      "request": "launch",
      "name": "Launch Program",
      "console": "integratedTerminal",
      "runtimeExecutable": "yarn",
      "runtimeArgs": ["test", "${workspaceFolder}/test/try.js"]
    }
  ]
}
where test/try.js is your test code.
Performance analysis of rust binaries (flame graphs)
If you’d like to analyze the CPU performance of your rust binary, you can use ‘perf’ to compute the flame graphs.
First - run the binary with perf enabled (this will make the binary a little bit slower):
sudo perf record -F500 --call-graph=dwarf,65528 /path/to/binary --other --flags
(you can also connect to already running binary - by providing its PID with -p option)
When you’re done collecting records, you have to convert them into flame-graph friendly format, by running:
sudo perf script -F +pid > perfbench.script
This will create the perfbench.script file, that you can later upload to https://profiler.firefox.com/ and see the detailed flame graph.
Debugging/understanding/tracing zkEVM assembly
Currently this is quite a complex process, but we’re working on making it a little bit smoother.
You start by installing the ‘compiler-tester’ repo (see its README.md instructions for details) - it is quite heavy as it needs the LLVM etc etc.
Afterwards, you can look at one of the tests (for example tests/solidity/simple/default.sol).
//! { "cases": [ {
//!     "name": "first",
//!     "inputs": [
//!         {
//!             "method": "first",
//!             "calldata": [
//!             ]
//!         }
//!     ],
//!     "expected": [
//!         "42"
//!     ]
//! }, ] }

// SPDX-License-Identifier: MIT

pragma solidity >=0.4.16;

contract Test {
  function first() public pure returns (uint64) {
    uint64 result = 42;
    return result;
  }
}
As you can see - it is self-contained - it has the solidity code at the bottom, and the top comments are used to define the test case - and expected result.
You can run it by calling:
cargo run --release --bin compiler-tester -- -DT \
        --path='tests/solidity/simple/default.sol' \
        --mode='Y+M3B3 0.8.19'
And then collect the detailed tracing information from trace directory. You’ll notice that you have 2 files for each test - one covering the deployment, and one covering the test run.
You can take test run one and upload it to our debugger to see detailed zkAssembler and state of memory, heap, stack and registers at each execution step.
Docker and CI
How to efficiently debug CI issues locally.
This document will be useful in case you struggle with reproducing some CI issues on your local machine.
In most cases, this is due to the fact that your local machine has some arifacts, configs, files that you might have set in the past, that are missing from the CI.
Basic docker commands
docker ps- prints the list of currently running containersdocker run- starts a new docker containerdocker exec- connects to a running container and executes the command.docker kill- stops the container.docker cp- allows copying files between your system and docker container.
Usually docker containers have a specific binary that they run, but for debugging we often want to start a bash instead.
The command below starts a new docker containers, and instead of running its binary - runs /bin/bash in interactive
mode.
docker run -it matterlabs/zk-environment:latest2.0-lightweight-nightly /bin/bash
Connects to already running job, and gets you the interactive shell.
docker exec -i -it local-setup-zksync-1 /bin/bash
Debugging CI
Many of the tests require postgres & reth - you initialize them with:
docker compose up -d
You should see something like this:
[+] Running 3/3
 ⠿ Network zksync-era_default       Created   0.0s
 ⠿ Container zksync-era-postgres-1  Started   0.3s
 ⠿ Container zksync-era-reth-1      Started   0.3s
Start the docker with the ‘basic’ imge
# We tell it to connect to the same 'subnetwork' as other containers (zksync-era_default).
# the IN_DOCKER variable is changing different urls (like postgres) from localhost to postgres - so that it can connect to those
# containers above.
docker run --network zksync-era_default -e IN_DOCKER=1   -it matterlabs/zk-environment:latest2.0-lightweight-nightly /bin/bash
# and then inside, run:

git clone https://github.com/matter-labs/zksync-era.git .
git checkout YOUR_BRANCH
zk
After this, you can run any commands you need.
When you see a command like ci_run zkstack dev contracts in the CI - this simply means that it executed
zkstack dev contracts inside that docker container.
IMPORTANT - by default, docker is running in the mode, where it does NOT persist the changes. So if you exit that
shell, all the changes will be removed (so when you restart, you’ll end up in the same pristine condition). You can
‘commit’ your changes into a new docker image, using docker commit XXX some_name, where XXX is your container id from
docker ps. Afterwards you can ‘start’ this docker image with docker run ... some_name.
Node Documentation
The Node (sometimes referred to as External Node or EN) is a read-only replica of the main node.
What is the Node
The Node is a read-replica of the main (centralized) node that can be run by external parties. It functions by receiving blocks from the given ZK Stack chain and re-applying transactions locally, starting from the genesis block. The Node shares most of its codebase with the main node. Consequently, when it re-applies transactions, it does so exactly as the main node did in the past.
It has three modes of initialization:
- recovery from genesis (Not supported on ZKsync Era), in Ethereum terms this corresponds to archival node, this option is slower than recovery from DB dump, but is the easiest way to spin up new Node.
- recovery from a DB dump, in Ethereum terms this corresponds to archival node.
- recovery from a snapshot, in Ethereum terms this corresponds to light node, such nodes will only have access to transactions data from after the node was initialized. The database can be pruned on such nodes.
High-level overview
At a high level, the Node can be seen as an application that has the following modules:
- API server that provides the publicly available Web3 interface.
- Consensus layer (ZKsync Era only for now) that interacts with the peer network and retrieves transactions and blocks to re-execute.
- Sequencer component that actually executes and persists transactions received from the synchronization layer.
- Several checker modules that ensure the consistency of the Node state.
With the EN, you are able to:
- Locally recreate and verify a ZK Stack chain’s, for example ZKsync Era’s mainnet/testnet state.
- Interact with the recreated state in a trustless way. The validity is locally verified.
- Use the Web3 API without having to query the main node.
- Send L2 transactions (that will be proxied to the main node).
With the EN, you can not:
- Create L2 blocks or L1 batches on your own.
- Generate proofs.
- Submit data to L1.
A more detailed overview of the Node’s components is provided in the components section.
API overview
API exposed by the Node strives to be Web3-compliant. If some method is exposed but behaves differently compared to Ethereum, it should be considered a bug. Please report such cases.
eth namespace
Data getters in this namespace operate in the L2 space: require/return L2 block numbers, check balances in L2, etc.
Available methods:
| Method | Notes |
|---|---|
eth_blockNumber | |
eth_chainId | |
eth_call | |
eth_estimateGas | |
eth_gasPrice | |
eth_newFilter | Maximum amount of installed filters is configurable |
eth_newBlockFilter | Same as above |
eth_newPendingTransactionsFilter | Same as above |
eth_uninstallFilter | |
eth_getLogs | Maximum amount of returned entities can be configured |
eth_getFilterLogs | Same as above |
eth_getFilterChanges | Same as above |
eth_getBalance | |
eth_getBlockByNumber | |
eth_getBlockByHash | |
eth_getBlockTransactionCountByNumber | |
eth_getBlockTransactionCountByHash | |
eth_getCode | |
eth_getStorageAt | |
eth_getTransactionCount | |
eth_getTransactionByHash | |
eth_getTransactionByBlockHashAndIndex | |
eth_getTransactionByBlockNumberAndIndex | |
eth_getTransactionReceipt | |
eth_protocolVersion | |
eth_sendRawTransaction | |
eth_syncing | Node is considered synced if it’s less than 11 blocks behind the main node. |
eth_coinbase | Always returns a zero address |
eth_accounts | Always returns an empty list |
eth_getCompilers | Always returns an empty list |
eth_hashrate | Always returns zero |
eth_getUncleCountByBlockHash | Always returns zero |
eth_getUncleCountByBlockNumber | Always returns zero |
eth_mining | Always returns false |
PubSub
Only available on the WebSocket servers.
Available methods:
| Method | Notes |
|---|---|
eth_subscribe | Maximum amount of subscriptions is configurable |
eth_subscription |
net namespace
Available methods:
| Method | Notes |
|---|---|
net_version | |
net_peer_count | Always returns 0 |
net_listening | Always returns false |
web3 namespace
Available methods:
| Method | Notes |
|---|---|
web3_clientVersion |
debug namespace
The debug namespace gives access to several non-standard RPC methods, which will allow developers to inspect and debug
calls and transactions.
This namespace is disabled by default and can be configured via setting EN_API_NAMESPACES as described in the
example config.
The traces will only start being generated for blocks synced after the debug namespace is enabled, they will not be backfilled! The only way to get traces for historical blocks is to fully re-sync the node
Available methods:
| Method | Notes |
|---|---|
debug_traceBlockByNumber | |
debug_traceBlockByHash | |
debug_traceCall | |
debug_traceTransaction |
zks namespace
This namespace contains rollup-specific extensions to the Web3 API. Note that only methods specified in the documentation are considered public. There may be other methods exposed in this namespace, but undocumented methods come without any kind of stability guarantees and can be changed or removed without notice.
Always refer to the documentation linked above to see the list of stabilized methods in this namespace.
en namespace
This namespace contains methods that Nodes call on the main node while syncing. If this namespace is enabled, other ENs can sync from this node.
Quick Start
Prerequisites
Install docker compose and Docker
Running ZKsync node locally
These commands start ZKsync Node locally inside docker.
For adjusting the Dockerfiles to use them with other chains setup using ZK Stack, see setup_for_other_chains
If you want to run Node for a chain different than ZKsync ERA, you can ask the company hosting the chains for the ready docker-compose files.
To start a mainnet instance, run:
cd docker-compose-examples
sudo docker compose --file mainnet-external-node-docker-compose.yml up
To reset its state, run:
cd docker-compose-examples
sudo docker compose --file mainnet-external-node-docker-compose.yml down --volumes
To start a testnet instance, run:
cd docker-compose-examples
sudo docker compose --file testnet-external-node-docker-compose.yml up
To reset its state, run:
cd docker-compose-examples
sudo docker compose --file testnet-external-node-docker-compose.yml down --volumes
Observability
You can see the status of the node (after recovery) in local grafana dashboard. You can also access a debug page with more information about the node here.
The HTTP JSON-RPC API can be accessed on port 3060 and WebSocket API can be accessed on port 3061.
The node will recover from a snapshot on it’s first run, this may take up to 10h. Before the recovery is finished, the API server won’t serve any requests.
If you need access to historical transaction data, please use recovery from DB dumps (see Advanced setup section)
System Requirements
Those are requirements for nodes that use snapshots recovery and history pruning (the default for docker-compose setup).
For requirements for nodes running from DB dump see the running section. DB dumps are a way to start Node with full historical transactions history.
For nodes with pruning disabled, expect the storage requirements on mainnet to grow at 1TB per month. If you want to stop historical DB pruning you can read more about this in the pruning section.
For chains other than ZKSync Era, the system requirements can be slightly lower (CPU and RAM) or even much lower (storage), depending on the chain.
- 32 GB of RAM and a relatively modern CPU
- 50 GB of storage for testnet nodes
- 500 GB of storage for mainnet nodes
- 100 Mbps connection (1 Gbps+ recommended)
Advanced setup
If you need monitoring, backups, to recover from DB dump or a more customized PostgreSQL settings, etc, please see: ansible-en-role repo
Node Configuration
This document outlines various configuration options for the EN. Currently, the Node requires the definition of numerous environment variables. To streamline this process, we provide prepared configs for the ZKsync Era - for both mainnet and testnet. You can use these files as a starting point and modify only the necessary sections.
You can also see directory docker-compose-examples if you want to run external-node on your machine with recommended default settings.
Important Configuration Notes
Execution Delay
The execution delay (the time L1 batches must wait before being executed) is now dynamically read from the ValidatorTimelock contract via multicall. The system automatically queries the contract to determine the current execution delay setting.
Database
The Node uses two databases: PostgreSQL and RocksDB.
PostgreSQL serves as the main source of truth in the EN, so all the API requests fetch the state from there. The
PostgreSQL connection is configured by the DATABASE_URL. Additionally, the DATABASE_POOL_SIZE variable defines the
size of the connection pool.
RocksDB is used in components where IO is a bottleneck, such as the State Keeper and the Merkle tree. If possible, it is
recommended to use an NVME SSD for RocksDB. RocksDB requires two variables to be set: EN_STATE_CACHE_PATH and
EN_MERKLE_TREE_PATH, which must point to different directories. When running a Node inside Docker Compose, Kubernetes
etc., these paths should point to dirs in a persistent volume (or 2 separate volumes). Persistent volumes must be
exclusive to a node; i.e., they must not be shared among nodes concurrently or transferred from one node to another.
Failing to adhere to this rule may result in RocksDB corruption or
the Node crashing on start.
L1 Web3 client
Node requires a connection to an Ethereum node. The corresponding env variable is EN_ETH_CLIENT_URL. Make sure to set
the URL corresponding to the correct L1 network (L1 mainnet for L2 mainnet and L1 sepolia for L2 testnet).
Note: Currently, the Node makes 2 requests to the L1 per L1 batch, so the Web3 client usage for a synced node should not be high. However, during the synchronization phase the new batches would be persisted on the Node quickly, so make sure that the L1 client won’t exceed any limits (e.g. in case you use Infura).
Exposed ports
The dockerized version of the server exposes the following ports:
- HTTP JSON-RPC: 3060
- WebSocket JSON-RPC: 3061
- Prometheus listener: 3322
- Healthcheck server: 3081
While the configuration variables for them exist, you are not expected to change them unless you want to use the Node outside provided Docker environment (not supported at the time of writing).
API limits
There are variables that allow you to fine-tune the limits of the RPC servers, such as limits on the number of returned entries or the limit for the accepted transaction size. Provided files contain sane defaults that are recommended for use, but these can be edited, e.g. to make the Node more/less restrictive.
Some common API limits config:
EN_MAX_RESPONSE_BODY_SIZE_MB(default is 10 i.e. 10MB) controls max size of a single response. Hitting the limit will result in errors similar to: “Response is too big (…)”.EN_MAX_RESPONSE_BODY_SIZE_OVERRIDES_MBoverrides max response size for specific RPC methods. E.g., setting this var toeth_getLogs=100,eth_getBlockReceipts=Nonesets max response size foreth_getLogsto 100MB and disables size limiting foreth_getBlockReceipts, while other RPC methods will use theEN_MAX_RESPONSE_BODY_SIZE_MBsetting.EN_REQ_ENTITIES_LIMIT(default 10,000) controls max possible limit of entities to be requested at once. Hitting the limit will result in errors similar to: “Query returned more than 10000 results (…)”
Gas Cap for eth_call
The external node supports configuring a gas cap for eth_call requests, similar to geth’s --rpc.gascap option. This
limits the maximum amount of gas that can be used in a single eth_call, preventing resource exhaustion from
computationally expensive calls.
Configuration:
Add the following to your node configuration YAML file:
api:
  web3_json_rpc:
    eth_call_gas_cap: 50000000 # 50M gas limit (optional)
Gas cap behavior:
- If not specified: Uses the protocol version-based gas limit (recommended default)
- If set to 0: No gas limit (unlimited gas, use with caution)
- If set to a positive value: Caps
eth_callgas usage to this limit
The node will use min(requested_gas, gas_cap) when processing eth_call requests. This ensures that even if a client
requests more gas than the cap allows, the call will be limited to the configured maximum.
Examples:
# Example 1: 10M gas cap (conservative)
api:
  web3_json_rpc:
    eth_call_gas_cap: 10000000

# Example 2: 100M gas cap (permissive)
api:
  web3_json_rpc:
    eth_call_gas_cap: 100000000

# Example 3: No gas cap (unlimited, not recommended for public nodes)
api:
  web3_json_rpc:
    eth_call_gas_cap: 0

# Example 4: Use protocol default (recommended)
api:
  web3_json_rpc:
    # eth_call_gas_cap not specified - uses protocol default
Compatibility note: This feature provides the same functionality as geth’s --rpc.gascap flag, ensuring
compatibility with existing Ethereum tooling and dApps that expect gas limiting behavior.
JSON-RPC API namespaces
There are 7 total supported API namespaces: eth, net, web3, debug - standard ones; zks - rollup-specific one;
pubsub - a.k.a. eth_subscribe; en - used by Nodes while syncing. You can configure what namespaces you want to
enable using EN_API_NAMESPACES and specifying namespace names in a comma-separated list. By default, all but the
debug namespace are enabled.
API caching
The API server performs in-memory caching of data used for VM invocations (i.e., eth_call, eth_estimateGas,
eth_sendRawTransaction methods), such as state values and bytecodes. Cache sizes have reasonable defaults, but can be
adjusted to tradeoff between performance and RAM consumption of the node.
EN_LATEST_VALUES_CACHE_SIZE_MBis the size of the latest values cache, used for VM invocations against the latest block. This is likely to be most utilized of the caches, potentially with hundreds / thousands of hits per VM invocation.EN_FACTORY_DEPS_CACHE_SIZE_MBis the size of the bytecodes (aka factory deps) cache.EN_INITIAL_WRITES_CACHE_SIZE_MBis the size of the initial writes caches. Initial write info is used as a part of the gas pricing model.
Optimizing RAM consumption
With the default config options, a node may consume large amounts of RAM (order of 32–64 GB for larger networks). This consumption can be reduced with a moderate performance tradeoff as follows.
For large networks in terms of the state (both the current state size and history), the main component consuming RAM is the Merkle tree (specifically, its RocksDB). Thus, enabling pruning and/or using snapshot recovery is an effective way to reduce RAM consumption. For example, an Era mainnet node with a 6-month pruning target should consume about 10 GB RAM (vs ~60 GB for an archive node).
For archive nodes, RAM consumption by the Merkle tree may be reduced by setting the following options:
# Disables pinning indices and filters for the Merkle tree in RAM, which can occupy a large amount of it;
# e.g., they are ~30 GB on the Era mainnet for an archive node as of May 2025.
EN_MERKLE_TREE_INCLUDE_INDICES_AND_FILTERS_IN_BLOCK_CACHE=true
# **MUST** be used together with the previous option to set the RocksDB cache size. 4–8 GB provides a reasonable performance tradeoff
# on the Era mainnet as of May 2025. On smaller networks, acceptable values may be smaller.
EN_MERKLE_TREE_BLOCK_CACHE_SIZE_MB=4096
# Limits the number of concurrently open files, which in turn influences OS-level page cache. A reasonable value
# heavily depends on the amount of data in the tree.
EN_MERKLE_TREE_MAX_OPEN_FILES=1024
These options can be used together with pruning / snapshot recovery as well, but their additional impact on RAM consumption is expected to be fairly small. The options can be changed or removed at any time; they do not require a long-term commitment or irreversible decisions, unlike enabling pruning for a node.
Logging and observability
MISC_LOG_FORMATdefines the format in which logs are shown:plaincorresponds to the human-readable format, while the other option isjson(recommended for deployments).RUST_LOGvariable allows you to set up the logs granularity (e.g. make the Node emit fewer logs). You can read about the format here.MISC_SENTRY_URLandMISC_OTLP_URLvariables can be configured to set up Sentry and OpenTelemetry exporters.- If Sentry is configured, you also have to set
EN_SENTRY_ENVIRONMENTvariable to configure the environment in events reported to sentry.
Running the Node
If you want to just run ZKSync node with recommended default setting, please see the quick start page.
This section assumes that you have prepared a configuration file as described on the previous page.
System Requirements for nodes started from DB dumps
This configuration is approximate and should be considered as minimal requirements.
- 32-core CPU
- 64GB RAM
- SSD storage (NVME recommended):
- ZKsync Sepolia Testnet - 10GB Node + 50GB PostgreSQL (at the time of writing, will grow over time, so should be constantly monitored)
- ZKsync Mainnet - 3TB Node + 8TB PostgreSQL (at the time of writing, will grow over time, so should be constantly monitored)
- 100 Mbps connection (1 Gbps+ recommended)
For smaller chains, less powerful hardware may be sufficient, especially in terms of disk space.
RAM requirements can generally be reduced with a moderate performance tradeoff. They also may be lower for non-archive nodes or nodes without a local Merkle tree.
A note about PostgreSQL storage
By far, the heaviest table to maintain is the call_traces table. This table is only required for the debug
namespace. If you want to clear some space and aren’t using the debug namespace, you can
- clear it with a simple query
DELETE FROM call_traces; - leave the
debugnamespace disabled via theEN_API_NAMESPACESenv var as described in the example config.
Infrastructure
You need to set up a PostgreSQL server, however it is out of the scope of these docs, but the popular choice is to run it in Docker. There are many of guides on that, here’s one example.
Note however that if you run PostgresSQL as a stand-alone Docker image (e.g. not in Docker-compose with a network shared
between Node and Postgres), Node won’t be able to access Postgres via localhost or 127.0.0.1 URLs. To make it work,
you’ll have to either run it with a --network host (on Linux) or use host.docker.internal instead of localhost in
the Node configuration (official docs).
Besides running Postgres, you are expected to have a DB dump from a corresponding env. You can restore it using
pg_restore -O -C <DUMP_PATH> --dbname=<DB_URL>.
You can also refer to Node configuration management blueprint for advanced DB instance configurations.
Running
Assuming you have the Node Docker image, an env file with the prepared configuration, and you have restored your DB with the pg dump, that is all you need.
Sample running command:
docker run --env-file <path_to_env_file> --mount type=bind,source=<local_rocksdb_data_path>,target=<configured_rocksdb_data_path> <image>
Helm charts and other infrastructure configuration options, if required, would be available later.
First start
When you start the node for the first time, the state in PostgreSQL corresponds to the dump you have used, but the state in RocksDB (mainly the Merkle tree) is absent. Before the node can make any progress, it has to rebuild the state in RocksDB and verify consistency. The exact time required for that depends on the hardware configuration, but it is reasonable to expect the state rebuild on the mainnet to take more than 20 hours.
Genesis synchronization
While it’s technically possible to synchronize an External Node from genesis, this process is not recommended for any users. The synchronization algorithm used for External Nodes is designed for keeping the live node up-to-date but doesn’t implement optimizations to re-execute large amounts of historical blocks. As a result, genesis synchronization on ZKsync Era can take multiple months for a single node, and it is not being continuously tested for each release. The node is guaranteed to never be in an incorrect state, but issues unrelated to correctness may occur (such as synchronization getting stuck).
The recommended ways to run the External Node are:
- Snapshot synchronization for full nodes (if you don’t need historical data).
- Restoration from a DB dump for archival nodes.
Redeploying the Node with a new PG dump
If you’ve been running the Node for some time and are going to redeploy it using a new PG dump, you should
- Stop the EN
- Remove SK cache (corresponding to
EN_STATE_CACHE_PATH) - Remove your current DB
- Restore with the new dump
- Start the EN
Monitoring the node behavior and analyzing the state it’s in is covered in the observability section.
Node Observability
The Node provides several options for setting up observability. Configuring logs and sentry is described in the configuration section, so this section focuses on the exposed metrics.
This section is written with the assumption that you’re familiar with Prometheus and Grafana.
Buckets
By default, latency histograms are distributed in the following buckets (in seconds):
[0.001, 0.005, 0.025, 0.1, 0.25, 1.0, 5.0, 30.0, 120.0]
Metrics
Node exposes a lot of metrics, a significant amount of which aren’t interesting outside the development flow. This section’s purpose is to highlight metrics that may be worth observing in the external setup.
If you are not planning to scrape Prometheus metrics, please unset EN_PROMETHEUS_PORT environment variable to prevent
memory leaking.
| Metric name | Type | Labels | Description |
|---|---|---|---|
external_node_synced | Gauge | - | 1 if synced, 0 otherwise. Matches eth_call behavior |
external_node_sync_lag | Gauge | - | How many blocks behind the main node the Node is |
external_node_fetcher_requests | Histogram | stage, actor | Duration of requests performed by the different fetcher components |
external_node_fetcher_cache_requests | Histogram | - | Duration of requests performed by the fetcher cache layer |
external_node_fetcher_miniblock | Gauge | status | The number of the last L2 block update fetched from the main node |
external_node_fetcher_l1_batch | Gauge | status | The number of the last batch update fetched from the main node |
external_node_action_queue_action_queue_size | Gauge | - | Amount of fetched items waiting to be processed |
server_miniblock_number | Gauge | stage=sealed | Last locally applied L2 block number |
server_block_number | Gauge | stage=sealed | Last locally applied L1 batch number |
server_block_number | Gauge | stage=tree_lightweight_mode | Last L1 batch number processed by the tree |
server_processed_txs | Counter | stage=mempool_added, state_keeper | Can be used to show incoming and processing TPS values |
api_web3_call | Histogram | method | Duration of Web3 API calls |
sql_connection_acquire | Histogram | - | Time to get an SQL connection from the connection pool |
Metrics can be used to detect anomalies in configuration, which is described in more detail in the next section.
Node Troubleshooting
The Node tries to follow the fail-fast principle: if an anomaly is discovered, instead of attempting state recovery, in most cases it will restart. Most of the time it will manifest as crashes, and if it happens once, it shouldn’t be treated as a problem.
However, if the node enters the crash loop or otherwise behaves unexpectedly, it may indicate either a bug in the implementation or a problem with configuration. This section tries to cover common problems.
Panics
Panics is the Rust programming language notion of irrecoverable errors, and normally if panic happens, the application will immediately crash.
- Panic matching
called Result::unwrap() on an Err value: Database(PgDatabaseError: problem communicating with the PostgreSQL, most likely some of the connections have died. - Panic matching
failed to init rocksdb: Error { message: "IO error: No space left on device: more space on SSD is required. - Anything that mentions “Poison Error”: a “secondary” panic that may occur if one of the components panicked first. If you see this panic, look for a panic that happened shortly before it to find the real cause.
Other kinds of panic aren’t normally expected. While in most cases, the state will be recovered after a restart, please report such cases to Matter Labs regardless.
Genesis Issues
On Era, a Node is supposed to start with an applied Postgres dump, or recover from a snapshot (the latter requires an opt-in by changing the node config; see the linked article for details). If you see any genesis-related errors for an Era node without snapshot recovery activated, it may mean the Node was started without an applied dump. For other networks, a Node may be able to sync from the genesis.
RocksDB Issues
When using Docker Compose, Kubernetes or other container orchestrators to run a Node, it is important to follow the rules regarding persistent volumes for RocksDB instances. Volumes must be attached to a specific Node (effectively, to a specific Postgres database). Volumes must not be shared across nodes at the same time (this may lead to RocksDB corruption), and must not be transferred from one node to another.
A symptom of incorrect persistent volume usage is a Node crashing on start with an error like this appearing in the logs:
ERROR zksync_node_framework::service: Task oneshot_runner failed: Oneshot task state_keeper/rocksdb_catchup_task failed
Caused by:
    0: Failed to catch up RocksDB to Postgres
    1: L1 batch number in state keeper cache (5153) is greater than the requested batch number (4652)
(Obviously, L1 batch numbers may differ.)
To fix the issue, allocate an exclusive persistent volume for the Node, ensure that the volume is empty and restart the Node.
Logs
Note: logs with the error level are reported to Sentry if it’s configured. If you notice unneeded alerts there that
you don’t consider actionable, you may disable logs for a component by tweaking the configuration.
| Level | Log substring | Interpretation |
|---|---|---|
| ERROR | “One of the tokio actors unexpectedly finished” | One of the components crashed, and the node is restarting. |
| WARN | “Stop signal received, | Satellite log of the message above |
| ERROR | “A lot of requests to the remote API failed in a row” | The remote API used to update token lists is probably down. Logs should disappear once API is available. |
| WARN | “Server returned an error status code: 429” | The main API rate limits are too strict. Contact Matter Labs to discuss the situation. |
| WARN | “Following transport error occurred” | There was a problem with fetching data from the main node. |
| WARN | “Unable to get the gas price” | There was a problem with fetching data from the main node. |
| WARN | “Consistency checker error” | There are problems querying L1, check the Web3 URL you specified in the config. |
| WARN | “Reorg detected” | Reorg was detected on the main node, the Node will rollback and restart |
Same as with panics, normally it’s only a problem if a WARN+ level log appears many times in a row.
Metrics anomalies
The following common anomalies can be discovered by observing metrics after the tree is rebuilt to match the DB snapshot:
external_node_sync_lagdoesn’t decrease andexternal_node_action_queue_action_queue_sizeis near 0. Cause: The fetcher can’t fetch new blocks quickly enough. Most likely, the network connection is too slow.external_node_sync_lagdoesn’t decrease andexternal_node_action_queue_action_queue_sizeis at some high level. Cause: The State Keeper doesn’t process fetched data quickly enough. Most likely, a more powerful CPU is needed.sql_connection_acquireskyrockets. Probably, there are not enough connections in the pool to match the demand.
Manual revert
Sometimes, it may be useful to revert the node state manually, as opposed to the automated revert performed by the reorg detector. For example, if a node has missed a mandatory update, it may produce block processing artifacts (e.g., events) diverging from the expected ones that are not caught by the reorg detector.
To perform a manual revert, ensure that the node is stopped (i.e., its Postgres and RocksDB instances are unused), and
execute the node binary with revert $l1_batch_number args. (If the node uses file-based configuration, the
corresponding args must be provided as well, as during the ordinary node run.) Here, $l1_batch_number is the number of
the last L1 batch to be retained by the node after the revert. The node will execute a revert and exit; after this, it
can be started normally.
Do not revert the node state by manually removing rows from Postgres. The node uses RocksDB instances (for the Merkle tree and state keeper cache) besides Postgres, which are expected to be in sync with Postgres at all times. If this invariant breaks, the RocksDB instances may become irreperably broken, which would require rebuilding the Merkle tree / state keeper cache from scratch. This would result in significant performance degradation (for the cache) / delays in block processing (for the Merkle tree).
Node components
This section contains an overview of the EN’s main components.
API
The Node can serve both the HTTP and the WS Web3 API, as well as PubSub. Whenever possible, it provides data based on the local state, with a few exceptions:
- Submitting transactions: Since it is a read replica, submitted transactions are proxied to the main node, and the response is returned from the main node. -06_components.md Querying transactions: The Node is not aware of the main node’s mempool, and it does not sync rejected transactions. Therefore, if a local lookup for a transaction or its receipt fails, the Node will attempt the same query on the main node.
Apart from these cases, the API does not depend on the main node. Even if the main node is temporarily unavailable, the Node can continue to serve the state it has locally.
Fetcher
The Fetcher component is responsible for maintaining synchronization between the Node and the main node. Its primary task is to fetch new blocks in order to update the local chain state. However, its responsibilities extend beyond that. For instance, the Fetcher is also responsible for keeping track of L1 batch statuses. This involves monitoring whether locally applied batches have been committed, proven, or executed on L1.
It is worth noting that in addition to fetching the state, the Node also retrieves the L1 gas price from the main node for the purpose of estimating fees for L2 transactions (since this also happens based on the local state). This information is necessary to ensure that gas estimations are performed in the exact same manner as the main node, thereby reducing the chances of a transaction not being included in a block.
State Keeper / VM
The State Keeper component serves as the “sequencer” part of the node. It shares most of its functionality with the main node, with one key distinction. The main node retrieves transactions from the mempool and has the authority to decide when a specific L2 block or L1 batch should be sealed. On the other hand, the Node retrieves transactions from the queue populated by the Fetcher and seals the corresponding blocks/batches based on the data obtained from the Fetcher queue.
The actual execution of batches takes place within the VM, which is identical in both the Main and Nodes.
Reorg Detector
In a ZK Stack chain, it is theoretically possible for L1 batches to be reverted before the corresponding “execute” operation is applied on L1, that is before the block is final. Such situations are highly uncommon and typically occur due to significant issues: e.g. a bug in the sequencer implementation preventing L1 batch commitment. Prior to batch finality, the chain operator can perform a rollback, reverting one or more batches and restoring the blockchain state to a previous point. Finalized batches cannot be reverted at all.
However, even though such situations are rare, the Node must handle them correctly.
To address this, the Node incorporates a Reorg Detector component. This module keeps track of all L1 batches that have not yet been finalized. It compares the locally obtained state root hashes with those provided by the main node’s API. If the root hashes for the latest available L1 batch do not match, the Reorg Detector searches for the specific L1 batch responsible for the divergence. Subsequently, it rolls back the local state and restarts the node. Upon restart, the EN resumes normal operation.
Consistency Checker
The main node API serves as the primary source of information for the EN. However, relying solely on the API may not provide sufficient security since the API data could potentially be incorrect due to various reasons. The primary source of truth for the rollup system is the L1 smart contract. Therefore, to enhance the security of the EN, each L1 batch undergoes cross-checking against the L1 smart contract by a component called the Consistency Checker.
When the Consistency Checker detects that a particular batch has been sent to L1, it recalculates a portion of the input known as the “block commitment” for the L1 transaction. The block commitment contains crucial data such as the state root and batch number, and is the same commitment that is used for generating a proof for the batch. The Consistency Checker then compares the locally obtained commitment with the actual commitment sent to L1. If the data does not match, it indicates a potential bug in either the main node or Node implementation or that the main node API has provided incorrect data. In either case, the state of the Node cannot be trusted, and the Node enters a crash loop until the issue is resolved.
Health check server
The Node also exposes an additional server that returns HTTP 200 response when the Node is operating normally, and HTTP 503 response when some of the health checks don’t pass (e.g. when the Node is not fully initialized yet). This server can be used, for example, to implement the readiness probe in an orchestration solution you use.
Data Availability fetcher
The Data Availability fetcher is responsible for fetching the DA-related information from the main node. It is only used in Validiums, where the pubdata is not stored on L1, but rather in a separate data availability layer.
Snapshots Recovery
Instead of initializing a node using a Postgres dump, it’s possible to configure a node to recover from a protocol-level snapshot. This process is much faster and requires much less storage. Postgres database of a mainnet node recovered from a snapshot is less than 500GB. Note that without pruning enabled, the node state will continuously grow at a rate about 15GB per day.
How it works
A snapshot is effectively a point-in-time snapshot of the VM state at the end of a certain L1 batch. Snapshots are created for the latest L1 batches periodically (roughly twice a day) and are stored in a public GCS bucket.
Recovery from a snapshot consists of several parts.
- Postgres recovery is the initial stage. The node API is not functioning during this stage. The stage is expected to take about 1 hour on the mainnet.
- Merkle tree recovery starts once Postgres is fully recovered. Merkle tree recovery can take about 3 hours on the mainnet. Ordinarily, Merkle tree recovery is a blocker for node synchronization; i.e., the node will not process blocks newer than the snapshot block until the Merkle tree is recovered. If the treeless mode is enabled, tree recovery is not performed, and the node will start catching up blocks immediately after Postgres recovery. This is still true if the tree data fetcher is enabled together with a Merkle tree; tree recovery is asynchronous in this case.
- Recovering RocksDB-based VM state cache is concurrent with Merkle tree recovery and also depends on Postgres recovery. It takes about 1 hour on the mainnet. Unlike Merkle tree recovery, VM state cache is not necessary for node operation (the node will get the state from Postgres is if it is absent), although it considerably speeds up VM execution.
After Postgres recovery is completed, the node becomes operational, providing Web3 API etc. It still needs some time to catch up executing blocks after the snapshot (i.e, roughly several hours worth of blocks / transactions). This may take order of 1–2 hours on the mainnet. In total, recovery process and catch-up thus should take roughly 5–6 hours with a Merkle tree, or 3–4 hours in the treeless mode / with a tree data fetcher.
Current limitations
Nodes recovered from snapshot don’t have any historical data from before the recovery. There is currently no way to
back-fill this historic data. E.g., if a node has recovered from a snapshot for L1 batch 500,000; then, it will not have
data for L1 batches 499,999, 499,998, etc. The relevant Web3 methods, such as eth_getBlockByNumber, will return an
error mentioning the first locally retained block or L1 batch if queried this missing data. The same error messages are
used for pruning because logically, recovering from a snapshot is equivalent to pruning node storage to
the snapshot L1 batch.
Configuration (for ZKsync Era)
To enable snapshot recovery on ZKsync mainnet, you need to set environment variables for a node before starting it for the first time:
EN_SNAPSHOTS_RECOVERY_ENABLED: 'true'
EN_SNAPSHOTS_OBJECT_STORE_BUCKET_BASE_URL: 'zksync-era-mainnet-external-node-snapshots'
EN_SNAPSHOTS_OBJECT_STORE_MODE: 'GCSAnonymousReadOnly'
For the ZKsync Sepolia testnet, use:
EN_SNAPSHOTS_RECOVERY_ENABLED: 'true'
EN_SNAPSHOTS_OBJECT_STORE_BUCKET_BASE_URL: 'zksync-era-boojnet-external-node-snapshots'
EN_SNAPSHOTS_OBJECT_STORE_MODE: 'GCSAnonymousReadOnly'
For a working examples of a fully configured ZKsync Nodes recovering from snapshots, see Docker Compose examples and Quick Start.
If a node is already recovered (does not matter whether from a snapshot or from a Postgres dump), setting these env variables will have no effect; the node will never reset its state.
Monitoring recovery
Snapshot recovery information is logged with the following targets:
- Recovery orchestration:
zksync_external_node::init - Postgres recovery:
zksync_snapshots_applier - Merkle tree recovery:
zksync_metadata_calculator::recovery,zksync_merkle_tree::recovery
An example of snapshot recovery logs during the first node start:
2024-06-20T07:25:32.466926Z  INFO zksync_external_node::init: Node has neither genesis L1 batch, nor snapshot recovery info
2024-06-20T07:25:32.466946Z  INFO zksync_external_node::init: Chosen node initialization strategy: SnapshotRecovery
2024-06-20T07:25:32.466951Z  WARN zksync_external_node::init: Proceeding with snapshot recovery. This is an experimental feature; use at your own risk
2024-06-20T07:25:32.475547Z  INFO zksync_snapshots_applier: Found snapshot with data up to L1 batch #7, L2 block #27, version 0, storage logs are divided into 10 chunk(s)
2024-06-20T07:25:32.516142Z  INFO zksync_snapshots_applier: Applied factory dependencies in 27.768291ms
2024-06-20T07:25:32.527363Z  INFO zksync_snapshots_applier: Recovering storage log chunks with 10 max concurrency
2024-06-20T07:25:32.608539Z  INFO zksync_snapshots_applier: Recovered 3007 storage logs in total; checking overall consistency...
2024-06-20T07:25:32.612967Z  INFO zksync_snapshots_applier: Retrieved 2 tokens from main node
2024-06-20T07:25:32.616142Z  INFO zksync_external_node::init: Recovered Postgres from snapshot in 148.523709ms
2024-06-20T07:25:32.645399Z  INFO zksync_metadata_calculator::recovery: Recovering Merkle tree from Postgres snapshot in 1 chunks with max concurrency 10
2024-06-20T07:25:32.650478Z  INFO zksync_metadata_calculator::recovery: Filtered recovered key chunks; 1 / 1 chunks remaining
2024-06-20T07:25:32.681327Z  INFO zksync_metadata_calculator::recovery: Recovered 1/1 Merkle tree chunks, there are 0 left to process
2024-06-20T07:25:32.784597Z  INFO zksync_metadata_calculator::recovery: Recovered Merkle tree from snapshot in 144.040125ms
(Obviously, timestamps and numbers in the logs will differ.)
Recovery logic also exports some metrics, the main of which are as follows:
| Metric name | Type | Labels | Description |
|---|---|---|---|
snapshots_applier_storage_logs_chunks_left_to_process | Gauge | - | Number of storage log chunks left to process during Postgres recovery |
Pruning
It is possible to configure a Node to periodically prune all data from L1 batches older than a configurable threshold. Data is pruned both from Postgres and from tree (RocksDB). Pruning happens continuously (i.e., does not require stopping the node) in the background during normal node operation. It is designed to not significantly impact node performance.
Types of pruned data in Postgres include:
- Block and L1 batch headers
- Transactions
- EVM logs aka events
- Overwritten storage logs
- Transaction traces
Pruned data is no longer available via Web3 API of the node. The relevant Web3 methods, such as eth_getBlockByNumber,
will return an error mentioning the first retained block or L1 batch if queried pruned data.
Interaction with snapshot recovery
Pruning and snapshot recovery are independent features. Pruning works both for archival nodes restored from a Postgres dump, and nodes recovered from a snapshot. Conversely, a node recovered from a snapshot may have pruning disabled; this would mean that it retains all data starting from the snapshot indefinitely (but not earlier data, see snapshot recovery limitations).
A rough guide whether to choose the recovery option and/or pruning is as follows:
- If you need a node with data retention period of up to a few days, set up a node from a snapshot with pruning enabled and wait for it to have enough data.
- If you need a node with the entire rollup history, using a Postgres dump is the only option, and pruning should be disabled.
- If you need a node with significant data retention (order of months), the best option right now is using a Postgres dump. You may enable pruning for such a node, but beware that full pruning may take significant amount of time (order of weeks or months). In the future, we intend to offer pre-pruned Postgres dumps with a few months of data.
Configuration
You can enable pruning by setting the environment variable
EN_PRUNING_ENABLED: 'true'
By default, the node will keep L1 batch data for 4 hours determined by the batch timestamp (always equal to the timestamp of the first block in the batch). You can configure the retention period using:
EN_PRUNING_DATA_RETENTION_SEC: '259200' # 3 days
The retention period can be set to any value, but for mainnet values under 24h will be ignored because a batch can only be pruned after it has been executed on Ethereum.
Pruning can be disabled or enabled and the data retention period can be freely changed during the node lifetime.
Pruning should be disabled when recovering the Merkle tree (e.g., if a node ran in the treeless mode before, or if its tree needs a reset for whatever reason). Otherwise, tree recovery will with almost definitely result in an error, or worse, in a corrupted tree.
Storage requirements for pruned nodes
The storage requirements depend on how long you configure to retain the data, but are roughly:
- 40GB + ~5GB/day of retained data of disk space needed on machine that runs the node
- 300GB + ~15GB/day of retained data of disk space for Postgres
When pruning an existing archival node, Postgres will be unable to reclaim disk space automatically. To reclaim disk
space, you need to manually run VACUUM FULL, which requires an ACCESS EXCLUSIVE lock. You can read more about it
in Postgres docs.
Monitoring pruning
Pruning information is logged with the following targets:
- Postgres pruning:
zksync_node_db_pruner - Merkle tree pruning:
zksync_metadata_calculator::pruning,zksync_merkle_tree::pruning.
To check whether Postgres pruning works as intended, you should look for logs like this:
2024-06-20T07:26:03.415382Z  INFO zksync_node_db_pruner: Soft pruned db l1_batches up to 8 and L2 blocks up to 29, operation took 14.850042ms
2024-06-20T07:26:04.433574Z  INFO zksync_node_db_pruner::metrics: Performed pruning of database, deleted 1 L1 batches, 2 L2 blocks, 68 storage logs, 383 events, 27 call traces, 12 L2-to-L1 logs
2024-06-20T07:26:04.436516Z  INFO zksync_node_db_pruner: Hard pruned db l1_batches up to 8 and L2 blocks up to 29, operation took 18.653083ms
(Obviously, timestamps and numbers in the logs will differ.)
Pruning logic also exports some metrics, the main of which are as follows:
| Metric name | Type | Labels | Description |
|---|---|---|---|
db_pruner_not_pruned_l1_batches_count | Gauge | - | Number of retained L1 batches |
db_pruner_pruning_chunk_duration_seconds | Histogram | prune_type | Latency of a single pruning iteration |
merkle_tree_pruning_deleted_stale_key_versions | Gauge | bound | Versions (= L1 batches) pruned from the Merkle tree |
Treeless Operation Mode
Normally, a Node needs to run the Merkle tree component (aka metadata calculator) in order to compute L1 batch state root hashes. A state root hash from the previous batch can be accessed by L2 contracts, so processing transactions in an L1 batch cannot start until the state root hash of the previous L1 batch is computed. Merkle tree requires non-trivial storage space and RAM (roughly 3 TB and 32 GB respectively for an archival mainnet node as of July 2024). While storage and RAM requirements can be significantly lowered with snapshot recovery and pruning, treeless operation mode allows to run a node without a local Merkle tree instance at all.
How it works
The relevant logic is encapsulated in the tree fetcher component that can be run instead, or concurrently with the Merkle tree component. Tree fetcher continuously loads L1 batch state root hashes for batches persisted to the node storage. It uses the following 2 sources of hashes:
- The rollup contract on L1 (e.g. on the Ethereum mainnet for the Era mainnet). The state root hash for a batch is submitted to this contract as a part of the batch commitment.
- Main L2 node (or more generally, the L2 node that the current node is configured to sync from). Only used if the L1 data source does not work (e.g., very recent L1 batches may be not yet committed to L1).
If the tree fetcher run concurrently to the Merkle tree, the tree will still compute state root hashes for all batches. If the tree is slower than the fetcher (which is expected in most cases), it will compare the computed hash against the state root hash from the tree fetcher and crash on a mismatch.
Tradeoffs
- Tree fetcher requires limited trust to the L1 Web3 provider and the main L2 node (note that trust in them is required for other node components, such as the consistency checker and reorg detector). This trust is limited in time; mismatched L1 batch root hashes will eventually be detected by the 2 aforementioned components and the Merkle tree (if it is run concurrently).
- Tree fetcher only loads root hashes of the Merkle tree, not other tree data. That is, it cannot replace the Merkle
tree if a node needs to serve the
zks_getProofendpoint, since it fetches proofs from the Merkle tree.
Configuration
The tree fetcher is disabled by default. You can enable it by specifying tree_fetcher in the list of components that a
node should run in the --components command-line arg. For example, to run all standard components and the tree
fetcher:
# Assume that the node binary in in $PATH
zksync_external_node --components=all,tree_fetcher
To run all standard components without the Merkle tree and the tree fetcher:
zksync_external_node --components=core,api,tree_fetcher
The tree fetcher currently does not have configurable parameters.
The tree fetcher can be freely switched on or off during the node lifetime; i.e., it’s not required to commit to running or not running it when initializing a node.
Switching on the tree fetcher during snapshot recovery can significantly speed it up (order of 2–3 hours for the mainnet) because the node no longer needs to recover the Merkle tree before starting catching up.
Monitoring tree fetcher
Tree fetcher information is logged with the zksync_node_sync::tree_data_fetcher target.
Tree fetcher exports some metrics:
| Metric name | Type | Labels | Description |
|---|---|---|---|
external_node_tree_data_fetcher_last_updated_batch_number | Gauge | - | Last L1 batch with tree data updated by the fetcher |
external_node_tree_data_fetcher_step_outcomes | Counter | kind | Number of times a fetcher step resulted in a certain outcome (e.g., update, no-op, or transient error) |
external_node_tree_data_fetcher_root_hash_sources | Counter | source | Number of root hashes fetched from a particular source (L1 or L2). |
Decentralization
In the default setup, the Node will fetch data from the ZKsync API endpoint maintained by Matter Labs. To reduce the reliance on this centralized endpoint we have developed a decentralized p2p networking stack (aka gossipnet) which will eventually be used instead of ZKsync API for synchronizing data.
On the gossipnet, the data integrity will be protected by the BFT (byzantine fault-tolerant) consensus algorithm (currently data is signed just by the main node though).
Enabling gossipnet on your node
The minimal supported server version for this is 24.11.0
Generating secrets
Each participant node of the gossipnet has to have an identity (a public/secret key pair). When running your node for the first time, generate the secrets by running:
docker run --entrypoint /usr/bin/zksync_external_node "matterlabs/external-node:2.0-v28.2.1" generate-secrets > consensus_secrets.yaml
chmod 600 consensus_secrets.yaml
NEVER reveal the secret keys used by your node. Otherwise, someone can impersonate your node on the gossipnet. If you suspect that your secret key has been leaked, you can generate fresh keys using the same tool.
If you want someone else to connect to your node, give them your PUBLIC key instead. Both public and secret keys are
present in the consensus_secrets.yaml (public keys are in comments).
Preparing configuration file
Copy the template of the consensus configuration file (for mainnet or testnet ).
You need to fill in the public_addr field. This is the address that will (not implemented yet) be advertised over
gossipnet to other nodes, so that they can establish connections to your node. If you don’t want to expose your node
to the public internet, you can use IP in your local network.
Currently the config contains the following fields (refer to config schema for more details):
server_addr- local TCP socket address that the node should listen on for incoming connections. Note that this is an additional TCP port that will be opened by the node.public_addr- the public address of your node that will be advertised over the gossipnet.max_payload_size- limit (in bytes) on the sized of the ZKsync ERA block received from the gossipnet. This protects your node from getting DoS`ed by too large network messages. Use the value from the template.gossip_dynamic_inbound_limit- maximal number of unauthenticated concurrent inbound connections that can be established to your node. This is a DDoS protection measure.
Setting environment variables
Uncomment (or add) the following lines in your .env config:
EN_CONSENSUS_CONFIG_PATH=...
EN_CONSENSUS_SECRETS_PATH=...
These variables should point to your consensus config and secrets files that we have just created. Tweak the paths to the files if you have placed them differently.
Add --enable-consensus flag to your entry point command
For the consensus configuration to take effect you have to add --enable-consensus flag to the command line when
running the node, for example:
docker run "matterlabs/external-node:2.0-v24.12.0" <all the other flags> --enable-consensus
Steps to modify the docker-compose files to support Other Chains
Below are the steps for adjusting ZKsync Era docker-compose files from here to support chains other than ZKsync Era.
If you want to run Node for a given chain, you can first ask the company hosting the chains for the Dockerfiles.
1. Update EN_L2_CHAIN_ID
The EN_L2_CHAIN_ID environment variable specifies the Layer 2 chain ID of the blockchain.
You can get it using main node rpc call eth_chainId or by asking the company hosting the chain. For example:
curl -X POST https://mainnet.era.zksync.io \
-H "Content-Type: application/json" \
-d '{"jsonrpc": "2.0", "method": "eth_chainId", "params": [], "id": 1}'
returns
{ "jsonrpc": "2.0", "result": "0x144", "id": 1}
where 0x144 is the chain ID (324 in decimal)
2. Update EN_MAIN_NODE_URL
The EN_MAIN_NODE_URL The EN_MAIN_NODE_URL environment variable should point to the main node URL of the target chain
3. Update snapshots recovery settings
Snapshots recovery is a feature that allows faster Node startup at the cost of no transaction history. By default the
ZKsync Era docker-compose file has this feature enabled, but it’s only recommended to use if the Node first startup time
is too slow. It can be disabled by changing EN_SNAPSHOTS_RECOVERY_ENABLED to false
If you want to keep this feature enabled for a Node, ask the company hosting the chain for the bucket name where the
snapshots are stored and update the value of EN_SNAPSHOTS_OBJECT_STORE_BUCKET_BASE_URL
5. (Validium chains only) Enable and configure DA fetcher
For Validium ENs to function properly, the Data Availability fetcher must be enabled and configured. It has to be added
to the components list, e.g. for a standard list of components and DA fetcher it would be --components=all,da_fetcher.
To configure the DA fetcher, you need to add the da_client config if the file-based config is used or configure in via
the environment variables, they need to have an EN_ prefix. If the DA client in use needs a secret to be configured -
you need to set it in your secrets config or a corresponding environment variable.
Introduction
The goal of the ZK Stack is to power the internet of value. Value needs to be secured, and only blockchains are able provide the level of security that the internet needs. The ZK Stack can be used to launch zero-knowledge rollups, which are extra secure blockchains.
ZK Rollups use advanced mathematics called zero-knowledge proofs to show that the execution of the rollup was done correctly. They also send (“roll up”) their data to another chain, in our case this is Ethereum. The ZK Stack uses the zkEVM to execute transactions, making it Ethereum compatible.
These two techniques allow the rollup to be verified externally. Unlike traditional blockchains, where you have to run a node to verify all transactions, the state of the rollup can be easily checked by external participants by validating the proof.
These external validators of a rollup can be other rollups. This means we can connect rollups trustlessly, and create a network of rollups. This network is called the ZK Chain ecosystem.
These specs will provide a high level overview of the zkEVM and a full specification of its more technical components, such as the prover, compiler, and the VM itself. We also specify the foundations of the ZK Chain ecosystem.
Overview
As stated in the introduction, the ZK Stack can be used to launch rollups. These rollups have some operators that are needed to run it, these are the sequencer and the prover, they create blocks and proofs, and submit them to the L1 contract.
A user submits their transaction to the sequencer. The job of the sequencer is to collect transactions and execute them using the zkEVM, and to provide a soft confirmation to the user that their transaction was executed. If the user chooses they can force the sequencer to include their transaction by submitting it via L1. After the sequencer executes the block, it sends it over to the prover, who creates a cryptographic proof of the block’s execution. This proof is then sent to the L1 contract alongside the necessary data. On the L1 a smart contract verifies that the proof is valid and all the data has been submitted, and the rollup’s state is also updated in the contract.
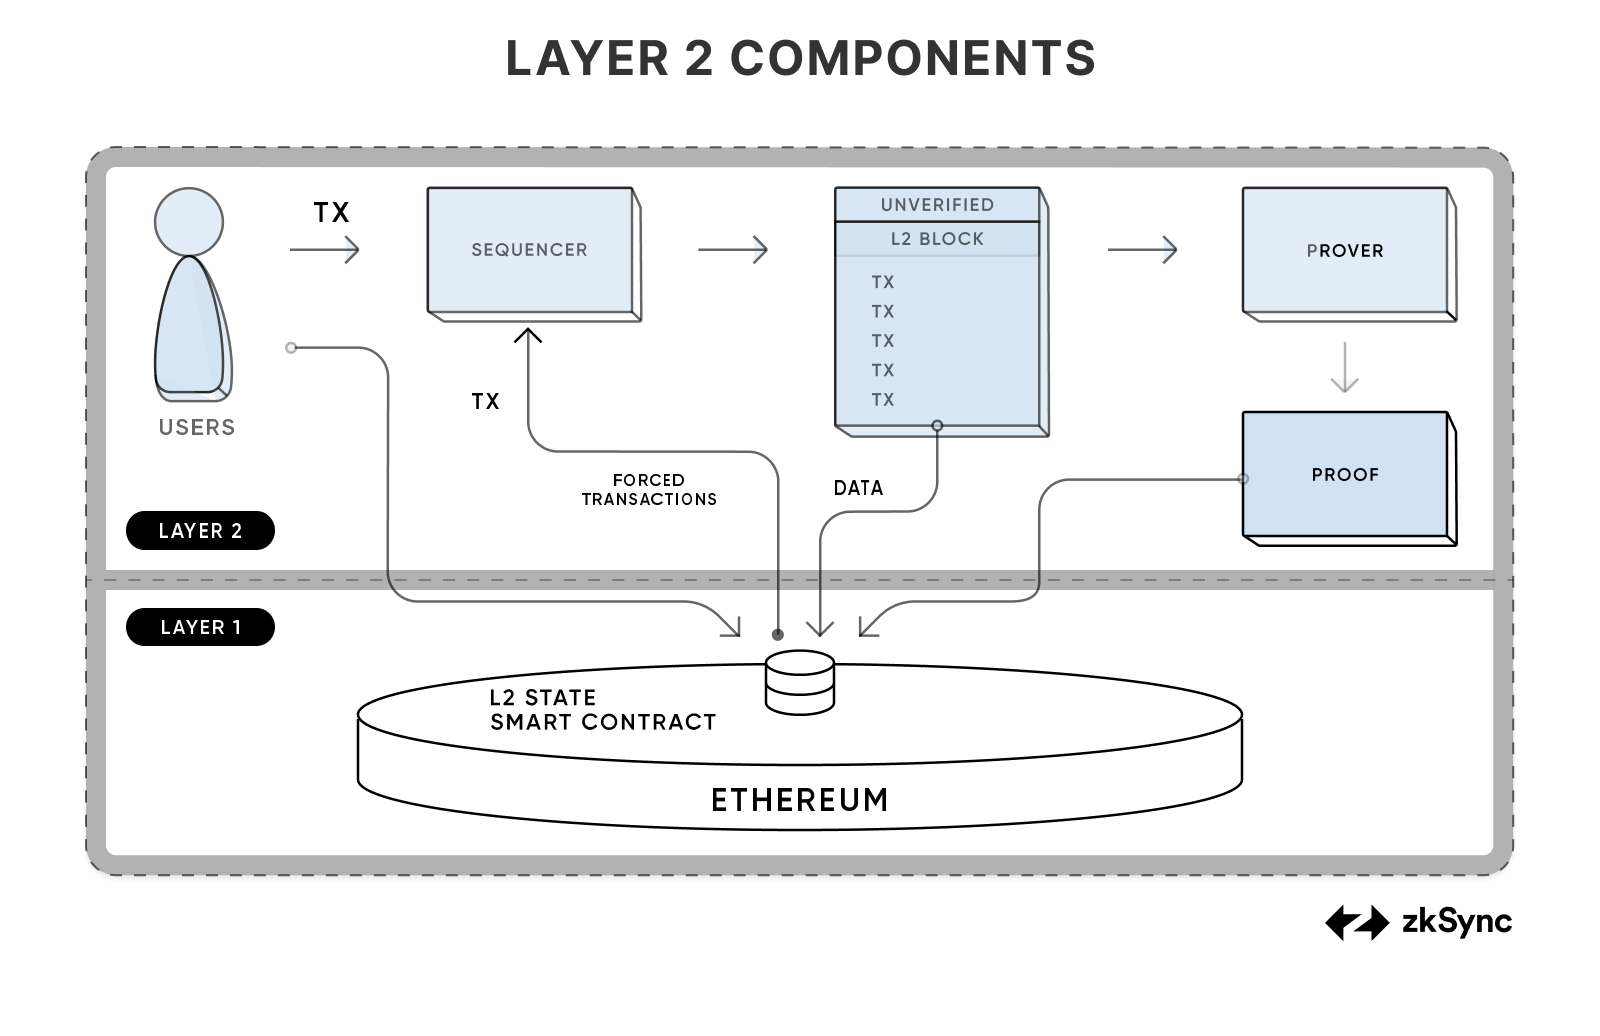
The core of this mechanism was the execution of transactions. The ZK Stack uses the zkEVM for this, which is similar to the EVM, but its role is different than the EVM’s role in Ethereum.
Transactions can also be submitted via L1. This happens via the same process that allows L1<>L2 communication. This method provides the rollup with censorship resistance, and allows trustless bridges to the L1.
The sequencer collects transactions into blocks blocks, similarly to Ethereum. To provide the best UX the protocol has small blocks with quick soft confirmations for the users. Unlike Ethereum, the zkEVM does not just have blocks, but also batches, which are just a collection of blocks. A batch is the unit that the prover processes.
Before we submit a proof we send the data to L1. Instead of submitting the data of each transaction, we submit how the state of the blockchain changes, this change is called the state diff. This approach allows the transactions that change the same storage slots to be very cheap, since these transactions don’t incur additional data costs.
Finally at the end of the process, we create the proofs and send them to L1. Our Boojum proof system provides excellent performance, and can be run on just 16Gb of GPU RAM. This will enable the proof generation to be truly decentralized.
Up to this point we have only talked about a single chain. We will connect these chains into a single ecosystem, called ZK Chain ecosystem.
Blocks & Batches - How we package transactions
In this article, we will explore the processing of transactions, how we group them into blocks, what it means to “seal” a block, and why it is important to have rollbacks in our virtual machine (VM).
At the basic level, we have individual transactions. However, to execute them more efficiently, we group them together into blocks & batches.
L1 Batch vs L2 Block (a.k.a MiniBlock) vs Transaction
To help visualize the concept, here are two images:

You can refer to the Block layout image to see how the blocks are organized. It provides a graphical representation of how transactions are arranged within the blocks and the arrangement of L2 blocks within L1 “batches.”

L2 blocks (aka Miniblocks)
Currently, the L2 blocks do not have a major role in the system, until we transition to a decentralized sequencer. We introduced them mainly as a “compatibility feature” to accommodate various tools, such as Metamask, which expect a block that changes frequently. This allows these tools to provide feedback to users, confirming that their transaction has been added.
As of now, an L2 block is created every 2 seconds (controlled by StateKeeper’s config miniblock_commit_deadline_ms),
and it includes all the transactions received during that time period. This periodic creation of L2 blocks ensures that
transactions are processed and included in the blocks regularly.
L1 batches
L1 batches play a crucial role because they serve as the fundamental unit for generating proofs. From the perspective of the virtual machine (VM), each L1 batch represents the execution of a single program, specifically the Bootloader. The Bootloader internally processes all the transactions belonging to that particular batch. Therefore, the L1 batch serves as the container for executing the program and handling the transactions within it.
So how large can L1 batch be
Most blockchains use factors like time and gas usage to determine when a block should be closed or sealed. However, our case is a bit more complex because we also need to consider prover capacity and limits related to publishing to L1.
The decision of when to seal the block is handled by the code in the conditional_sealer module. It
maintains a list of SealCriterion and at the time of writing this article, we have 9 reasons to seal the
block, which include:
- Transaction slots limit (currently set to 750 transactions in
StateKeeper’s config -transaction_slots). - Gas limit (currently set to
MAX_L2_TX_GAS_LIMIT= 80M). - Published data limit (as each L1 batch must publish information about the changed slots to L1, so all the changes must
fit within the L1 transaction limit, currently set to
MAX_PUBDATA_PER_L1_BATCH= 120k). - zkEVM Geometry limits - For certain operations like merklelization, there is a maximum number of circuits that can be included in a single L1 batch. If this limit is exceeded, we wouldn’t be able to generate the proof.
We also have a TimeoutCriterion - but it is not enabled.
However, these sealing criteria pose a significant challenge because it is difficult to predict in advance whether adding a given transaction to the current batch will exceed the limits or not. This unpredictability adds complexity to the process of determining when to seal the block.
What if a transaction doesn’t fit
To handle situations where a transaction exceeds the limits of the currently active L1 batch, we employ a “try and
rollback” approach. This means that we attempt to add the transaction to the active L1 batch, and if we receive a
ExcludeAndSeal response indicating that it doesn’t fit, we roll back the virtual machine (VM) to the state before the
transaction was attempted.
Implementing this approach introduces a significant amount of complexity in the oracles (also known as interfaces) of
the VM. These oracles need to support snapshotting and rolling back operations to ensure consistency when handling
transactions that don’t fit.
In a separate article, we will delve into more details about how these oracles and the VM work, providing a comprehensive understanding of their functionality and interactions.
Deeper dive
Glossary
- Batch - a set of transactions that the bootloader processes (
commitBatches,proveBatches, andexecuteBatcheswork with it). A batch consists of multiple transactions. - L2 block - a non-intersecting sub-set of consecutively executed transactions. This is the kind of block you see in the
API. This is the one that will eventually be used for
block.number/block.timestamp/etc. This will happen eventually, since at the time of this writing the virtual block migration is being run. - Virtual block — blocks the data of which will be returned in the contract execution environment during the migration. They are called “virtual”, since they have no trace in our API, i.e. it is not possible to query information about them in any way.
Motivation
Before the recent upgrade, block.number, block.timestamp, as well as blockhash in Solidity, returned information
about batches, i.e. large blocks that are proven on L1 and which consist of many small L2 blocks. At the same time,
API returns block.number and block.timestamp as for L2 blocks.
L2 blocks were created for fast soft confirmation on wallets and block explorer. For example, MetaMask shows transactions as confirmed only after the block in which transaction execution was mined. So if the user needs to wait for the batch confirmation it would take at least minutes (for soft confirmation) and hours for full confirmation which is very bad UX. But API could return soft confirmation much earlier through L2 blocks.
There was a huge outcry in the community for us to return the information for L2 blocks in block.number,
block.timestamp, as well as blockhash, because of discrepancy of runtime execution and returned data by API.
However, there were over 15mln L2 blocks, while less than 200k batches, meaning that if we simply “switched” from
returning L1 batches’ info to L2 block’s info, some contracts (especially those that use block.number for measuring
time intervals instead of block.timestamp) would break. For that, we decided to have an accelerated migration process,
i.e. the block.number will grow faster and faster, until it becomes roughly 8x times the L2 block production speed,
allowing it to gradually reach the L2 block number, after which the information on the L2 block.number will be
returned. The blocks the info of which will be returned during this process are called “virtual blocks”. Their
information will never be available in any of our APIs, which should not be a major breaking change, since our API
already mostly works with L2 blocks, while L1 batches’s information is returned in the runtime.
Adapting for Solidity
In order to get the returned value for block.number, block.timestamp, blockhash our compiler used the following
functions:
getBlockNumbergetBlockTimestampgetBlockHashEVM
During the migration process, these will return the values of the virtual blocks. After the migration is complete, they will return values for L2 blocks.
Migration status
At the time of this writing, the migration has been complete on testnet, i.e. there we already have only the L2 block information returned. However, the migration on mainnet is still ongoing and most likely will end on late October / early November.
Blocks’ processing and consistency checks
Our SystemContext contract allows to get information about batches and L2 blocks. Some of the information is hard to
calculate onchain. For instance, time. The timing information (for both batches and L2 blocks) are provided by the
operator. In order to check that the operator provided some realistic values, certain checks are done on L1. Generally
though, we try to check as much as we can on L2.
Initializing L1 batch
At the start of the batch, the operator provides the timestamp of the batch, its number and the hash of the previous batch.. The root hash of the Merkle tree serves as the root hash of the batch.
The SystemContext can immediately check whether the provided number is the correct batch number. It also immediately sends the previous batch hash to L1, where it will be checked during the commit operation. Also, some general consistency checks are performed. This logic can be found here.
L2 blocks processing and consistency checks
setL2Block
Before each transaction, we call setL2Block
method.
There we will provide some data about the L2 block that the transaction belongs to:
_l2BlockNumberThe number of the new L2 block._l2BlockTimestampThe timestamp of the new L2 block._expectedPrevL2BlockHashThe expected hash of the previous L2 block._isFirstInBatchWhether this method is called for the first time in the batch._maxVirtualBlocksToCreateThe maximum number of virtual block to create with this L2 block.
If two transactions belong to the same L2 block, only the first one may have non-zero _maxVirtualBlocksToCreate. The
rest of the data must be same.
The setL2Block
performs
a lot of similar consistency checks to the ones for the L1 batch.
L2 blockhash calculation and storage
Unlike L1 batch’s hash, the L2 blocks’ hashes can be checked on L2.
The hash of an L2 block is
keccak256(abi.encode(_blockNumber, _blockTimestamp, _prevL2BlockHash, _blockTxsRollingHash)). Where
_blockTxsRollingHash is defined in the following way:
_blockTxsRollingHash = 0 for an empty block.
_blockTxsRollingHash = keccak(0, tx1_hash) for a block with one tx.
_blockTxsRollingHash = keccak(keccak(0, tx1_hash), tx2_hash) for a block with two txs, etc.
To add a transaction hash to the current miniblock we use the appendTransactionToCurrentL2Block
function.
Since ZKsync is a state-diff based rollup, there is no way to deduce the hashes of the L2 blocks based on the
transactions’ in the batch (because there is no access to the transaction’s hashes). At the same time, in order to
server blockhash method, the VM requires the knowledge of some of the previous L2 block hashes. In order to save up on
pubdata (by making sure that the same storage slots are reused, i.e. we only have repeated writes) we
store only
the last 257 block hashes. You can read more on what are the repeated writes and how the pubdata is processed
here.
We store only the last 257 blocks, since the EVM requires only 256 previous ones and we use 257 as a safe margin.
Legacy blockhash
When initializing L2 blocks that do not have their hashes stored on L2 (basically these are blocks before the migration upgrade), we use the following formula for their hash:
keccak256(abi.encodePacked(uint32(_blockNumber)))
Timing invariants
While the timestamp of each L2 block is provided by the operator, there are some timing invariants that the system preserves:
- For each L2 block its timestamp should be > the timestamp of the previous L2 block
- For each L2 block its timestamp should be ≥ timestamp of the batch it belongs to
- Each batch must start with a new L2 block (i.e. an L2 block can not span across batches).
- The timestamp of a batch must be ≥ the timestamp of the latest L2 block which belonged to the previous batch.
- The timestamp of the last miniblock in batch can not go too far into the future. This is enforced by publishing an L2→L1 log, with the timestamp which is then checked on L1.
Fictive L2 block & finalizing the batch
At the end of the batch, the bootloader calls the setL2Block
one more time
to allow the operator to create a new empty block. This is done purely for some of the technical reasons inside the
node, where each batch ends with an empty L2 block.
We do not enforce that the last block is empty explicitly as it complicates the development process and testing, but in practice, it is, and either way, it should be secure.
Also, at the end of the batch we send the timestamps of the batch as well as the timestamp of the last miniblock in order to check on L1 that both of these are realistic. Checking any other L2 block’s timestamp is not required since all of them are enforced to be between those two.
Migration & virtual blocks’ logic
As already explained above, for a smoother upgrade for the ecosystem, there is a migration being performed during which instead of returning either batch information or L2 block information, we will return the virtual block information until they catch up with the L2 block’s number.
Production of the virtual blocks
- In each batch, there should be at least one virtual block created.
- Whenever a new L2 block is created, the operator can select how many virtual blocks it wants to create. This can be any number, however, if the number of the virtual block exceeds the L2 block number, the migration is considered complete and we switch to the mode where the L2 block information will be returned.
Additional note on blockhashes
Note, that if we used some complex formula for virtual blocks’ hashes (like we do for L2 blocks), we would have to put
all of these into storage for the data availability. Even if we used the same storage trick that we used for the L2
blocks, where we store only the last 257’s block’s hashes under the current load/migration plans it would be expected
that we have roughly ~250 virtual blocks per batch, practically meaning that we will publish all of these anyway. This
would be too expensive. That is why we have to use a simple formula of keccak(uint256(number)) for now. Note, that
they do not collide with the legacy miniblock hash, since legacy miniblock hashes are calculated as
keccak(uint32(number)).
Also, we need to keep the consistency of previous blockhashes, i.e. if blockhash(X) returns a non-zero value, it
should be consistent among the future blocks. For instance, let’s say that the hash of batch 1000 is 1,
i.e. blockhash(1000) = 1. Then, when we migrate to virtual blocks, we need to ensure that blockhash(1000) will
return either 0 (if and only if the block is more than 256 blocks old) or 1. Because of that for blockhash we will
have the following complex
logic:
- For blocks that were created before the virtual block upgrade, use the batch hashes
- For blocks that were created during the virtual block upgrade, use
keccak(uint256(number)). - For blocks that were created after the virtual blocks have caught up with the L2 blocks, use L2 block hashes.
L1 Smart contracts
This document presumes familiarity with Rollups. For a better understanding, consider reading the overview here.
Rollups inherit security and decentralization guarantees from Ethereum, on which they store information about changes in their own state, providing validity proofs for state transition, implementing a communication mechanism, etc. In practice, all this is achieved by Smart Contracts built on top of Ethereum. This document details the architecture of the L2 contracts on Ethereum Layer 1. We also have contracts that support the ZK Chain ecosystem, we cover those in the Bridgehub section. The Bridgehub relies on these individual contracts.
Diamond
Technically, this L1 smart contract acts as a connector between Ethereum (L1) and a single L2. It checks the validity proof and data availability, handles L2 <-> L1 communication, finalizes L2 state transition, and more.
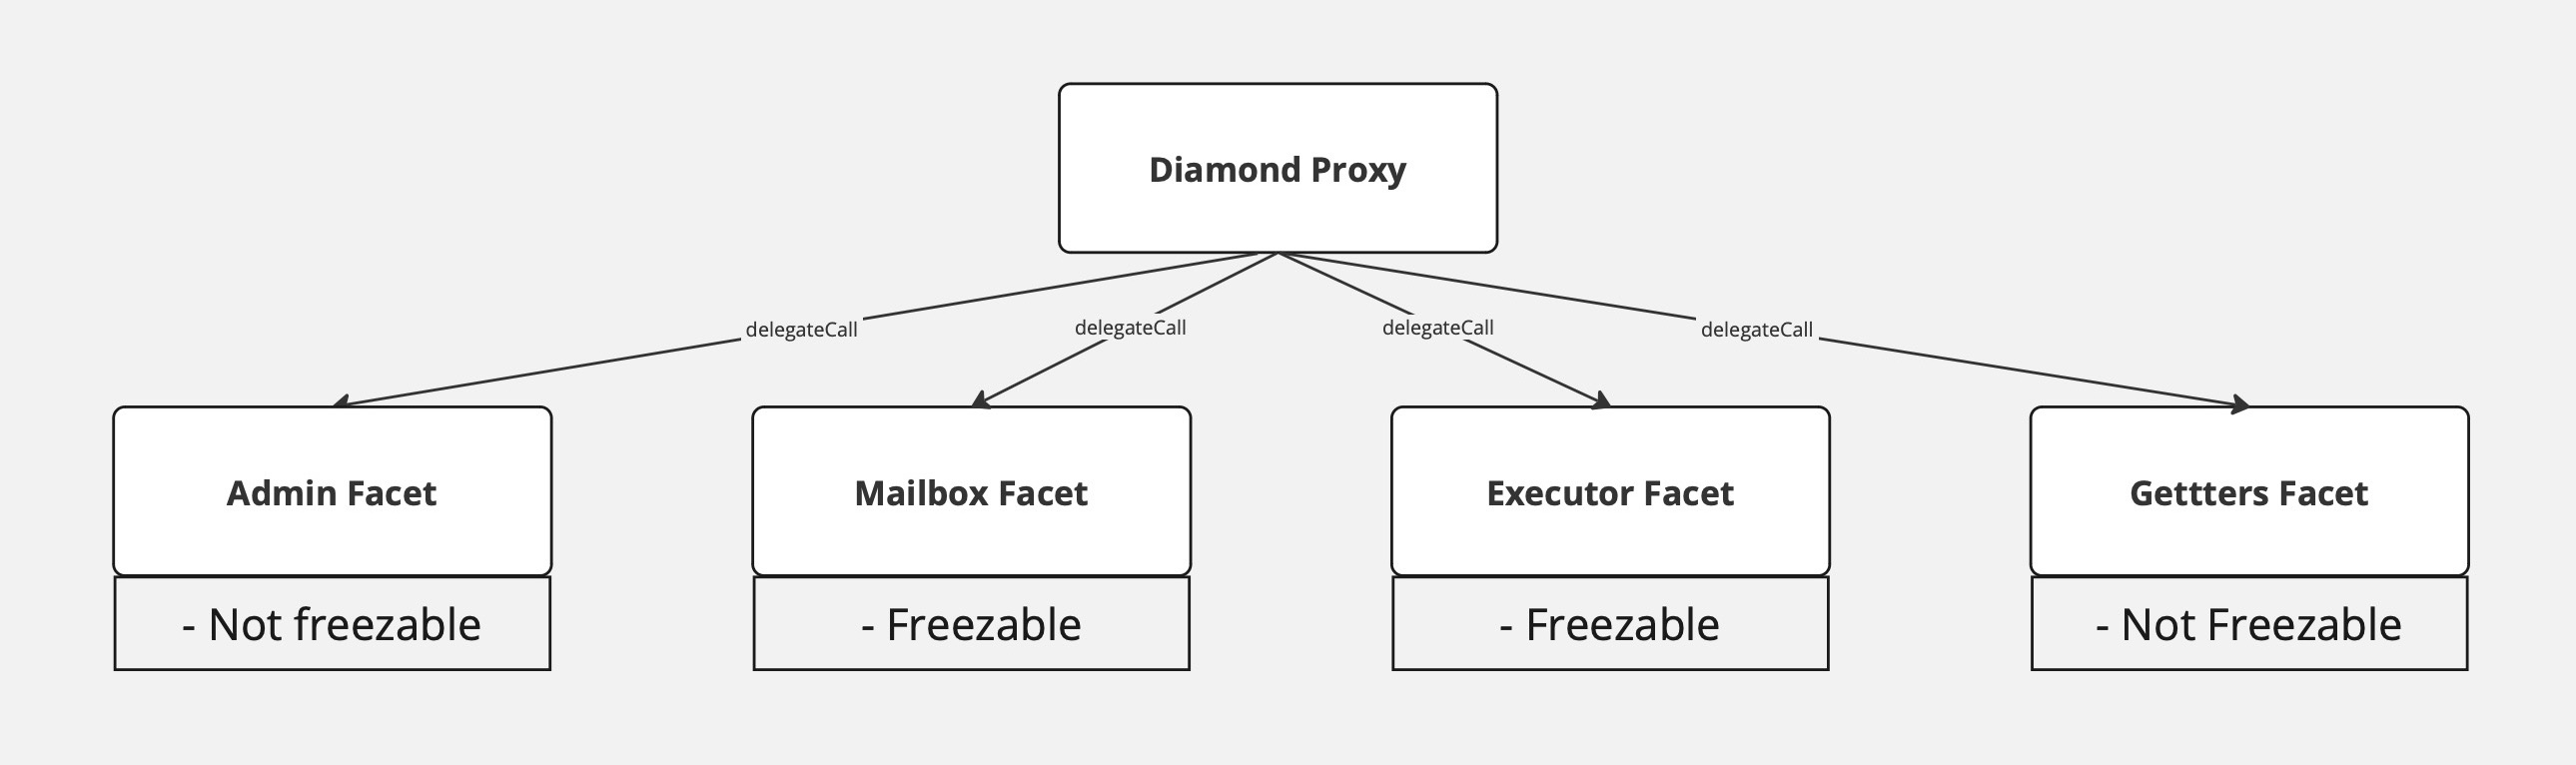
DiamondProxy
The main contract uses EIP-2535 diamond proxy pattern. It is an in-house implementation that is inspired by the mudgen reference implementation. It has no external functions, only the fallback that delegates a call to one of the facets (target/implementation contract). So even an upgrade system is a separate facet that can be replaced.
One of the differences from the reference implementation is access freezable. Each of the facets has an associated
parameter that indicates if it is possible to freeze access to the facet. Privileged actors can freeze the diamond
(not a specific facet!) and all facets with the marker isFreezable should be inaccessible until the governor or admin
unfreezes the diamond. Note that it is a very dangerous thing since the diamond proxy can freeze the upgrade system and
then the diamond will be frozen forever.
The diamond proxy pattern is very flexible and extendable. For now, it allows splitting implementation contracts by their logical meaning, removes the limit of bytecode size per contract and implements security features such as freezing. In the future, it can also be viewed as EIP-6900 for ZK Stack, where each ZK Chain can implement a sub-set of allowed implementation contracts.
GettersFacet
Separate facet, whose only function is providing view and pure methods. It also implements
diamond loupe which makes managing facets easier. This contract
must never be frozen.
AdminFacet
Controls changing the privileged addresses such as governor and validators or one of the system parameters (L2 bootloader bytecode hash, verifier address, verifier parameters, etc), and it also manages the freezing/unfreezing and execution of upgrades in the diamond proxy.
The admin facet is controlled by two entities:
- Governance - Separate smart contract that can perform critical changes to the system as protocol upgrades. This contract controlled by two multisigs, one managed by Matter Labs team and another will be multisig with well-respected contributors in the crypto space. Only together they can perform an instant upgrade, the Matter Labs team can only schedule an upgrade with delay.
- Admin - Multisig smart contract managed by Matter Labs that can perform non-critical changes to the system such as granting validator permissions. Note, that the Admin is the same multisig as the owner of the governance.
MailboxFacet
The facet that handles L2 <-> L1 communication, an overview for which can be found in docs.
The Mailbox performs three functions:
- L1 <-> L2 communication.
- Bridging native Ether to the L2 (with the launch of the Shared Bridge this will be moved)
- Censorship resistance mechanism (in the research stage).
L1 -> L2 communication is implemented as requesting an L2 transaction on L1 and executing it on L2. This means a user can call the function on the L1 contract to save the data about the transaction in some queue. Later on, a validator can process it on L2 and mark it as processed on the L1 priority queue. Currently, it is used for sending information from L1 to L2 or implementing multi-layer protocols.
NOTE: While user requests the transaction from L1, the initiated transaction on L2 will have such a msg.sender:
  address sender = msg.sender;
  if (sender != tx.origin) {
      sender = AddressAliasHelper.applyL1ToL2Alias(msg.sender);
  }
where
uint160 constant offset = uint160(0x1111000000000000000000000000000000001111);

function applyL1ToL2Alias(address l1Address) internal pure returns (address l2Address) {
  unchecked {
    l2Address = address(uint160(l1Address) + offset);
  }
}
For most of the rollups the address aliasing needs to prevent cross-chain exploits that would otherwise be possible if we simply reused the same L1 addresses as the L2 sender. In zkEVM address derivation rule is different from the Ethereum, so cross-chain exploits are already impossible. However, the zkEVM may add full EVM support in the future, so applying address aliasing leaves room for future EVM compatibility.
The L1 -> L2 communication is also used for bridging ether. The user should include a msg.value when initiating a
transaction request on the L1 contract. Before executing a transaction on L2, the specified address will be credited
with the funds. To withdraw funds user should call withdraw function on the L2EtherToken system contracts. This will
burn the funds on L2, allowing the user to reclaim them through the finalizeEthWithdrawal function on the
MailboxFacet.
More about L1->L2 operations can be found here.
L2 -> L1 communication, in contrast to L1 -> L2 communication, is based only on transferring the information, and not on the transaction execution on L1. The full description of the mechanism for sending information from L2 to L1 can be found here.
Committer and Executor facets
These contracts accept L2 batches, enforces data availability and checks the validity of zk-proofs. The state transition pipeline is split into three stages:
commitBatchesSharedBridge- check L2 batch timestamp, process the L2 logs, save data for a batch, and prepare data for zk-proof.proveBatchesSharedBridge- validate zk-proof.executeBatchesSharedBridge- finalize the state, marking L1 -> L2 communication processing, and saving Merkle tree with L2 logs.
These stages are divided by contracts as:
CommitterhandlesprecommitSharedBridgeandcommitBatchesSharedBridge, including batch metadata checks, L2 log processing, DA validation inputs, and batch commitment creation.Executorhandles proof validation, batch execution, and batch reverts.
Each L2 -> L1 system log will have a key that is part of the following:
enum SystemLogKey {
  L2_TO_L1_LOGS_TREE_ROOT_KEY,
  TOTAL_L2_TO_L1_PUBDATA_KEY,
  STATE_DIFF_HASH_KEY,
  PACKED_BATCH_AND_L2_BLOCK_TIMESTAMP_KEY,
  PREV_BATCH_HASH_KEY,
  CHAINED_PRIORITY_TXN_HASH_KEY,
  NUMBER_OF_LAYER_1_TXS_KEY,
  EXPECTED_SYSTEM_CONTRACT_UPGRADE_TX_HASH_KEY
}
When a batch is committed, we process L2 -> L1 system logs. Here are the invariants that are expected there:
- In a given batch there will be either 7 or 8 system logs. The 8th log is only required for a protocol upgrade.
- There will be a single log for each key that is contained within
SystemLogKey - Three logs from the
L2_TO_L1_MESSENGERwith keys: L2_TO_L1_LOGS_TREE_ROOT_KEYTOTAL_L2_TO_L1_PUBDATA_KEYSTATE_DIFF_HASH_KEY- Two logs from
L2_SYSTEM_CONTEXT_SYSTEM_CONTRACT_ADDRwith keys:PACKED_BATCH_AND_L2_BLOCK_TIMESTAMP_KEYPREV_BATCH_HASH_KEY
- Two or three logs from
L2_BOOTLOADER_ADDRESSwith keys:CHAINED_PRIORITY_TXN_HASH_KEYNUMBER_OF_LAYER_1_TXS_KEYEXPECTED_SYSTEM_CONTRACT_UPGRADE_TX_HASH_KEY
- None logs from other addresses (may be changed in the future).
DiamondInit
It is a one-function contract that implements the logic of initializing a diamond proxy. It is called only once on the diamond constructor and is not saved in the diamond as a facet.
Implementation detail - function returns a magic value just like it is designed in EIP-1271, but the magic value is 32 bytes in size.
Bridges
Bridges are completely separate contracts from the Diamond. They are a wrapper for L1 <-> L2 communication on contracts on both L1 and L2. Upon locking assets on L1, a request is sent to mint these bridged assets on L2. Upon burning assets on L2, a request is sent to unlock them on L2.
Unlike the native Ether bridging, all other assets can be bridged by the custom implementation relying on the trustless L1 <-> L2 communication.
L1ERC20Bridge
The “legacy” implementation of the ERC20 token bridge. Works only with regular ERC20 tokens, i.e. not with fee-on-transfer tokens or other custom logic for handling user balances.
deposit- lock funds inside the contract and send a request to mint bridged assets on L2.claimFailedDeposit- unlock funds if the deposit was initiated but then failed on L2.finalizeWithdrawal- unlock funds for the valid withdrawal request from L2.
The owner of the L1ERC20Bridge is the Governance contract.
L1AssetRouter
The main bridge implementation handles transfers Ether, ERC20 tokens and of WETH tokens between the two domains. It is designed to streamline and enhance the user experience for bridging WETH tokens by minimizing the number of transactions required and reducing liquidity fragmentation thus improving efficiency and user experience.
This contract accepts WETH deposits on L1, unwraps them to ETH, and sends the ETH to the L2 WETH bridge contract, where it is wrapped back into WETH and delivered to the L2 recipient.
Thus, the deposit is made in one transaction, and the user receives L2 WETH that can be unwrapped to ETH.
For withdrawals, the contract receives ETH from the L2 WETH bridge contract, wraps it into WETH, and sends the WETH to the L1 recipient.
The owner of the L1WethBridge contract is the Governance contract.
L2SharedBridge
The L2 counterpart of the L1 Shared bridge.
withdraw- initiate a withdrawal by burning funds on the contract and sending a corresponding message to L1.finalizeDeposit- finalize the deposit and mint funds on L2. The function is only callable by L1 bridge.
The owner of the L2SharedBridge and the contracts related to it is the Governance contract.
Governance
This contract manages calls for all governed zkEVM contracts on L1 and L2. Mostly, it is used for upgradability an changing critical system parameters. The contract has minimum delay settings for the call execution.
Each upgrade consists of two steps:
- Scheduling - The owner can schedule upgrades in two different manners:
- Fully transparent data. All the targets, calldata, and upgrade conditions are known to the community before upgrade execution.
- Shadow upgrade. The owner only shows the commitment to the upgrade. This upgrade type is mostly useful for fixing critical issues in the production environment.
- Upgrade execution - the Owner or Security council can perform the upgrade with previously scheduled parameters.
- Upgrade with delay. Scheduled operations should elapse the delay period. Both the owner and Security Council can execute this type of upgrade.
- Instant upgrade. Scheduled operations can be executed at any moment. Only the Security Council can perform this type of upgrade.
Please note that the cancel function is owner-only, so the Security Council cannot unilaterally cancel a scheduled operation. A cancellation can still be executed through the owner — the Protocol Upgrade Handler — whose emergency upgrade path requires approvals from the Security Council, the Guardians, and the ZK Foundation together.
The diagram below outlines the complete journey from the initiation of an operation to its execution.
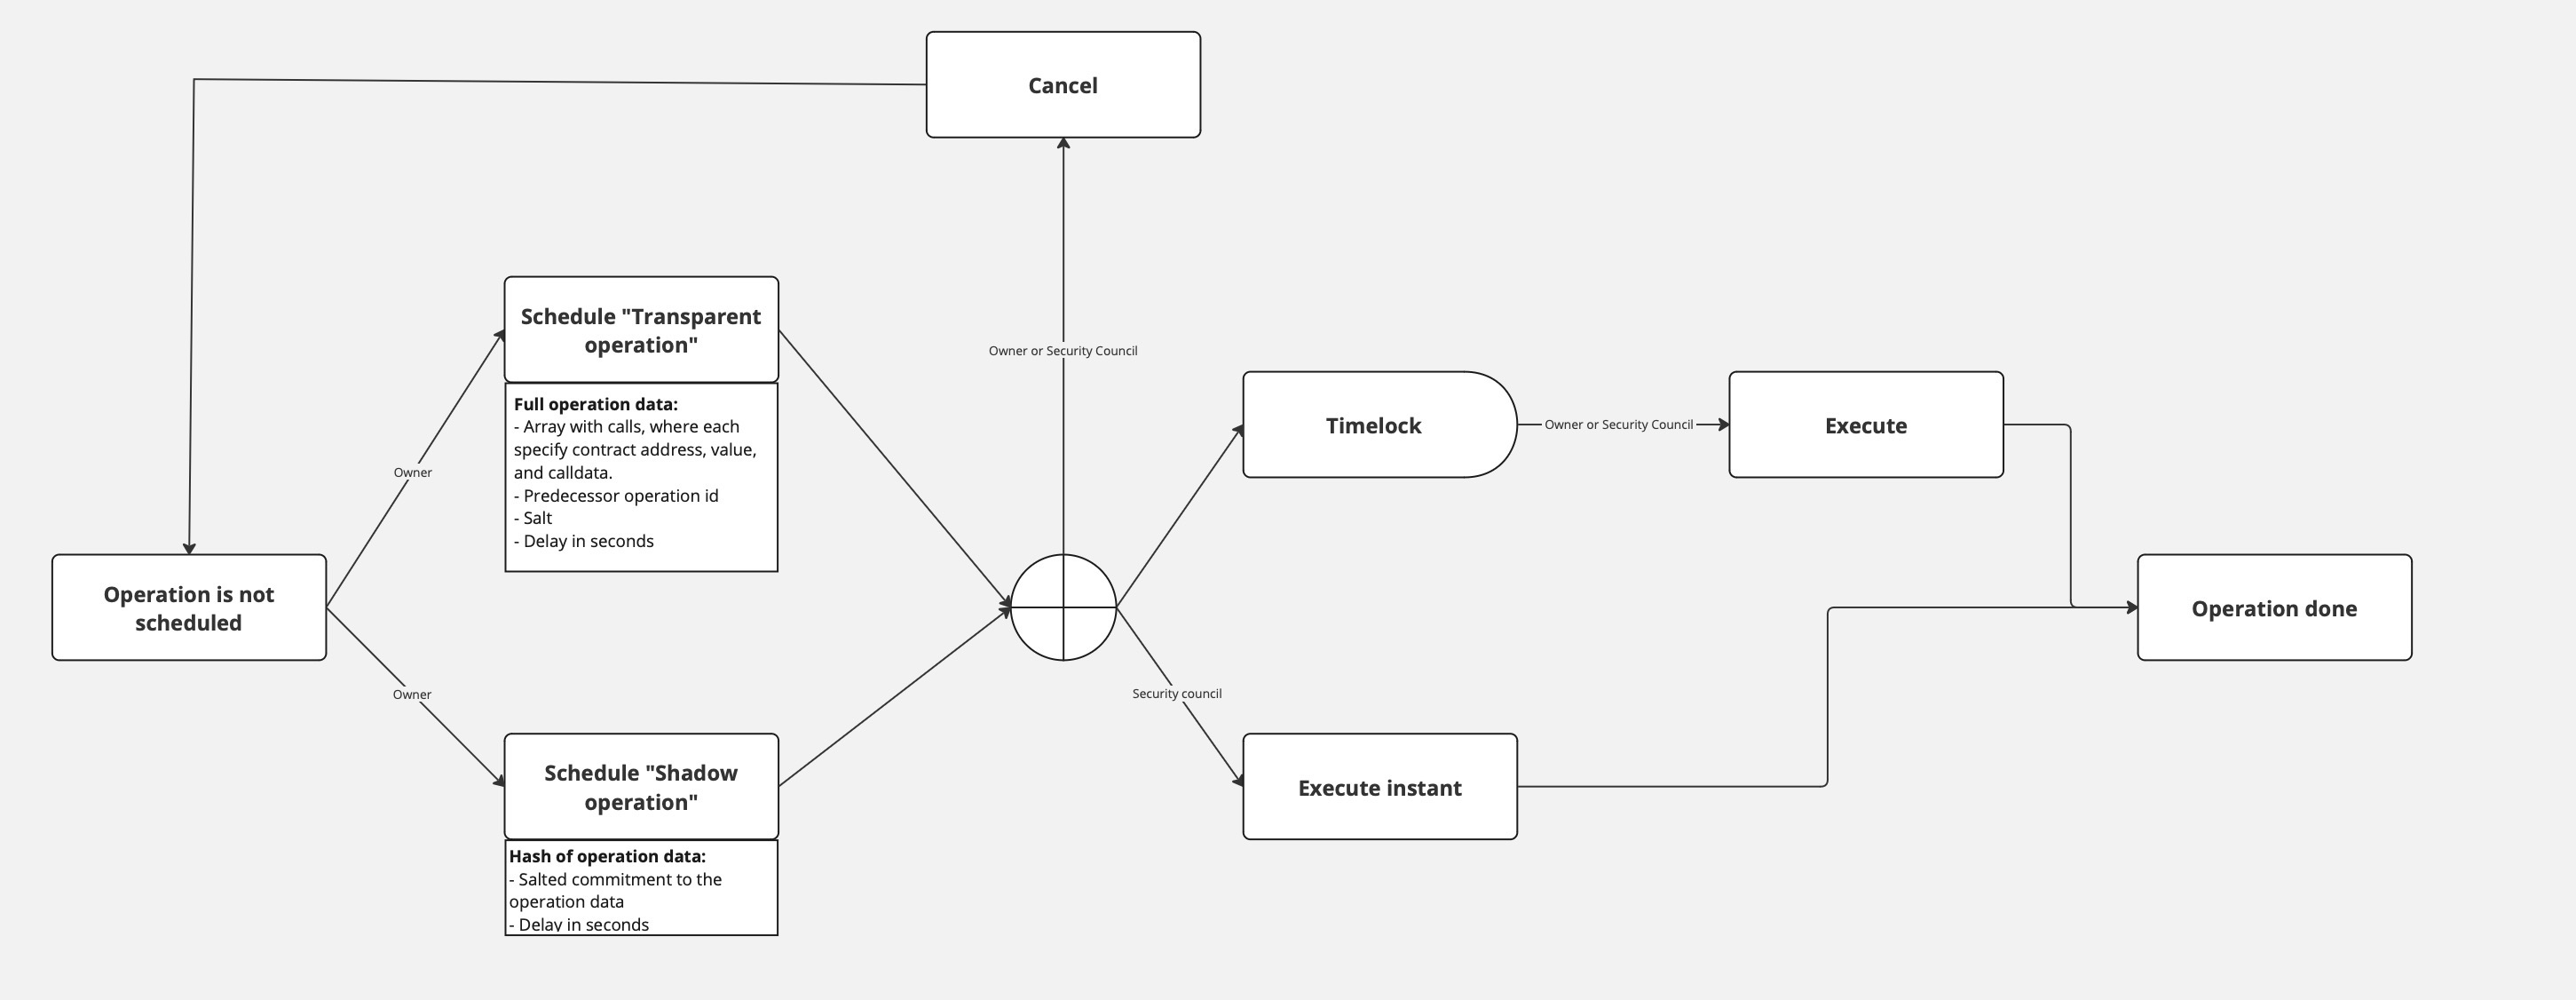
ValidatorTimelock
An intermediate smart contract between the validator EOA account and the ZKsync smart contract. Its primary purpose is to provide a trustless means of delaying batch execution without modifying the main ZKsync contract. ZKsync actively monitors the chain activity and reacts to any suspicious activity by freezing the chain. This allows time for investigation and mitigation before resuming normal operations.
It is a temporary solution to prevent any significant impact of the validator hot key leakage, while the network is in the Alpha stage.
ValidatorTimelock uses per-chain role-based access control with six operational roles, each gating the corresponding
*SharedBridge entry point:
precommitSharedBridge→PRECOMMITTER_ROLEcommitBatchesSharedBridge→COMMITTER_ROLErevertBatchesSharedBridge→REVERTER_ROLEproveBatchesSharedBridge→PROVER_ROLEexecuteBatchesSharedBridge→EXECUTOR_ROLEupgradeChainFromVersion→UPGRADER_ROLE
The addValidator/removeValidator helpers grant or revoke all roles at once;
addValidatorRoles/removeValidatorRoles allow granular per-role assignment.
When the validator calls commitBatchesSharedBridge, the same calldata will be propagated to the ZKsync contract
(DiamondProxy through call where it invokes the CommitterFacet through delegatecall), and also a timestamp is
assigned to these batches to track the time these batches are committed by the validator to enforce a delay between
committing and execution of batches. Then, the validator can prove the already committed batches regardless of the
mentioned timestamp, and again the same calldata (related to the proveBatchesSharedBridge function) will be propagated
to the ZKsync contract. After the delay is elapsed, the validator is allowed to call executeBatchesSharedBridge to
propagate the same calldata to ZKsync contract.
The execution delay is dynamically read from the contract’s executionDelay() function by the node, eliminating the
need for manual configuration management.
The owner of the ValidatorTimelock contract is the same as the owner of the Governance contract - Matter Labs multisig.
Allowlist
The auxiliary contract controls the permission access list. It is used in bridges and diamond proxies to control which addresses can interact with them in the Alpha release. Currently, it is supposed to set all permissions to public.
The owner of the Allowlist contract is the Governance contract.
Deposit Limitation
The amount of deposit can be limited. This limitation is applied on an account level and is not time-based. In other words, each account cannot deposit more than the cap defined. The tokens and the cap can be set through governance transactions. Moreover, there is an allow listing mechanism as well (only some allow listed accounts can call some specific functions). So, the combination of deposit limitation and allow listing leads to limiting the deposit of the allow listed account to be less than the defined cap.
struct Deposit {
  bool depositLimitation;
  uint256 depositCap;
}
Currently, the limit is used only for blocking deposits of the specific token (turning on the limitation and setting the limit to zero). And on the near future, this functionality will be completely removed.
ZK Stack contracts specs
The order of the files here only roughly represents the order of reading. A lot of topics are intertwined, so it is recommended to read everything first to have a complete picture and then refer to specific documents for more details.
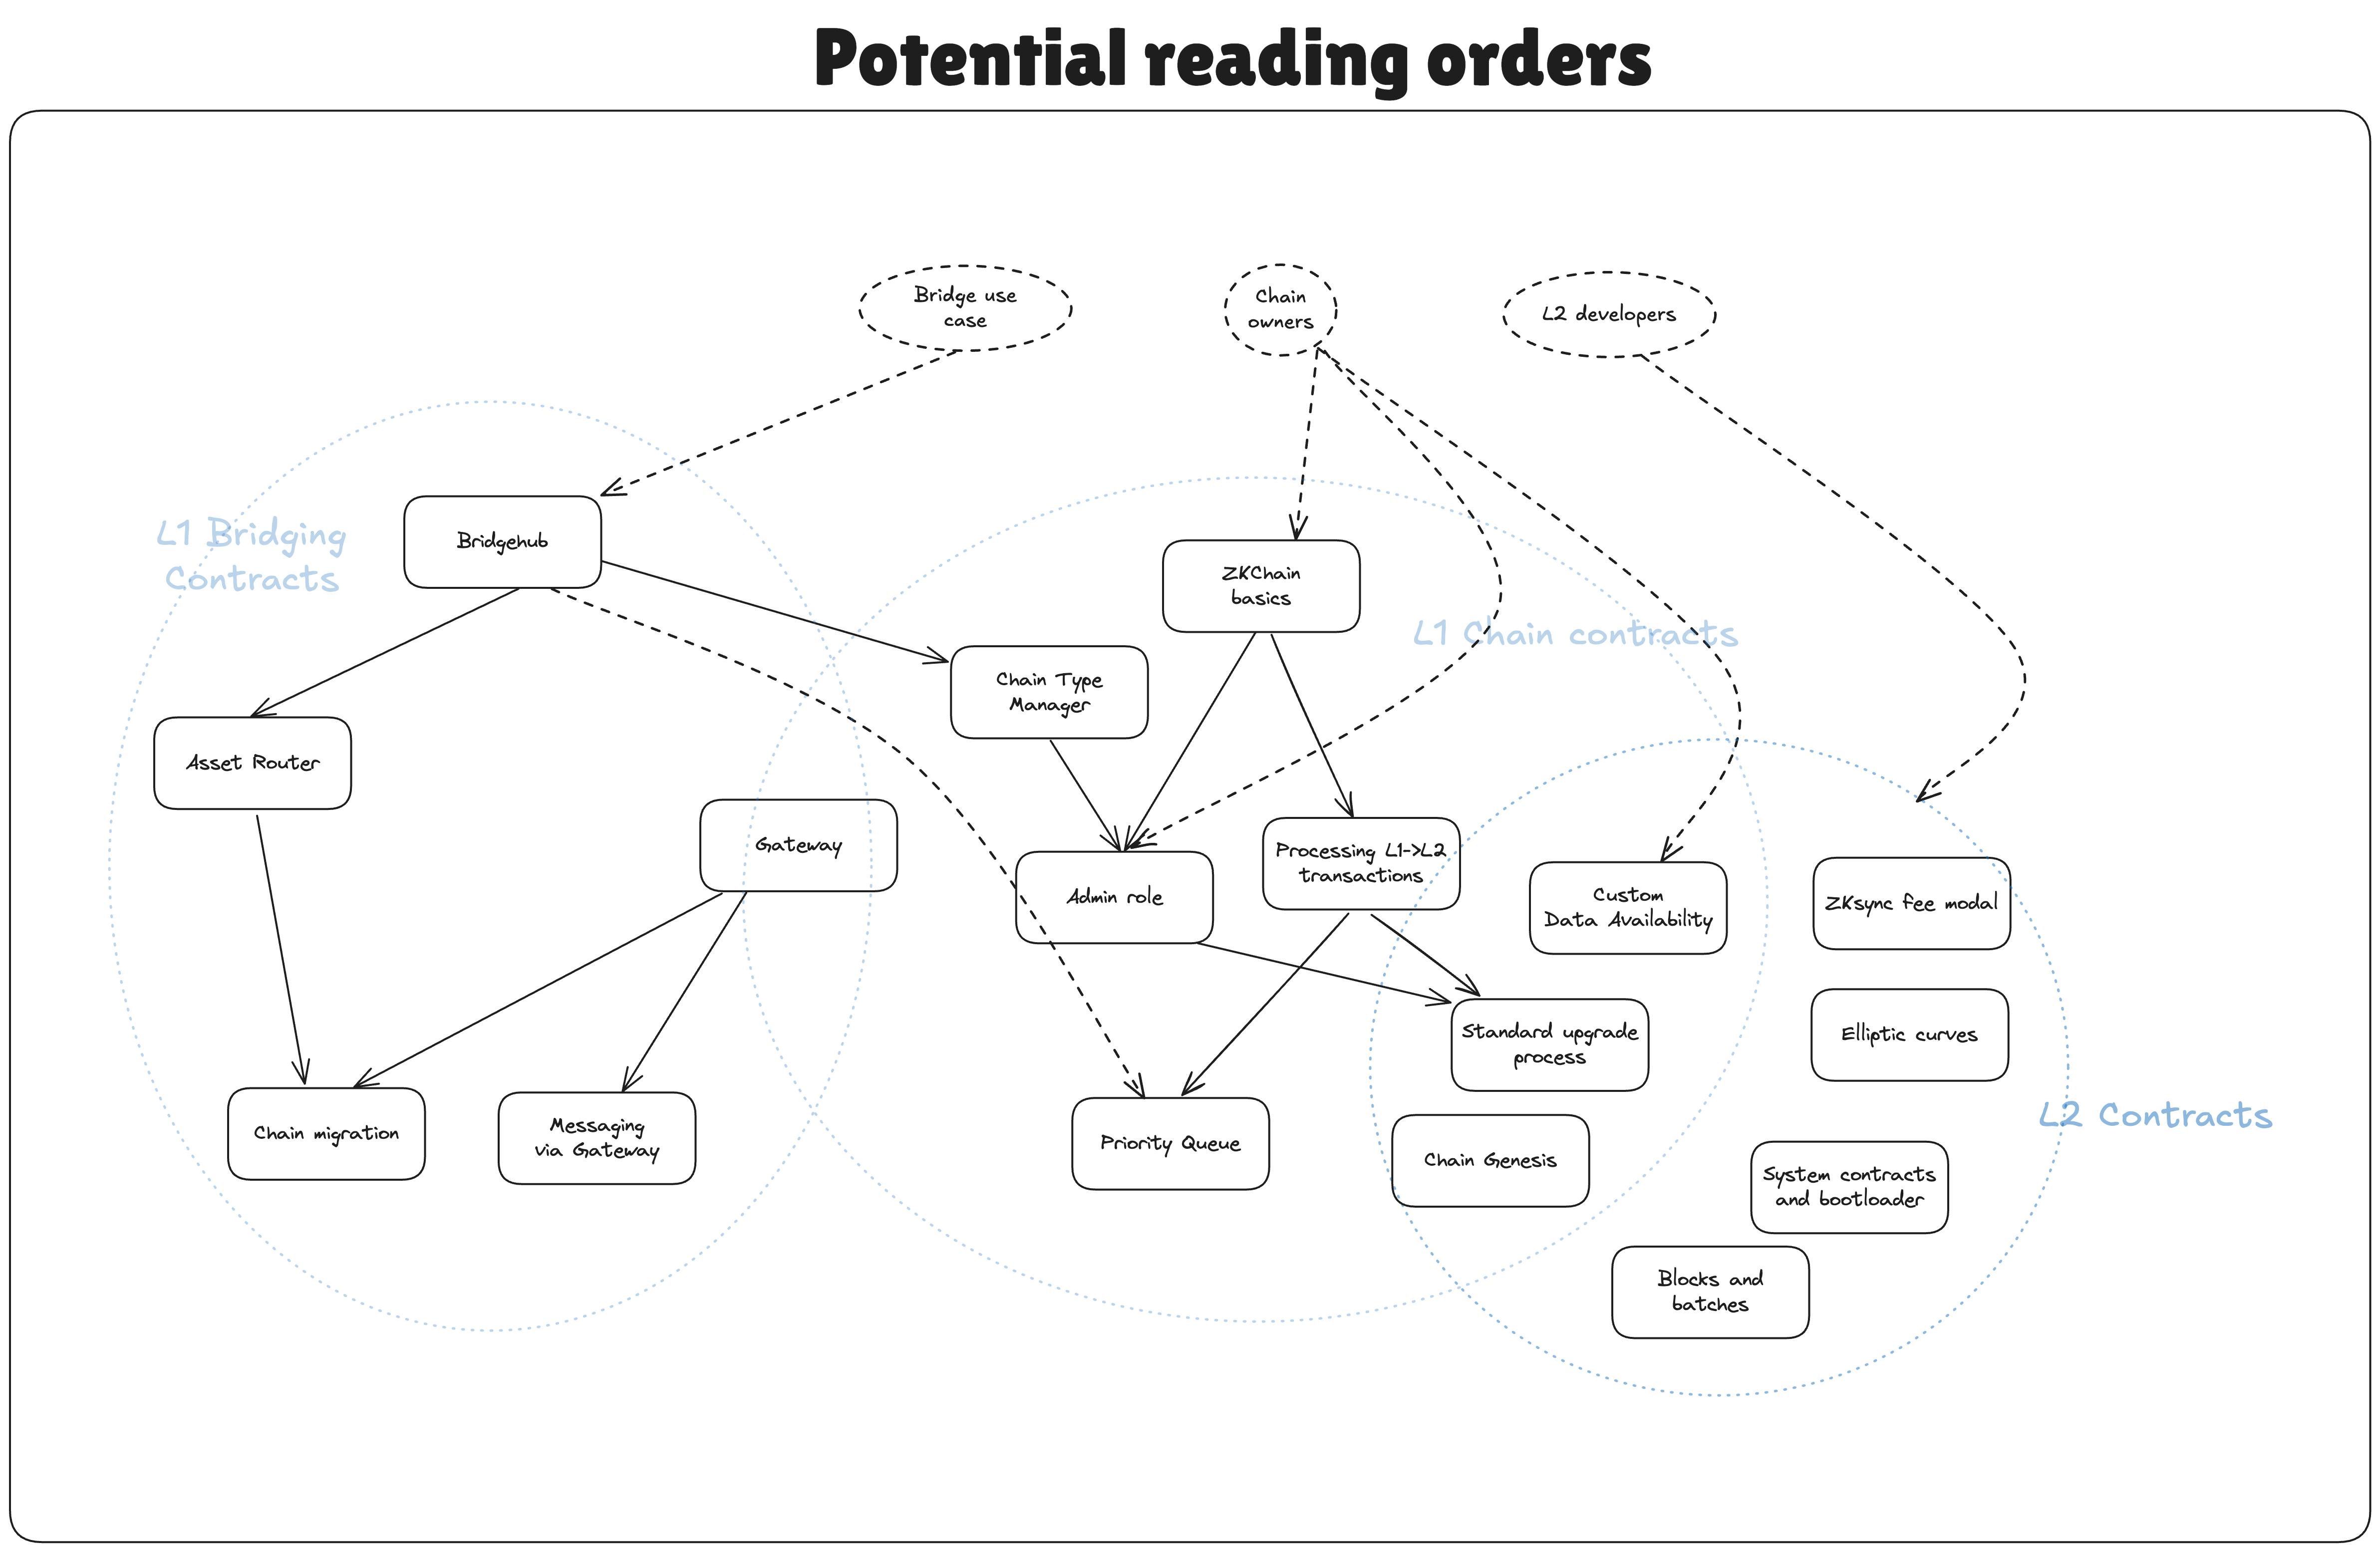
Contracts repo structure
The repository contains the following sections:
- gas-bound-caller that contains
GasBoundCallerutility contract implementation. You can read more about it in its README. - da-contracts contracts that should be deployed on L1 only.
- l1-contracts. Despite the legacy name, it contains contracts that are deployed both on L1 and on L2. This folder encompasses bridging, ZK chain contracts, the contracts for chain admin, etc. The name is historical due to the fact that these contracts were usually deployed on L1 only. However with Gateway, settlement and bridging-related contracts will be deployed on both EVM and eraVM environment. Also, bridging has been unified between L1 and L2 in many places and so keeping everything in one project allows to avoid code duplication.
- l2-contracts. Contains contracts that are deployed only on L2.
- system-contracts. Contains system contracts or predeployed L2 contracts.
For auditors: Invariants/tricky places to look out for
This section is for auditors of the codebase. It includes some of the important invariants that the system relies on and which if broken could have bad consequences.
- Assuming that the accepting CTM is correct & efficient, the L1→GW part of the L1→GW→L2 transaction never fails. It is assumed that the provided max amount for gas is always enough for any transaction that can realistically come from L1.
- GW → L1 migration never fails. If it is possible to get into a state where the migration is not possible to finish, then the chain is basically lost. There are some exceptions where for now it is the expected behavior. (check out the “Migration invariants & protocol upgradability” section)
- The general consistency of chains when migration between different settlement layers is done. Including the feasibility of emergency upgrades, etc. I.e. whether the whole system is thought-through.
- Preimage attacks in the L2→L1 tree, we apply special prefixes to ensure that the tree structure is fixed, i.e. all logs are 88 bytes long (this is for backwards compatibility reasons). For batch leaves and chain id leaves we use special prefixes.
- Data availability guarantees. Whether rollup users can always restore all their storage slots, etc.
The desired properties of the system are that funds can not be stolen from the L1 contracts, and that L2 constracts are executed securely.
Contracts
Contracts are used throughout the codebase. The core or the L2 system is coded in smart contracts, these can be found in zkEVM documentation
The chain uses contracts to settle.
Chain admins use contracts on L1 to manage the chain.
Contracts are also used to bridge assets between chains.
Glossary
- Validator/Operator - a privileged address that can commit/verify/execute L2 batches.
- L2 batch (or just batch) - An aggregation of multiple L2 blocks. Note, that while the API operates on L2 blocks, the prove system operates on batches, which represent a single proved VM execution, which typically contains multiple L2 blocks.
- Facet - implementation contract. The word comes from the EIP-2535.
- Gas - a unit that measures the amount of computational effort required to execute specific operations on the ZKsync Era network.
- MessageRoot, ChainRoot, ChainBatchRoot, LocalLogsRoot , L2ToL1LogsRoot- different nodes in the recursive Merkle tree used to aggregate messages. Note, LocalLogsRoot and L2ToL1LogsRoot are the same.
- assetId - unique 32 bytes used to identify different assets in the AssetRouter.
- Settlement Layer - the layer where a chains settles its batches. Can be L1 or Gateway.
Some terms are inherited from the wider Ethereum ecosystem.
List of contracts and abbreviations:
-
Chain Manager Contracts
-
Bridgehub
Main ecosystem contract. Tracks all the chains and their types (i.e. CTMs), based on their chain ID and addresses. This is where new chains register.
-
ChainTypeManager (CTM) Contract:
used to coordinate upgrades for a certain chain classes. We only support a single CTM currently.
-
CTMDeploymentTracker:
Tracks the deployment of a new CTM on different settlement layers, such as Gateway. Needed as the Bridgehub is registered in the AssetRouter as an AssetHandler for chains so that they can be migrated to the Gateway.
-
-
Chain contracts
- Diamond Proxy: A type of proxy contract (i.e. like Transparent Upgradable, Universal Upgradable). Currently only the ZK chains use this contract, so it is used sometimes as a synonym for the chain.
- MailboxFacet: functions on the chain used to send and receive messages to the L1
- GetterFacet: functions that are read-only and can be called by anyone
- AdminFacet: functions that are used to manage the chain
- ExecutorFacet: functions that are used to execute L2 batches
- Verifier
- Additional contracts:
- ValidatorTimelock
- DiamondInit
- PriorityQueue
- PriorityTree
- MessageVerification
- Any upgrade contract, i.e. GatewayUpgrade
- Diamond Proxy: A type of proxy contract (i.e. like Transparent Upgradable, Universal Upgradable). Currently only the ZK chains use this contract, so it is used sometimes as a synonym for the chain.
-
Messaging related contracts:
- MessageRoot
- L1Nullifier
-
Asset related contracts:
- AssetRouter
- NativeTokenVault
- Additional contracts:
- BridgeStandardERC29
- IAssetHandler
- DeploymentTracker
- Legacy:
- L1Erc20Bridge
- L2SharedBridge (upgraded from L2Erc20Bridge)
-
DA contracts:
- CalldataDA
- CaddlataDAGateway
- RelayedSLDAValidator
- RollupDAManager
- ValidiumL1DAValidator
-
Libraries and Primitives:
- DynamicIncrementalMerkleTree
- FullMerkleTree
- MessageHashing
Overview
Introduction
Ethereum’s future is rollup-centric. This means breaking with the current paradigm of isolated EVM chains to infrastructure that is focused on an ecosystem of interconnected zkEVMs, (which we name ZK Chains). This ecosystem will be grounded on Ethereum, requiring the appropriate L1 smart contracts. Here we outline our ZK Stack approach for these contracts, their interfaces, the needed changes to the existing architecture, as well as future features to be implemented.
If you want to know more about ZK Chains, check this blog post, or go through our docs.
High-level design
We want to create a system where:
- ZK Chains should be launched permissionlessly within the ecosystem.
- Settlement should be made cheap by proof aggregation.
- Interop should enable unified liquidity for assets across the ecosystem.
- Multi-chain smart contracts need to be easy to develop, which means easy access to traditional bridges, and other supporting architecture.
ZK Chains have specific trust requirements - they need to satisfy certain common standards so that they can trust each other. This means a single set of L1 smart contracts has to manage the proof verification for all ZK Chains, and if the proof system is upgraded, all chains have to be upgraded together. New chains will be able to be launched permissionlessly in the ecosystem according to this shared standard.
To allow unified liquidity each L1 asset (ETH, ERC20, NFTs) will have a single bridge contract on L1 for the whole ecosystem. These shared bridges will allow users to deposit, withdraw and transfer from any ZK Chain in the ecosystem. These shared bridges are also responsible for deploying and maintaining their counterparts on the ZK Chains. The counterparts will be asset contracts extended with bridging functionality.
To enable the bridging functionality:
- On the L1 we will add a Bridgehub contract which connects asset bridges to all the ZK Chains.
- On the ZK Chain side we will add special system contracts that enable these features.
We want to make the ecosystem as modular as possible, giving developers the ability to modify the architecture as needed; consensus mechanism, staking, and DA requirements.
We also want the system to be forward-compatible, alternative Chain Type Manager (CTM) contracts. Those future features have to be considered in this initial design, so it can evolve to support them (meaning, chains being launched now will still be able to leverage them when available).
Architecture
General Architecture
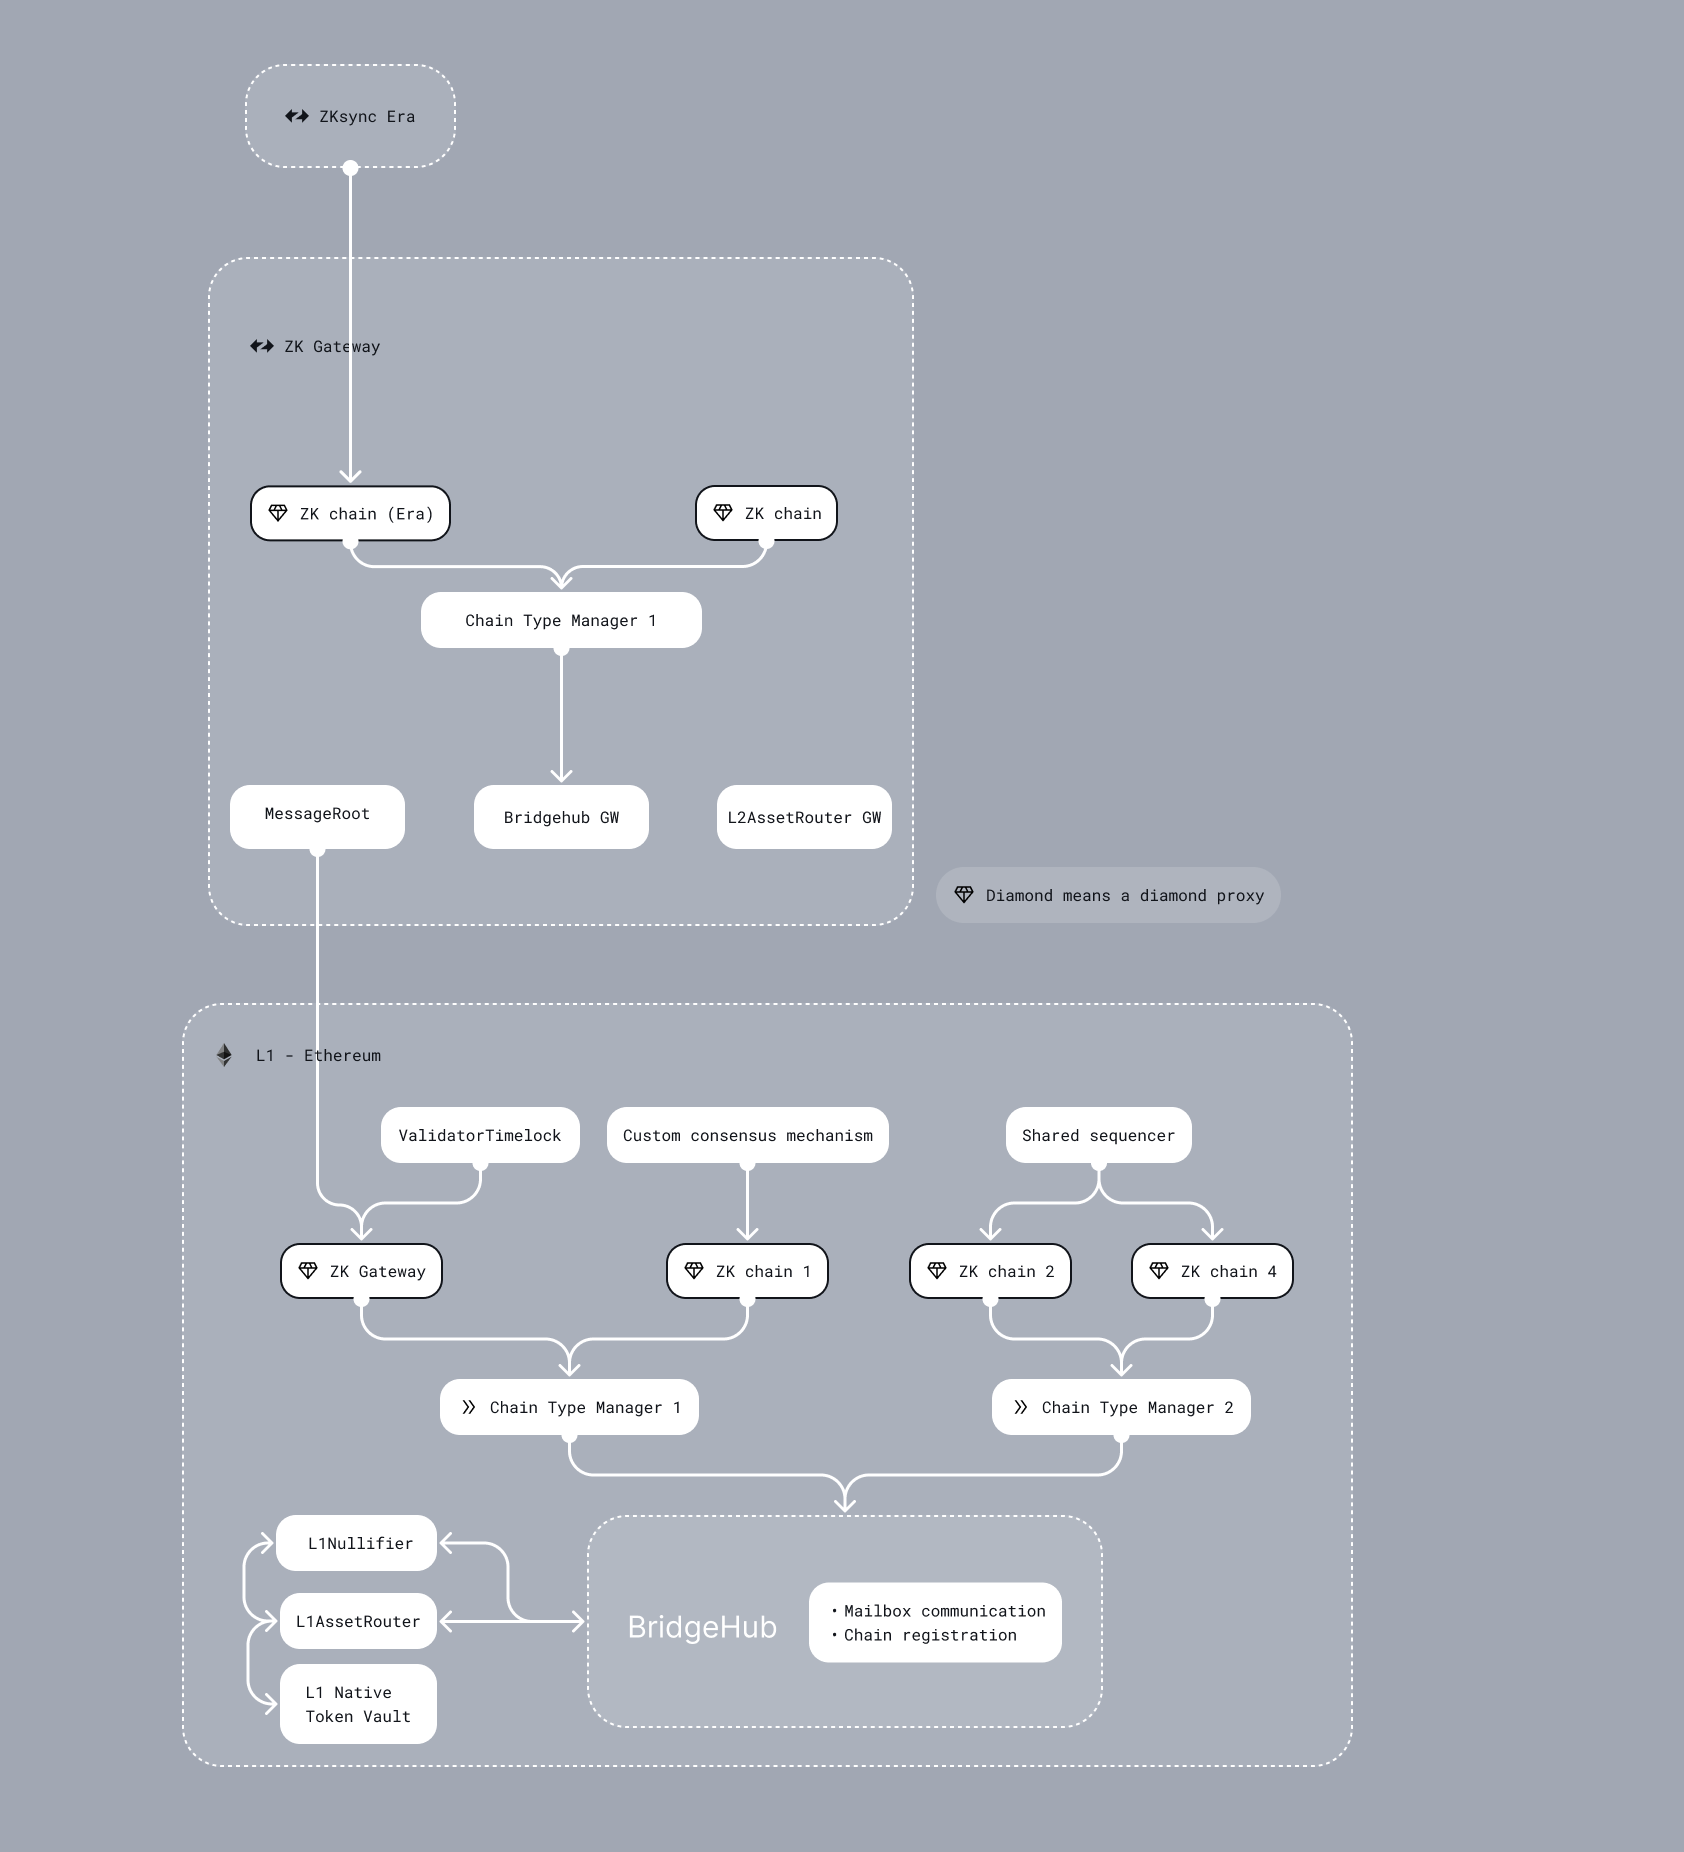
Components
Bridgehub
-
This is the main registry contract. This is where ZK Chains can register, starting in a permissioned manner, but with the goal to be permissionless in the future. This is where their
chainIDis determined. Chains on Gateway will also register here. ThisRegistryis also where Chain Type Manager contracts should register. Each chain has to specify its desired CTM when registering (Initially, only one will be available).function newChain( uint256 _chainId, address _chainTypeManager ) external returns (uint256 chainId); function newChainTypeManager(address _chainTypeManager) external;
Chain Type Manager
ChainTypeManagerA chain type manager manages proof verification and standard rollup DA for multiple chains. It also implements the following functionalities:ChainTypeRegistryThe chain type is shared for multiple chains, so initialization and upgrades have to be the same for all chains. Registration is not permissionless but happens based on the registrations in the bridgehub’sRegistry. At registration aDiamondProxyis deployed and initialized with the appropriateFacetsfor each ZK Chain.FacetsandVerifierare shared across chains that use the same chain type. The chain diamond is initialized withAdmin,Getters,Mailbox,Committer,Executor, andMigratorfacets.ZKChainBaseis an inherited base contract, not a diamond facet. TheCommitterhandles batch precommit/commit logic, including L2 log processing and batch commitment creation. TheExecutorhandles proving, executing, and reverting batches, and calls theVerifierduring proof validation. TheMigratorhandles settlement-layer migration logic- Upgrade Mechanism The system requires all chains to be up-to-date with the latest implementation, so whenever an
update is needed, we have to “force” each chain to update, but due to decentralization, we have to give each chain a
time frame. This is done in the update mechanism contract, this is where the bootloader and system contracts are
published, and the
ProposedUpgradeis stored. Then each chain can call this upgrade for themselves as needed. After the deadline is over, the not-updated chains are frozen, that is, cannot post new proofs. Frozen chains can unfreeze by updating their proof system.
- Each chain has a
DiamondProxy.- The Diamond Proxy is the proxy pattern that is used for the chain contracts. A diamond proxy points to multiple implementation contracts called facets. Each selector is saved in the proxy, and the correct facet is selected and called.
- In the future the DiamondProxy can be configured by picking alternative facets e.g. Validiums will have their own
Executor
Chain specific contracts
- A chain might implement its own specific consensus mechanism. This needs its own contracts. Only this contract will be able to submit proofs to the State Transition contract.
- DA contracts.
- Currently, the
ValidatorTimelockis an example of such a contract.
Components interactions
In this section, we will present some diagrams showing the interaction of different components.
New Chain
A chain registers in the Bridgehub, this is where the chain ID is determined. Read more about it here. The chain’s governor specifies the State Transition that they plan to use. In the first version only a single State Transition contract will be available for use, our with Boojum proof verification.
At initialization we prepare the DiamondInit contract. We store the genesis batch hash in the chain contract, all
chains start out with the same state. A diamond proxy is deployed and initialised with this initial value, along with
predefined facets which are made available by the chain contract. These facets contain the proof verification and other
features required to process proofs. The chain ID is set in the VM in a special system transaction sent from L1.
Common Standards and Upgrades
In this initial phase, ZK Chains have to follow some common standards, so that they can trust each other. Read more about it here. This means all chains start out with the same empty state, they have the same VM implementations and proof systems, asset contracts can trust each on different chains, and the chains are upgraded together. We elaborate on the shared upgrade mechanism here.
Upgrade mechanism
Currently, there are three types of upgrades for zkEVM. Normal upgrades (used for new features) are initiated by the Governor (a multisig) and are public for a certain timeframe before they can be applied. Shadow upgrades are similar to normal upgrades, but the data is not known at the moment the upgrade is proposed, but only when executed (they can be executed with the delay, or instantly if approved by the security council). Instant upgrades (used for security issues), on the other hand happen quickly and need to be approved by the Security Council in addition to the Governor. For ZK Chains the difference is that upgrades now happen on multiple chains. This is only a problem for shadow upgrades - in this case, the chains have to tightly coordinate to make all the upgrades happen in a short time frame, as the content of the upgrade becomes public once the first chain is upgraded. The actual upgrade process is as follows:
- Prepare Upgrade for all chains:
- The new facets and upgrade contracts have to be deployed,
- The upgrade’ calldata (diamondCut, initCalldata with ProposedUpgrade) is hashed on L1 and the hash is saved.
- Upgrade specific chain
- The upgrade has to be called on the specific chain. The upgrade calldata is passed in as calldata and verified. The protocol version is updated.
- Ideally, the upgrade will be very similar for all chains. If it is not, a smart contract can calculate the
differences. If this is also not possible, we have to set the
diamondCutfor each chain by hand.
- Freeze not upgraded chains
- After a certain time the chains that are not upgraded are frozen.
Bridgehub
Introduction
Bridgehub is the main chain registry contract for the ecosystem, that stores:
- A mapping from chainId to chains address
- A mapping from chainId to the CTM it belongs to.
- A mapping from chainId to its base token (i.e. the token that is used for paying fees)
- Whitelisted settlement layers (i.e. Gateway)
Note sure what CTM is? Check our the overview.
The Bridgehub is the contract where new chains can register. Overall, it is the main registry for all the contracts. Note, that a clone of Bridgehub is also deployed on each L2 chain, it is used to start interop txs by checking that the chain is active. It is also used on settlement layers such as Gateway. All the in all, the architecture of the entire ecosystem can be seen below:
Chain Type Manager (CTM)
If someone is already familiar with the previous version of ZKsync architecture, this contract was previously known as “State Transition Manager (STM)”.
Currently bridging between different zk rollups requires the funds to pass through L1. This is slow & expensive.
The vision of seamless internet of value requires transfers of value to be both seamless and trustless. This means that for instance different chains need to share the same L1 liquidity, i.e. a transfer of funds should never touch L1 in the process. However, it requires some sort of trust between two chains. If a malicious (or broken) rollup becomes a part of the shared liquidity pool it can steal all the funds.
However, can two instances of the same zk rollup trust each other? The answer is yes, because no new additions of rollups introduce new trust assumptions. Assuming there are no bugs in circuits, the system will work as intended.
How can two rollups know that they are two different instances of the same system? We can create a factory of such contracts (and so we would know that each new rollup created by this instance is correct one). But just creating correct contracts is not enough. Ethereum changes, new bugs may be found in the original system & so an instance that does not keep itself up-to-date with the upgrades may exploit some bug from the past and jeopardize the entire system. Just deploying is not enough. We need to constantly make sure that all chains are up to date and maintain whatever other invariants are needed for these chains to trust each other.
Let’s define as Chain Type Manager (CTM) **as a contract that is responsible for the following:
- It serves as a factory to deploy new ZK chains.
- It is responsible for ensuring that all the chains deployed by it are up-to-date.
Note, that this means that chains have a “weaker” governance. I.e. governance can only do very limited number of things, such as setting the validator. Chain admin can not set its own upgrades and it can only “execute” the upgrade that has already been prepared by the CTM.
In the long term vision chains deployment will be permissionless, however CTM will always remain the main point of trust and will have to be explicitly whitelisted by the decentralized governance of the entire ecosystem before its chain can get the access to the shared liquidity.
Configurability in the current release
For now, only one CTM will be supported — the one that deploys instances of ZKsync Era, possibly using other DA layers. To read more about different DA layers, check out this document.
The exact process of deploying & registering a chain can be read here. Overall, each chain in the current release will have the following parameters:
| Chain parameter | Updatability | Comment |
|---|---|---|
| chainId | Permanent | Permanent identifier of the chain. Due to wallet support reasons, for now chainId has to be small (48 bits). This is one of the reasons why for now we’ll deploy chains manually, to prevent them from having the same chainId as some another popular chain. In the future it will be trustlessly assigned as a random 32-byte value. |
| baseTokenAssetId | Permanent | Each chain can have their own custom base token (i.e. token used for paying the fees). It is set once during creation and can never be changed. Note, that we refer to and “asset id” here instead of an L1 address. To read more about what is assetId and how it works check out the document for asset router |
| chainTypeManager | Permanent | The CTM that deployed the chain. In principle, it could be possible to migrate between CTMs (assuming both CTMs support that). However, in practice it may be very hard and as of now such functionality is not supported. |
| admin | By admin of chain | The admin of the chain. It has some limited powers to govern the chain. To read more about which powers are available to a chain admin and which precautions should be taken, check out this document |
| validatorTimelock | CTM | For now, we want all the chains to use the same 3h timelock period before their batches are finalized. Only CTM can update the address that can submit state transitions to the rollup (that is, the validatorTimelock). |
| validatorTimelock.validator | By admin of chain | The admin of chain can choose who can submit new batches to the ValidatorTimelock. |
| priorityTx FeeParams | By admin of chain | The admin of a ZK chain can amend the priority transaction fee params. |
| transactionFilterer | By admin of chain | A chain may put an additional filter to the incoming L1->L2 transactions. This may be needed by a permissioned chain (e.g. a Validium bank-like corporate chain). |
| DA validation / permanent rollup status | By admin of chain | A chain can decide which DA layer to use. You check out more about safe DA management here |
| executing upgrades | By admin of chain | While exclusively CTM governance can set the content of the upgrade, chains will typically be able to choose suitable time for them to actually execute it. In the current release, chains will have to follow our upgrades. |
| settlement layer | By admin of chain | The admin of the chain can enact migrations to other settlement layers. |
Note, that if we take a look at the access control for the corresponding functions inside the AdminFacet, the may see that a lot of methods from above that are marked as “By admin of chain” could be in theory amended by the ChainTypeManager. However, this sort of action requires approval from decentralized governance. Also, in case of an urgent high risk situation, the decentralized governance might force upgrade the contract via CTM.
Upgradability in the current release
In the current release, each chain will be an instance of ZKsync Era and so the upgrade process of each individual chain will be similar to that of ZKsync Era.
-
Firstly, the governance of the CTM will publish the server (including sequencer, prover, etc) that support the new version . This is done offchain. Enough time should be given to various zkStack devs to update their version.
-
The governance of the CTM will publish the upgrade onchain by automatically executing the following three transactions:
setChainCreationParams⇒ to ensure that new chains will be created with the versionsetValidatorTimelock(if needed) ⇒ to ensure that the new chains will use the new validator timelock right-awaysetNewVersionUpgrade⇒ to save the upgrade information that each chain will need to follow to conduct the upgrade on their side.
-
After that, each ChainAdmin can upgrade to the new version in suitable time for them.
Note, that while the governance does try to give the maximal possible time for chains to upgrade, the governance will typically put restrictions (aka deadlines) on the time by which the chain has to be upgraded. If the deadline is passed, the chain can not commit new batches until the upgrade is executed.
Emergency upgrade
In case of an emergency, the security council has the ability to freeze the ecosystem and conduct an emergency upgrade.
In case we are aware that some of the committed batches on a chain are dangerous to be executed, the CTM can call revertBatches on that chain. This is performed by the CTM owner — the governance-controlled Protocol Upgrade Handler — typically as part of a freeze and emergency upgrade. This action does not lead to funds being lost. Note that reverting batches is not exclusive to the CTM: the underlying revertBatchesSharedBridge function on the chain is callable by both the CTM and the chain’s validators (via the REVERTER_ROLE on the ValidatorTimelock), so a chain’s operator can also revert its own not-yet-executed batches.
Issues & caveats
- If an ZK chain skips an upgrade (i.e. it has version X, it did not upgrade to
X + 1and now the latest protocol version isX + 2there is no built-in way to upgrade). This team will require manual intervention from us to upgrade. - The approach of calling
revertBatchesfor malicious chains is not scalable (O(N) of the number of chains). The situation is very rare, so it is fine in the short term, but not in the long run.
Safe ChainAdmin management
While the ecosystem does a decentralized trusted governance, each chain has its own Chain Admin. While the upgrade parameters are chosen by the governance, chain admin is still a powerful role and should be managed carefully.
In this document we will explore what are the abilities of the ChainAdmin, how dangerous they are and how to mitigate potential issues.
General guidelines
The system does not restrict in any way how the admin of the chain should be implemented. However special caution should be taken to keep it safe.
The general guideline is that an admin of a ZK chain should be at least a well-distributed multisig. Having it as an EOA is definitely a bad idea since having this address stolen can lead to chain being permanently frozen.
Additional measures may be taken to self-restrict the ChainAdmin to ensure that some operations can be only done in safe fashion.
Generally all the functionality of chain admin should be treated with maximal security and caution, and having hotkey separate roles in rare circuimstances, e.g. to call setTokenMultiplier in case of an ERC-20 based chain.
Chain Admin functionality
Setting validators for a chain
The admin of a chain can call ValidatorTimelock on the settlement layer to add or remove validators via addValidator/removeValidator (which grant/revoke all six per-chain roles at once), or assign individual roles granularly via addValidatorRoles/removeValidatorRoles i.e. for an addresses to have the right to commit/verify/execute batches.
The system is protected against malicious validators, they can never steal funds from users. However, this role is still relatively powerful: If the DA layer is not reliable, and a batch does get executed, the funds may be frozen. This is why the chains should be cautious about DA layers that they use. Note, that on L1 the ValidatorTimelock has 3h delay, while on Gateway this timelock will not be present.
In case the malicious block has not been executed yet, it can be reverted.
Setting DA layer
This is one of the most powerful settings that a chain can have: setting a custom DA layer. The dangers of doing this wrong are obvious: lack of proper data availability solution may lead to funds being frozen. Term “frozen funds” mainly refers to the inability to reconstruct the complete state since externally only the root hash is visible, thus preventing the chain from progressing. (Note: that funds can never be stolen due to ZKP checks of the VM execution).
Sometimes, users may need assurances that a chain will never become frozen even under a malicious chain admin. A general though unstable approach is discussed here, however this release comes with a solution specially tailored for rollups: the isPermanentRollup setting.
isPermanentRollup setting
Chain also exposes the AdminFacet.makePermanentRollup function. It will turn a chain into a permanent rollup, ensuring that DA validator pairs can be only set to values that are approved by decentralized governance to be used for rollups.
This functionality is obviously dangerous in a sense that it is permanent and revokes the right of the chain to change its DA layer. On the other hand, it ensures perpetual safety for users. This is the option that ZKsync Era is using.
changeFeeParams method
This method allows to change how the fees are charged for priority operations.
The worst impact of setting this value wrongly is having L1->L2 transactions underpriced.
setTokenMultiplier method
This method allows to set the token multiplier, i.e. the ratio between the price of ETH and the price of the token. It will be used for L1->L2 priority transactions.
Typically, ChainAdmins of ERC20 chains will have a special hotkey responsible for calling this function to keep the price up to date. An example on how it is implemented in the current system can be seen here.
The worst impact of setting this value wrongly is having L1->L2 transactions underpriced.
setPubdataPricingMode
This method allows to set whether the pubdata price will be taken into account for priority operations.
The worst impact of setting this value wrongly is having L1->L2 transactions underpriced.
setTransactionFilterer
This method allows to set a transaction filterer, i.e. an additional validator for all incoming L1->L2 transactions. The worst impact is users’ transactions being censored.
Migration to another settlement layer
The upgrade can start migration of a chain to another settlement layer. Currently all the settlement layers are whitelisted, so generally this operation is harmless (except for the inconvenience in case the migration was unplanned).
However, some caution needs to be applied to migrate properly as described in the section below.
Chain admin when migrating to gateway
When a chain migrates to gateway, it provides the address of the new admin on L2. The following rules apply:
- If a ZK chain has already been deployed on a settlement layer, its admin stays the same.
- If a ZK chain has not been deployed yet, then the new admin is set.
The above means that in the current release the admin of the chain on the new settlement layer is “detached” from the admin on L1. It is the responsibility of the chain to set the L2 admin correctly: either it should have the same signers or, even better in the long run, put the aliased L1 admin to have most of the abilities inside the L2 chain admin.
Since most of the Admin’s functionality above are related to L1->L2 operations, the L1 chain admin will continue playing a crucial role even after the chain migrates to Gateway. However, some of the new functionality are relevant on the chain admin on the settlement layer only:
- Managing DA
- Managing new validators
- It is the admin of the settlement layer that do migrations of chains
As such, the choice of the L2 Admin is very important. Also, if the chain admin on the new settlement layer is not accessible (e.g. accidentally wrong address was chosen), the chain is lost:
- No validators will be set
- The chain can not migrate back
Overall very special care needs to be taken when selecting an admin for the migration to a new settlement layer.
Proposed modular ChainAdmin implementation
Warning. The proposed implementation here will likely not be used by the Matter Labs team for ZKsync Era due to the issues listed in the issues section. This code, however, is still in scope of the audit and may serve as a future basis of a more long term solution.
In order to ensure that the architecture here flexible enough for future other chains to use, it uses a modular architecture to ensure that other chains could fit it to their needs. By default, this contract is not even Ownable, and anyone can execute transactions out of the name of it. In order to add new features such as restricting calling dangerous methods and access control, restrictions should be added there. Each restriction is a contract that implements the IRestriction interface. The following restrictions have been implemented so far:
-
AccessControlRestrictionthat allows to specify which addresses can call which methods. In the case of Era, only theDEFAULT_ADMIN_ROLEwill be able to call any methods. Other chains with non-ETH base token may need an account that would periodically call the L1 contract to update the ETH price there. They may create theSET_TOKEN_MULTIPLIER_ROLErole that is required to update the token price and give its rights to some hot private key. -
PermanentRestrictionthat ensures that:
a) This restriction could not be lifted, i.e. the chain admin of the chain must forever have it. Even if the address of the ChainAdmin changes, it ensures that the new admin has this restriction turned on.
b) It specifies the calldata this which certain methods can be called. For instance, in case a chain wants to keep itself permanently tied to certain DA, it will ensure that the only DA validation method that can be used is rollup. Some sort of decentralized governance could be chosen to select which DA validation pair corresponds to this DA method.
The approach above does not only helps to protect the chain, but also provides correct information for chains that are present in our ecosystem. For instance, if a chain claims to perpetually have a certain property, having the PermanentRestriction as part of the chain admin can ensure all observers of that.
Issues and limitations
Due to specifics of migration to another settlement layers (i.e. that migrations do not overwrite the admin), maintaining the same PermanentRestriction becomes hard in case a restriction has been added on top of the chain admin inside one chain, but not the other.
While very flexible, this modular approach should still be polished enough before recommending it as a generic solution for everyone. However, the provided new ChainAdmin can still be helpful for new chains as with the AccessControlRestriction it provides a ready-to-use framework for role-based managing of the chain. Using PermanentRestriction for now is discouraged however.
Creating new chains with BridgeHub
The main contract of the whole ZK Chains ecosystem is called BridgeHub. It contains:
- the registry from chainId to CTMs that is responsible for that chainId
- the base token for each chainId.
- the whitelist of CTMs
- the whitelist of tokens allowed to be
baseTokensof chains. - the whitelist of settlement layers
- etc
BridgeHub is responsible for creating new chains. It is also the main point of entry for L1→L2 transactions for all the chains. Users won’t be able to interact with chains directly, all the actions must be done through the BridgeHub, which will ensure that the fees have been paid and will route the call to the corresponding chain. One of the reasons it was done this way was to have the unified interface for all chains that will ever be included in the ZK Chains ecosystem.
To create a chain, the BridgeHub.createNewChain function needs to be called:
/// @notice register new chain. New chains can be only registered on Bridgehub deployed on L1. Later they can be moved to any other layer.
/// @notice for Eth the baseToken address is 1
/// @param _chainId the chainId of the chain
/// @param _chainTypeManager the state transition manager address
/// @param _baseTokenAssetId the base token asset id of the chain
/// @param _salt the salt for the chainId, currently not used
/// @param _admin the admin of the chain
/// @param _initData the fixed initialization data for the chain
/// @param _factoryDeps the factory dependencies for the chain's deployment
function createNewChain(
    uint256 _chainId,
    address _chainTypeManager,
    bytes32 _baseTokenAssetId,
    // solhint-disable-next-line no-unused-vars
    uint256 _salt,
    address _admin,
    bytes calldata _initData,
    bytes[] calldata _factoryDeps
) external
BridgeHub will check that the CTM as well as the base token are whitelisted and route the call to the CTM
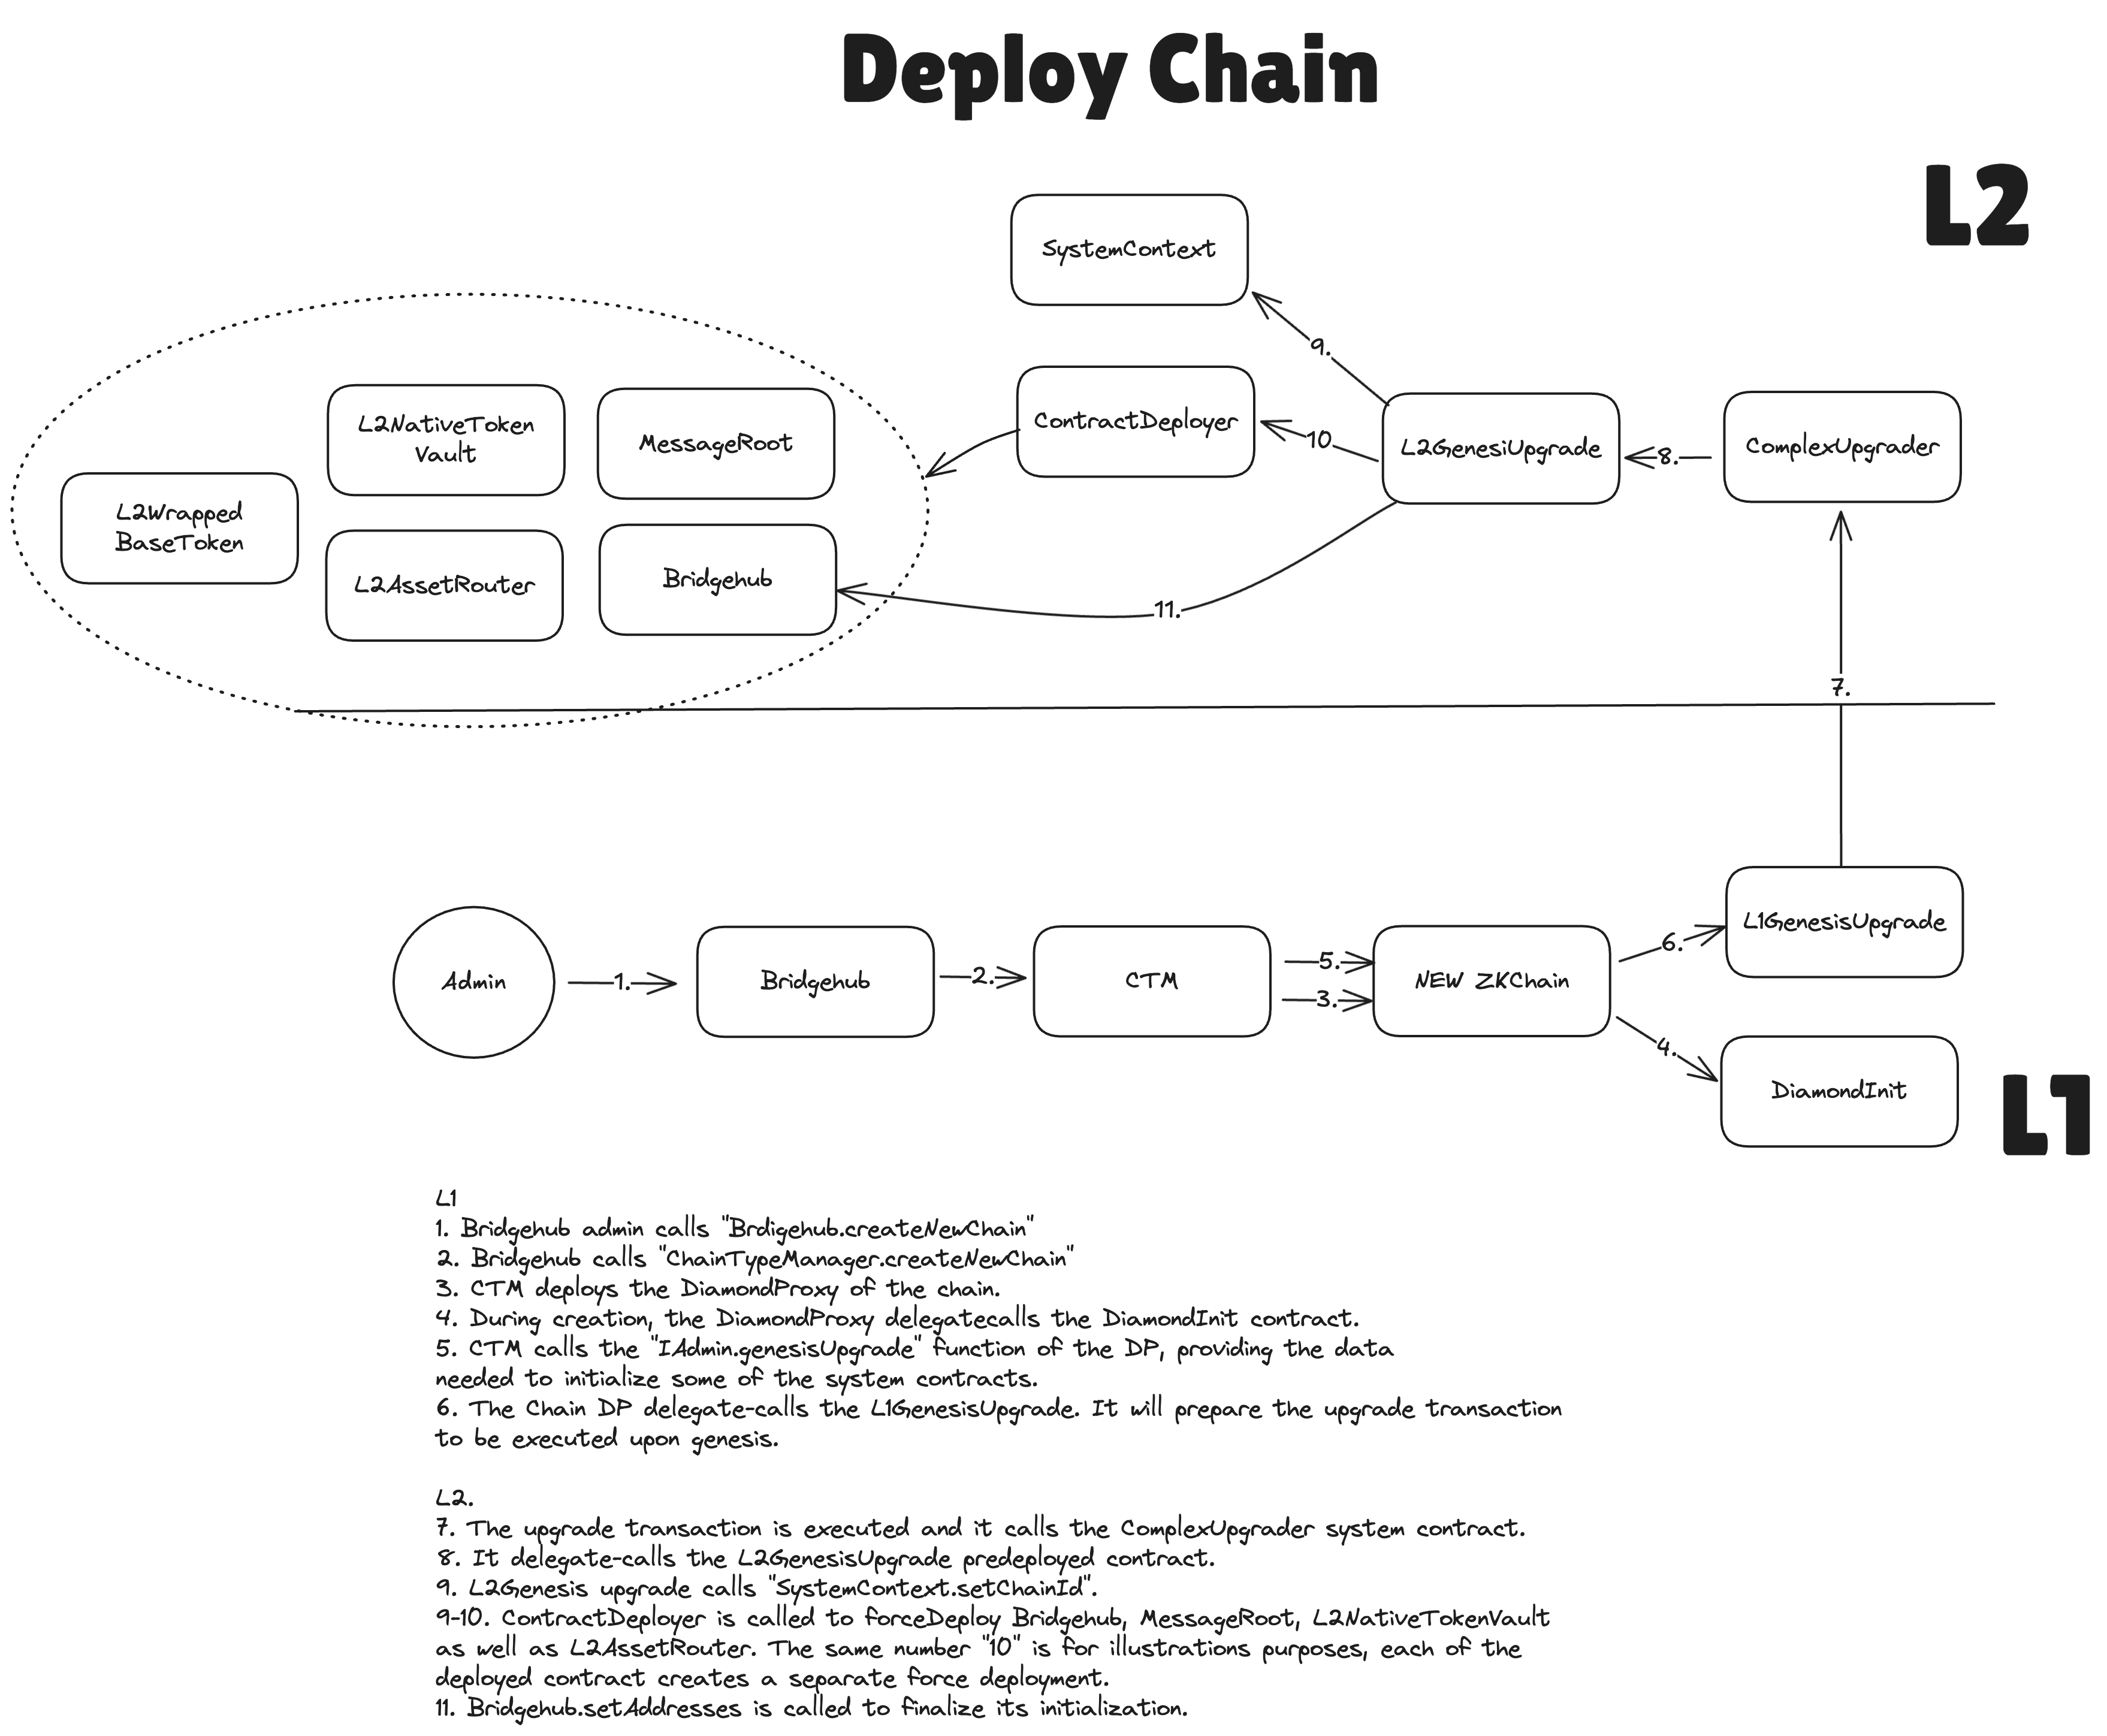
Creation of a chain in the current release
In the future, chain creation will be permissionless. A securely random chainId will be generated for each chain to be registered. However, generating 32-byte chainId is not feasible with the current SDK expectations on EVM and so for now chainId is of type uint48. And so it has to be chosen by the admin of BridgeHub. Also, for the current release we would want to avoid chains being able to choose their own initialization parameter to prevent possible malicious input.
For this reason, there will be an entity called admin which is basically a hot key managed by us and it will be used to deploy new chains.
So the flow for deploying their own chain for users will be the following:
- Users tell us that they want to deploy a chain with certain governance, CTM (we’ll likely allow only one for now), and baseToken.
- Our server will generate a chainId not reserved by any other major chain and the
adminwill call theBridgeHub.createNewChain. This will call theCTM.createNewChainthat will deploy the instance of the rollup as well as initialize the first transaction there — the system upgrade transaction needed to set the chainId on L2.
After that, the chain is ready to be used. Note, that the admin of the newly created chain (this will be the organization that will manage this chain from now on) will have to conduct certain configurations before the chain can be used securely.
Built-in contracts and their initialization
Each single ZK Chain has a set of the following contracts that, while not belong to kernel space, are built-in and provide important functionality:
- Bridgehub (the source code is identical to the L1 one). The role of bridgehub is to facilitate cross chain transactions. It contains a mapping from chainId to the address of the diamond proxy of the chain. It is really used only on the L1 and Gateway, i.e. layers that can serve as a settlement layer.
- L2AssetRouter. The new iteration of the SharedBridge.
- L2NativeTokenVault. The Native token vault on L2.
- MessageRoot (the source code is identical to the L1 one). Similar to bridgehub, it facilitates cross-chain communication, but is practically unused on all chains except for L1/GW.
It should be noted that those contracts are deployed at genesis and have the same address on all ZK Chains.
The exact addresses for those contracts are (with links to ZKsync Era explorer):
- Bridgehub –
0x0000000000000000000000000000000000010002. - L2AssetRouter –
0x0000000000000000000000000000000000010003. - L2NativeTokenVault –
0x0000000000000000000000000000000000010004. - MessageRoot –
0x0000000000000000000000000000000000010005.
To reuse as much code as possible from L1 and also to allow easier initialization, most of these contracts are not initialized as just part of the genesis storage root. Instead, the data for their initialization is part of the original diamondcut for the chain. In the same initial upgrade transaction when the chainId is initialized, these contracts are force-deployed and initialized also. An important part in it plays the new L2GenesisUpgrade contract, which is pre-deployed in a user-space contract, but it is delegate-called by the ComplexUpgrader system contract (already exists as part of genesis and existed before this upgrade).
Additional limitations for the current version
In the current version creating new chains will not be permissionless. That is needed to ensure that no malicious input can be provided there.
Limitations of custom base tokens in the current release
ZKsync Era uses ETH as a base token. Upon creation of an ZKChain other chains may want to use their own custom base tokens. Note, that for the current release all the possible base tokens are whitelisted. The other limitation is that all the base tokens must be backed 1-1 on L1 as well as they are solely implemented with L2BaseToken contract. In other words:
- No custom logic is allowed on L2 for base tokens
- Base tokens can not be minted on L2 without being backed by the corresponding L1 amount.
If someone wants to build a protocol that mints base tokens on L2, the option for now is to “mint” an infinite amount of those on L1, deposit on L2 and then give those out as a way to “mint”. We will update this in the future.
Upgrade process document
Intro
This document assumes that you have understanding about the structure on individual chains’ L1 contracts.
Upgrading the ecosystem of ZKChains is a complicated process. ZKSync is a complex ecosystem with many chains and contracts and each upgrade is unique, but there are some steps that repeat for most upgrades. These are mostly how we interact with the CTM, the diamond facets, the L1→L2 upgrade, how we update the verification keys.
Where each upgrade consists of two parameters:
- Facet cuts - change of the internal implementation of the diamond proxy
- Diamond Initialization - delegate call to the specified address with specified data
The second parameter is very powerful and flexible enough to move majority of upgrade logic there.
Preparation for the upgrade
The ZKsync ecosystem has governance smart contracts that govern the protocol. Only these contracts have the permission to set upgrades in the CTM. This is done via the setNewVersionUpgrade function. This sets the upgrade data, the new protocol version, and the deadline by which chains have to upgrade. Chains can upgrade themselves with the same data. After the deadline is over, each non-upgraded chain is frozen, they cannot post new proofs. Frozen chains can
unfreeze by updating.
Upgrade structure
Upgrade information is composed in the form of a DiamondCutData struct. During the upgrade, the chain’s DiamondProxy will delegateCall the initAddress with the provided initCalldata, while the facets that the DiamondProxy will be changed according to the facetCuts. This scheme is very powerful and it allows to change anything in the contract. However, we typically have a very specific set of changes that we need to do. To facilitate these, two contracts have been created:
- BaseZkSyncUpgrade - Generic template with function that can be useful for upgrades
- DefaultUpgrade - Default implementation of the
BaseZkSyncUpgrade, contract that is most often planned to be used as diamond initialization when doing upgrades.
Note, that the Gateway upgrade (v26) was more complex than the usual ones and so a similar, but separate process was used for it. It also used its own custom implementation of the
BaseZkSyncUpgrade: GatewayUpgrade.
Protocol version
For tracking upgrade versions on different networks (private testnet, public testnet, mainnet) we use protocol version, which is basically just a number denoting the deployed version. The protocol version is different from Diamond Cut proposalId, since protocolId only shows how much upgrade proposal was proposed/executed, but nothing about the content of upgrades, while the protocol version is needed to understand what version is deployed.
In the BaseZkSyncUpgrade & DefaultUpgrade we allow to arbitrarily increase the proposal version while upgrading a system, but only increase it. We are doing that since we can skip some protocol versions if for example found a bug there (but it was deployed on another network already).
Protocol upgrade transaction
During upgrade, we typically need not only update the L1 contracts, but also the L2 ones. This is achieved by creating an upgrade transactions. More details on how those are processed inside the system can be read here.
Whitelisting and executing upgrade
Note, that due to how powerful the upgrades are, if we allowed any chain admin to inact any upgrade it wants, it could allow malicious chains to potentially break some of the ecosystem invariants. Because of that, any upgrade should be firstly whitelisted by the decentralized governance through calling the setNewVersionUpgrade function of the ChainTypeManager.
In order to execute the upgrade, the chain admin would call the upgradeChainFromVersion function from the Admin facet.
BridgeHub & Asset Routers
Bridgehub as the main chain registry
Bridgehub is the most important contract in the system, that stores:
- A mapping from chainId to chains address
- A mapping from chainId to the CTM it belongs to.
- A mapping from chainId to its base token (i.e. the token that is used for paying fees)
- etc
Not sure what CTM is? Check out the Chain Type Manager page for details.
Overall, it is the main registry for all the contracts. Note, that a clone of Bridgehub is also deployed on each L2 chain, but this clone is only used on settlement layers. All the in all, the architecture of the entire ecosystem can be seen below:

Asset router as the main asset bridging entrypoint
The main entry for passing value between chains is the AssetRouter, it is responsible for facilitating bridging between multiple asset types. To read more in detail on how it works, please refer to custom asset bridging documentation.
For the purpose of this document, it is enough to treat the Asset Router as a blackbox that is responsible for processing escrowing funds on the source chain and minting them on the destination chain.
For those that are aware of the previous ZKsync architecture, its role is similar to L1SharedBridge that we had before. Note, however, that it is a different contract with much enhanced functionality. Also, note that the L1SharedBridge will NOT be upgraded to the L1AssetRouter. For more details about migration, please check out the migration doc.
Handling base tokens
On L2, a base token (not to be consfused with a native token, i.e. an ERC20 token with a main contract on the chain) is the one that is used for msg.value and it is managed at L2BaseToken system contract. We need its logic to be strictly defined in L2BaseToken, since the base asset is expected to behave the exactly the same as ether on EVM. For now this token contract does not support base minting and burning of the asset, nor further customization.
In other words, in the current release base assets can only be transferred through msg.value. They can also only be minted when they are backed 1-1 on L1.
L1→L2 communication via Bridgehub.requestL2TransactionDirect
L1→L2 communication allows users on L1 to create a request for a transaction to happen on L2. This is the primary censorship resistance mechanism. If you are interested, you can read more on L1→L2 communications here, but for now just understanding that L1→L2 communication allows to request transactions to happen on L2 is enough.
The L1→L2 communication is also the only way to mint a base asset at the moment. Fees to the operator as well as msg.value will be minted on L2BaseToken after the corresponding L1→L2 tx has been processed.
To request an L1→L2 transaction, the BridgeHub.requestL2TransactionDirect function needs to be invoked. The user should pass the struct with the following parameters:
struct L2TransactionRequestDirect {
  uint256 chainId;
  uint256 mintValue;
  address l2Contract;
  uint256 l2Value;
  bytes l2Calldata;
  uint256 l2GasLimit;
  uint256 l2GasPerPubdataByteLimit;
  bytes[] factoryDeps;
  address refundRecipient;
}
Most of the params are self-explanatory & replicate the logic of ZKsync Era. The only non-trivial fields are:
mintValueis the total amount of the base tokens that should be minted on L2 as the result of this transaction. The requirement is thatrequest.mintValue >= request.l2Value + request.l2GasLimit * derivedL2GasPrice(...), wherederivedL2GasPrice(...)is the gas price to be used by this L1→L2 transaction. The exact price is defined by the ZKChain.
Here is a quick guide on how this transaction is routed through the bridgehub.
-
The bridgehub retrieves the
baseTokenAssetIdof the chain with the correspondingchainIdand callsL1AssetRouter.bridgehubDepositBaseTokenmethod. TheL1AssetRouterwill then use standard token depositing mechanism to burn/escrow the respective amount of thebaseTokenAssetId. You can read more about it in the asset router doc. This step ensures that the baseToken will be backed 1-1 on L1. -
After that, it just routes the corresponding call to the ZKChain with the corresponding
chainId. It is now the responsibility of the ZKChain to validate that the transaction is correct and can be accepted by it. This validation includes, but not limited to:- The fact that the user paid enough funds for the transaction (basically
request.l2GasLimit * derivedL2GasPrice(...) + request.l2Value >= request.mintValue. - The fact the transaction is always executable (the
request.l2GasLimitis not high enough). - etc.
- The fact that the user paid enough funds for the transaction (basically
-
After the ZKChain validates the tx, it includes it into its priority queue. Once the operator executes this transaction on L2, the
mintValueof the baseToken will be minted on L2. ThederivedL2GasPrice(...) * gasUsedwill be given to the operator’s balance. The other funds can be routed either of the following way:
If the transaction is successful, the request.l2Value will be minted on the request.l2Contract address (it can potentially transfer these funds within the transaction). The rest are minted to the request.refundRecipient address. In case the transaction is not successful, all of the base token will be minted to the request.refundRecipient address. These are the same rules as for the ZKsync Era.
Diagram of the L1→L2 transaction flow on L1 for direct user calls, the baseToken can be ETH or an ERC20:
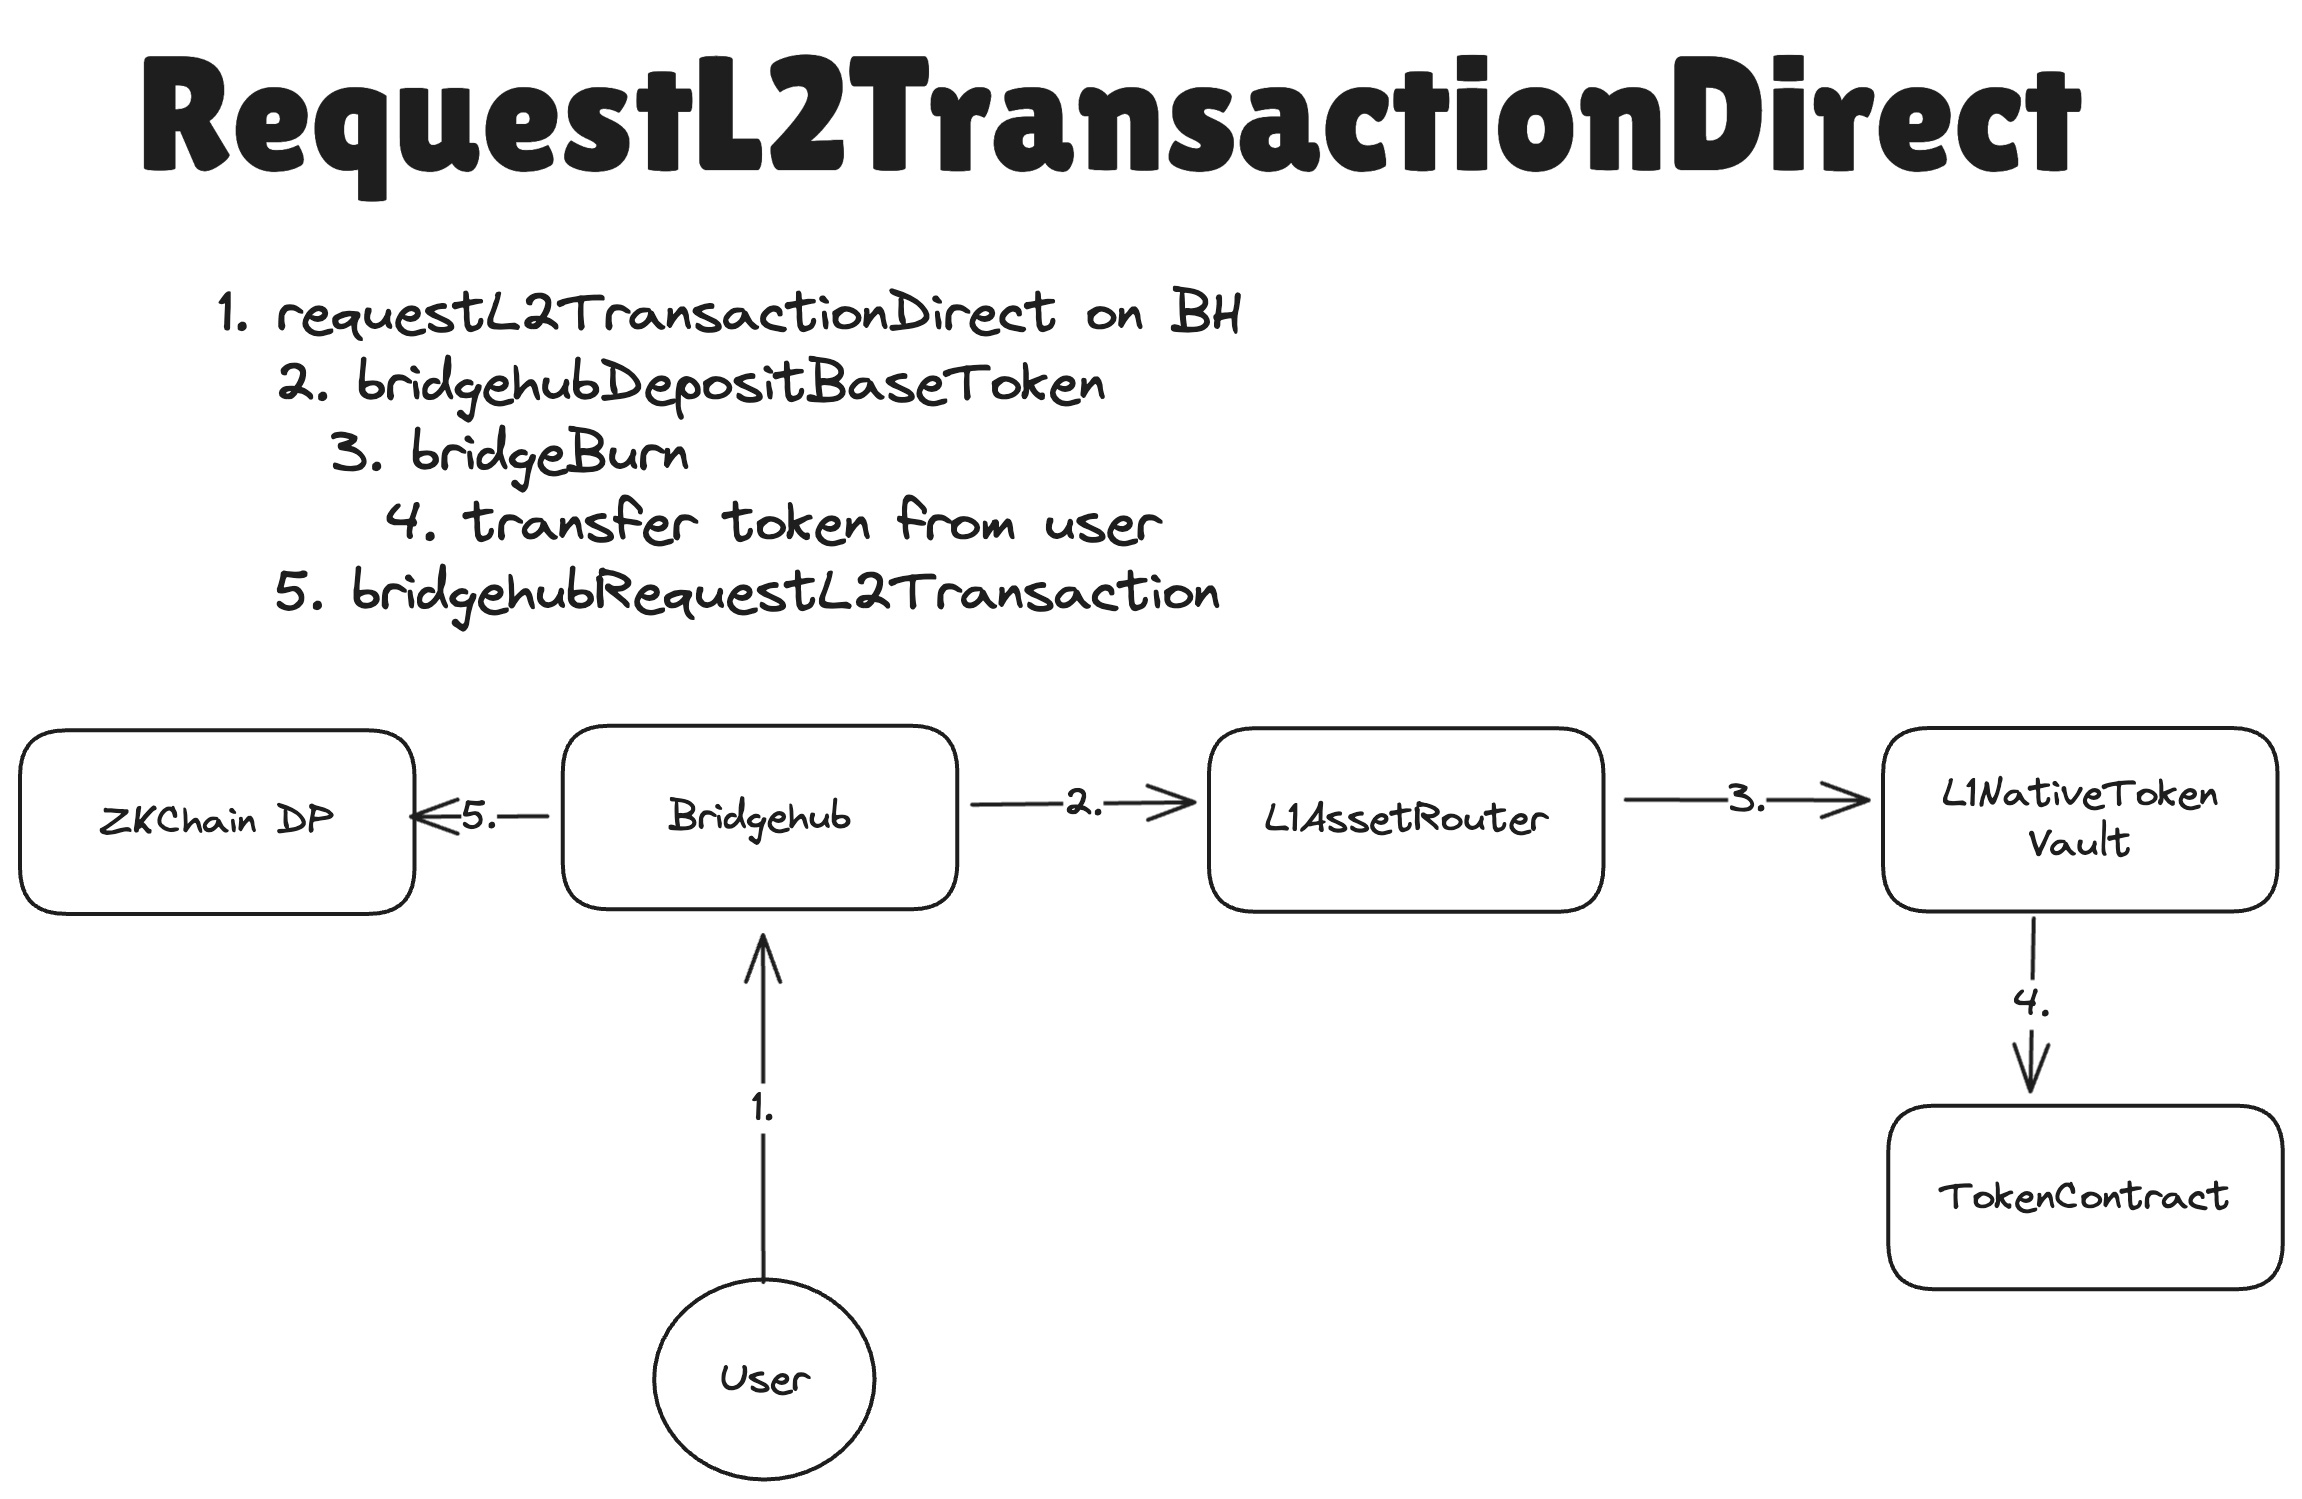
Diagram of the L1→L2 transaction flow on L2 (it is the same regardless of the baseToken):
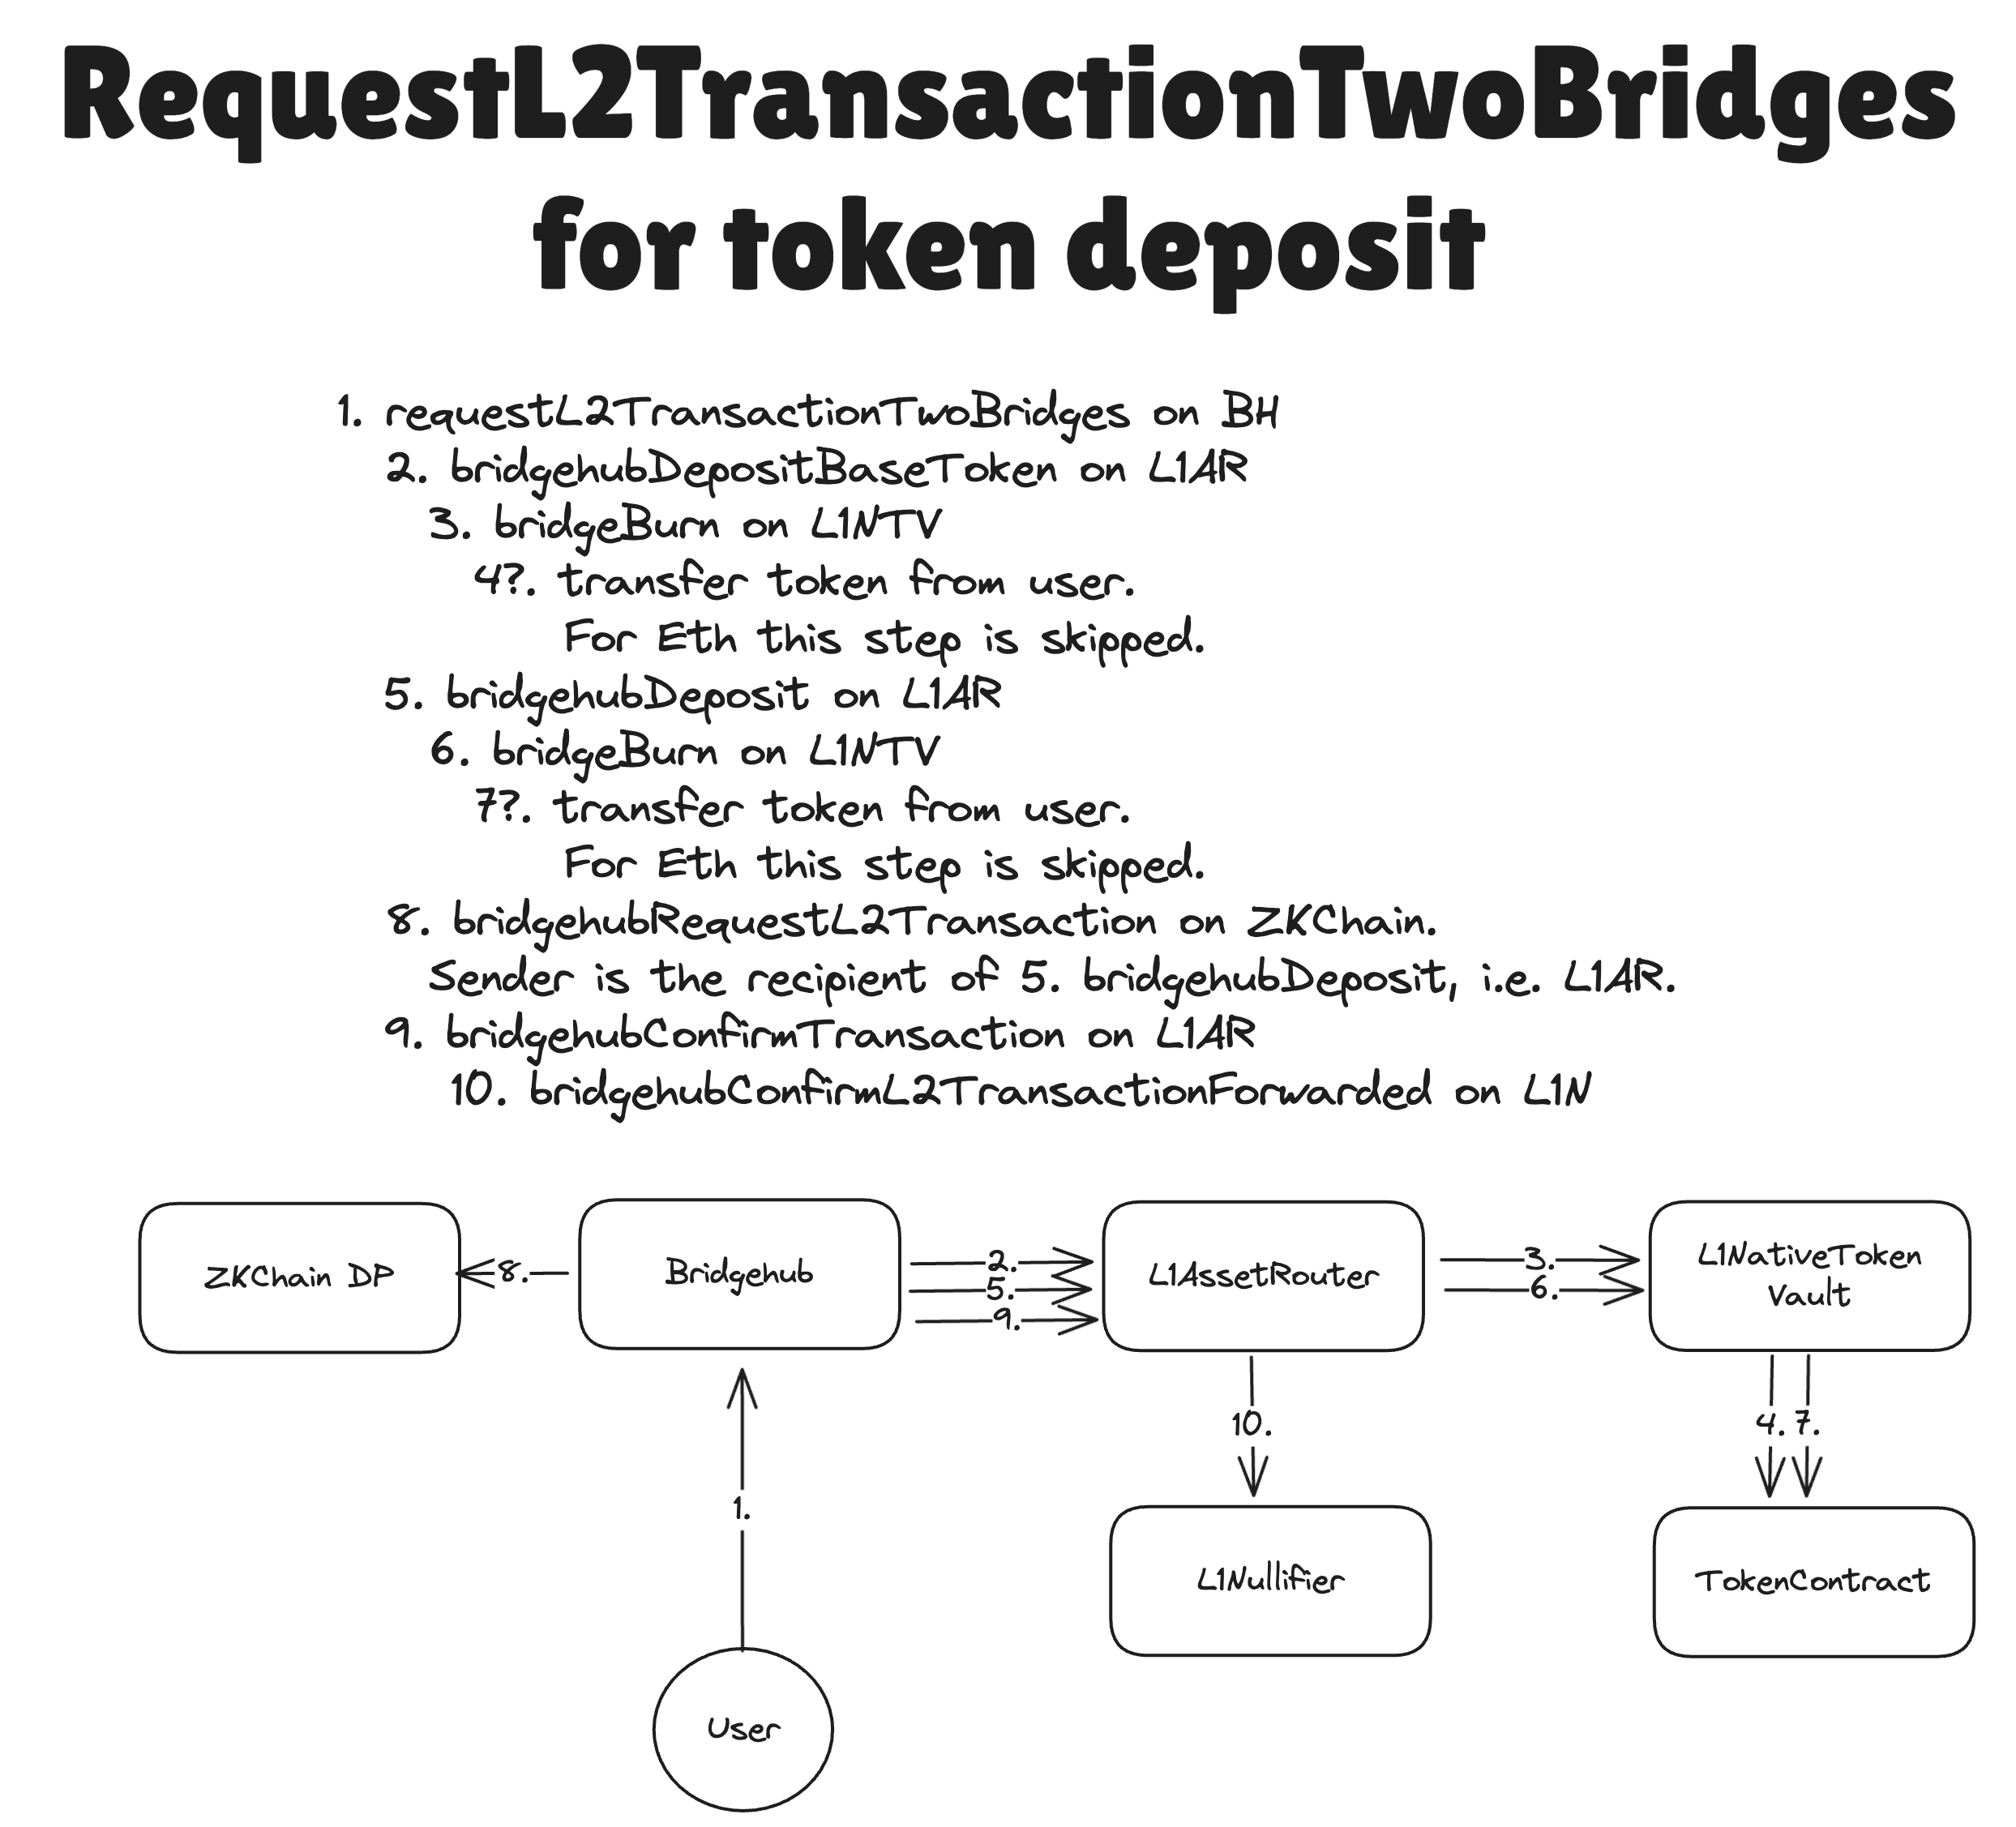
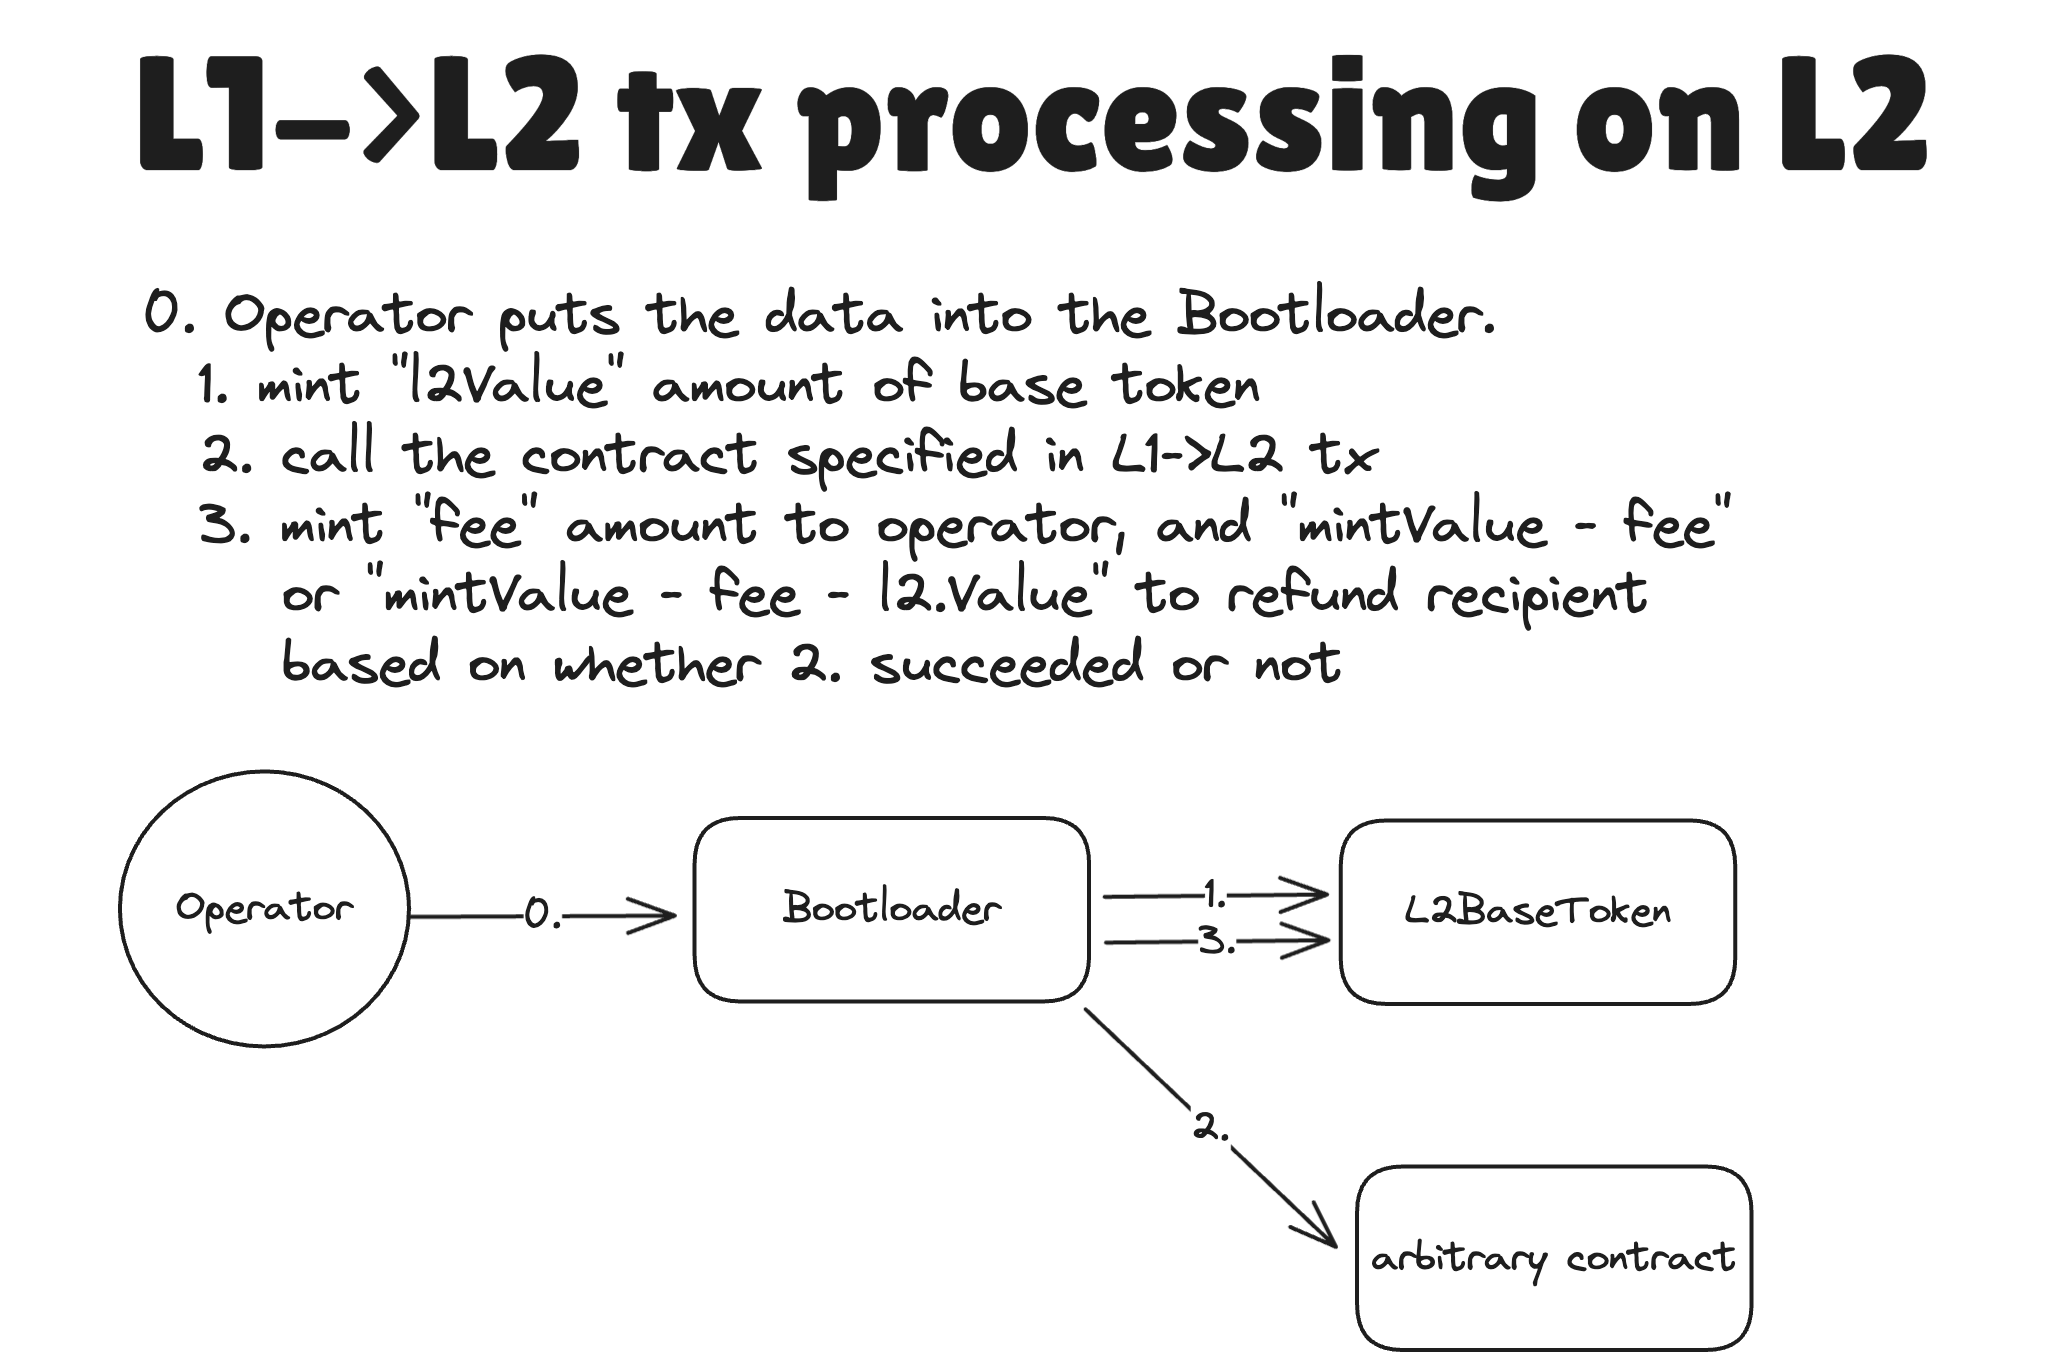
Limitations of custom base tokens in the current release
ZKsync Era uses ETH as a base token. Upon creation of an ZKChain other chains may want to use their own custom base tokens. Note, that for the current release all the possible base tokens are whitelisted. The other limitation is that all the base tokens must be backed 1-1 on L1 as well as they are solely implemented with L2BaseToken contract. In other words:
- No custom logic is allowed on L2 for base tokens
- Base tokens can not be minted on L2 without being backed by the corresponding L1 amount.
If someone wants to build a protocol that mints base tokens on L2, the option for now is to “mint” an infinite amount of those on L1, deposit on L2 and then give those out as a way to “mint”. We will update this in the future.
General architecture and initialization of SharedBridge for a new ZKChain
Once the chain is created, its L2AssetRouter will be automatically deployed upon genesis. You can read more about it in the Chain creation flow.
requestL2TransactionTwoBridges
L1AssetRouter is used as the main “glue” for value bridging across chains. Whenever a token that is not native needs to be bridged between two chains an L1<>L2 transaction out of the name of an AssetRouter needs to be performed. For more details, check out the asset router documentation. But for this section it is enough to understand that we need to somehow make a transaction out of the name of L1AssetRouter to its L2 counterpart to deliver the message about certain amount of asset being bridged.
In the next paragraphs we will often refer to
L1AssetRouteras performing something. It is good enough for understanding of how bridgehub functionality works. Under the hood though, it mainly serves as common entry that calls various asset handlers that are chosen based on asset id. You can read more about it in the asset router documentation.
Let’s say that a ZKChain has ETH as its base token. Let’s say that the depositor wants to bridge USDC to that chain. We can not use BridgeHub.requestL2TransactionDirect, because it only takes base token mintValue and then starts an L1→L2 transaction rightaway out of the name of the user and not the L1AssetRouter.
We need some way to atomically deposit both ETH and USDC to the shared bridge + start a transaction from L1AssetRouter. For that we have a separate function on Bridgehub: BridgeHub.requestL2TransactionTwoBridges. The reason behind the name “two bridges” is a bit historical: the transaction supposed compose to do actions with two bridges: the bridge responsible for base tokens and the second bridge responsible for any other token.
Note, however, that only L1AssetRouter can be used to bridge base tokens. And the role of the second bridge can be played by any contract that supports the protocol desrcibed below.
When calling BridgeHub.requestL2TransactionTwoBridges the following struct needs to be provided:
struct L2TransactionRequestTwoBridgesOuter {
  uint256 chainId;
  uint256 mintValue;
  uint256 l2Value;
  uint256 l2GasLimit;
  uint256 l2GasPerPubdataByteLimit;
  address refundRecipient;
  address secondBridgeAddress;
  uint256 secondBridgeValue;
  bytes secondBridgeCalldata;
}
The first few fields are the same as for the simple L1→L2 transaction case. However there are three new fields:
secondBridgeAddressis the address of the bridge (or contract in general) which will need to perform the L1->L2 transaction. In this case it should be the sameL1AssetRoutersecondBridgeValueis themsg.valueto be sent to the bridge which is responsible for the asset being deposited (in this case it isL1AssetRouter). This can be used to deposit ETH to ZKChains that have base token that is not ETH.secondBridgeCalldatais the data to pass to the second contract.L1AssetRoutersupports multiple formats of calldata, the list can be seen in thebridgehubDepositfunction of theL1AssetRouter.
The function will do the following:
L1
- It will deposit the
request.mintValueof the ZKChain’s base token the same way as during a simple L1→L2 transaction. These funds will be used for funding thel2Valueand the fee to the operator. - It will call the
secondBridgeAddress(L1AssetRouter) once again and this time it will deposit the funds to theL1AssetRouter, but this time it will be deposit not to pay the fees, but rather for the sake of bridging the desired token.
This call will return the parameters to call the l2 contract with (the address of the L2 bridge counterpart, the calldata and factory deps to call it with). 3. After the BridgeHub will call the ZKChain to add the corresponding L1→L2 transaction to the priority queue. 4. The BridgeHub will call the SharedBridge once again so that it can remember the hash of the corresponding deposit transaction. This is needed in case the deposit fails.
L2
- After some time, the corresponding L1→L2 is created.
- The L2AssetRouter will receive the message and re-route it to the asset handler of the bridged token. To read more about how it works, check out the asset router documentation.
Diagram of a depositing ETH onto a chain with USDC as the baseToken. Note that some contract calls (like USDC.transferFrom are omitted for the sake of consiceness):
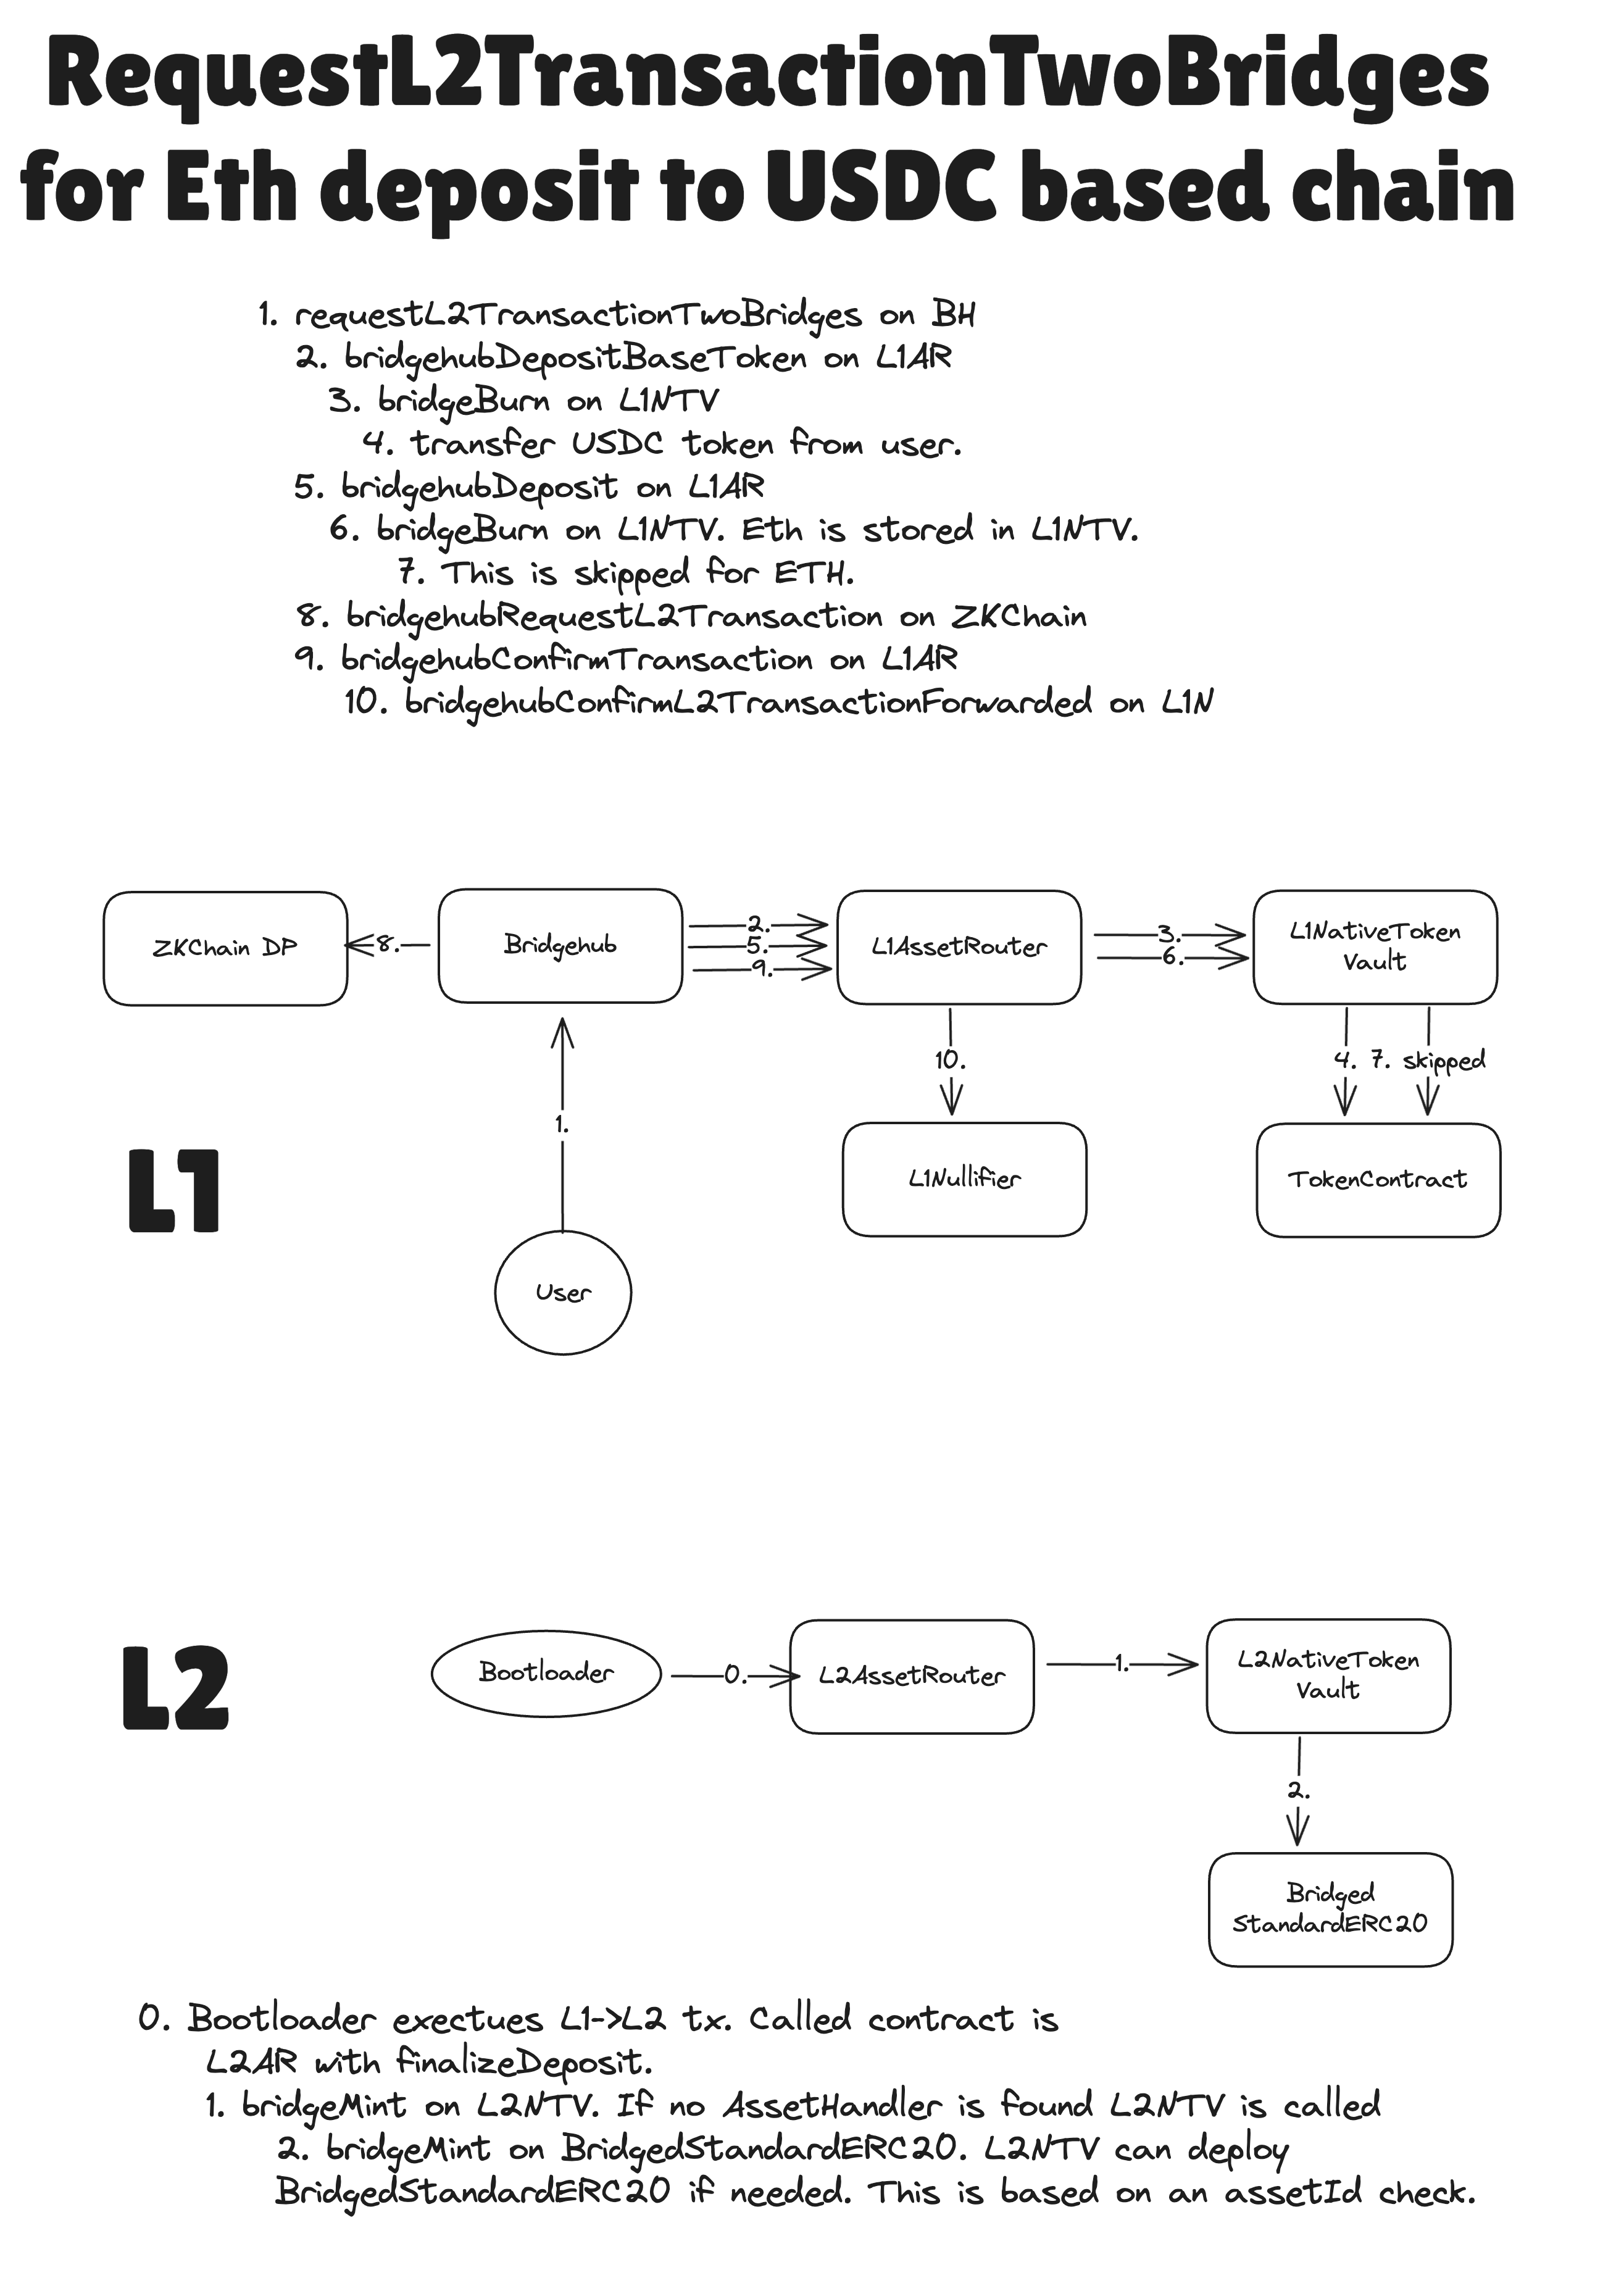
Generic usage of BridgeHub.requestL2TransactionTwoBridges
L1AssetRouter is the only bridge that can handle base tokens. However, the BridgeHub.requestL2TransactionTwoBridges could be used by secondBridgeAddress on L1.
Let’s do a quick recap on how it works:
When calling BridgeHub.requestL2TransactionTwoBridges the following struct needs to be provided:
struct L2TransactionRequestTwoBridgesOuter {
  uint256 chainId;
  uint256 mintValue;
  uint256 l2Value;
  uint256 l2GasLimit;
  uint256 l2GasPerPubdataByteLimit;
  address refundRecipient;
  address secondBridgeAddress;
  uint256 secondBridgeValue;
  bytes secondBridgeCalldata;
}
secondBridgeAddressis the address of the L1 contract that needs to perform the L1->L2 transaction.secondBridgeValueis themsg.valueto be sent to thesecondBridgeAddress.secondBridgeCalldatais the data to pass to thesecondBridgeAddress. This can be interpreted any way it wants.
- Firstly, the Bridgehub will deposit the
request.mintValuethe same way as during a simple L1→L2 transaction. These funds will be used for funding thel2Valueand the fee to the operator. - After that, the
secondBridgeAddress.bridgehubDepositwith the following signature is called
struct L2TransactionRequestTwoBridgesInner {
  // Should be equal to a constant `keccak256("TWO_BRIDGES_MAGIC_VALUE")) - 1`
  bytes32 magicValue;
  // The L2 contract to call
  address l2Contract;
  // The calldata to call it with
  bytes l2Calldata;
  // The factory deps to call it with
  bytes[] factoryDeps;
  // Just some 32-byte value that can be used for later processing
  // It is called `txDataHash` as it *should* be used as a way to facilitate
  // reclaiming failed deposits.
  bytes32 txDataHash;
}

function bridgehubDeposit(
  uint256 _chainId,
  // The actual user that does the deposit
  address _prevMsgSender,
  // The msg.value of the L1->L2 transaction to be created
  uint256 _l2Value,
  // Custom bridge-specific data
  bytes calldata _data
) external payable returns (L2TransactionRequestTwoBridgesInner memory request);
Now the job of the contract will be to “validate” whether they are okay with the transaction to come. For instance, the CTMDeploymentTracker checks that the _prevMsgSender is the owner of CTMDeploymentTracker and has the necessary rights to perform the transaction out of the name of it.
Ultimately, the correctly processed bridgehubDeposit function basically grants BridgeHub the right to create an L1→L2 transaction out of the name of the secondBridgeAddress. Since it is so powerful, the first returned value must be a magical constant that is equal to keccak256("TWO_BRIDGES_MAGIC_VALUE")) - 1. The fact that it was a somewhat non standard signature and a struct with the magical value is the major defense against “accidental” approvals to start a transaction out of the name of an account.
Aside from the magical constant, the method should also return the information an L1→L2 transaction will start its call with: the l2Contract , l2Calldata, factoryDeps. It also should return the txDataHash field. The meaning txDataHash will be needed in the next paragraphs. But generally it can be any 32-byte value the bridge wants.
- After that, an L1→L2 transaction is invoked. Note, that the “trusted”
L1AssetRouterhas enforced that the baseToken was deposited correctly (again, the step (1) can only be handled by theL1AssetRouter), while the second bridge can provide any data to call its L2 counterpart with. - As a final step, following function is called:
function bridgehubConfirmL2Transaction(
  // `chainId` of the ZKChain
  uint256 _chainId,
  // the same value that was returned by `bridgehubDeposit`
  bytes32 _txDataHash,
  // the hash of the L1->L2 transaction
  bytes32 _txHash
) external;
This function is needed for whatever actions are needed to be done after the L1→L2 transaction has been invoked.
On L1AssetRouter it is used to remember the hash of each deposit transaction, so that later on, the funds could be returned to user if the L1->L2 transaction fails. The _txDataHash is stored so that the whenever the users will want to reclaim funds from a failed deposit, they would provide the token and the amount as well as the sender to send the money to.
Claiming failed deposits
In case a deposit fails, the L1AssetRouter allows users to recover the deposited funds by providing a proof that the corresponding transaction indeed failed. The logic is the same as in the current Era implementation.
Withdrawing funds from L2
Funds withdrawal is a similar way to how it is done currently on Era.
The user needs to call the L2AssetRouter.withdraw function on L2, while providing the token they want to withdraw. This function would then calls the corresponding L2 asset handler and ask him to burn the funds. We expand a bit more about it in the asset router documentation.
Note, however, that it is not the way to withdraw base token. To withdraw base token, L2BaseToken.withdraw needs to be called.
After the batch with the withdrawal request has been executed, the user can finalize the withdrawal on L1 by calling L1AssetRouter.finalizeWithdrawal, where the user provides the proof of the corresponding withdrawal message.
Overview of Custom Asset Bridging with the Asset Router
Bridges are completely separate contracts from the ZKChains and system contracts. They are a wrapper for L1 <-> L2 communication on both L1 and L2. Upon locking assets on one layer, a request is sent to mint these bridged assets on the other layer. Upon burning assets on one layer, a request is sent to unlock them on the other.
Custom asset bridging is a new bridging model that allows to:
- Minimize the effort needed by custom tokens to be able to become part of the elastic chain ecosystem. Before, each custom token would have to build its own bridge, but now just custom asset deployment trackers / asset handler is needed. This is achieved by building a modular bridge which separates the logic of L1<>L2 messaging from the holding of the asset.
- Unify the interfaces between L1 and L2 bridge contracts, paving the way for easy cross chain bridging. It will especially become valuable once interop is enabled.
New concepts
- assetId => identifier to track bridged assets across chains. This is used to link messages to specific asset handlers in the AssetRouters. Note, that since the same asset could be created on multiple chains, assetId is not just an address. It’s obtained by combining chain id, NTV as asset deployment tracker and asset data. Usually, address is used as asset data field. This was assets that share the same address on different chains will have different assetId.
- AssetHandler => contract that manages liquidity (burns/mints, locks/unlocks, etc.) for specific token (or a set of them) on a chain.
- AssetDeploymentTracker => contract that manages the deployment of asset handlers across chains. This is the contract that registers these asset handlers in the AssetRouters.
- AssetRouter => contract that coordinates crosschain token bridging and routes messages to the correct AssetHandler.
Normal flow
Registering a custom asset
-
AssetHandler Registration for New Tokens Before you can bridge a new token, you must register its AssetHandler in both routers. However, for NTV (Native Token Vault) assets this step isn’t required. If an L1→L2 transaction is submitted without a registered AssetHandler, it won’t fail—instead, the message is automatically forwarded to the L2NTV contract. The L2NTV then verifies that the asset was deployed by the L1NTV by checking that the
assetIdembeds the correct ADT address (for NTV assets, the ADT is the NTV and the relevant address is the L2NTV address). If theassetIdis valid, the token contract is deployed on L2. -
Automatic Bridging via the Native Token Vault The Native Token Vault is a special AssetHandler designed for automatic bridging. It lets you bridge an L1 token to L2 without pre-deploying the token contract or registering it in the L2 router. Under the hood, unregistered AssetHandler messages are forwarded to the L2NTV, which performs the same
assetIdcheck and, upon validation, deploys the corresponding token contract. -
Custom Asset Registration Flow
- Deploy the Asset Handlers (on L1 and L2), the custom token contracts, and the Asset Deployment Tracker (ADT). The ADT is expected to be deployed on L1.
- The ADT calls
setAssetHandlerAddressThisChainonL1AssetRouterto register itself and its corresponding Asset Handler by updating the appropriate mapping. - During an L1→L2 deposit, the internal method
_setAssetHandlerAddressOnCounterpartis invoked automatically to propagate the registration to the L2 router.
A visualization of this process can be seen here:
Asset Registration
Bridging an already-registered asset
-
From L1 to L2
- The user calls
requestL2TransactionTwoBridgesonBridgehub, specifyingL1AssetRouteras the second bridge address, along with all other parameters required to initiate the transfer. - Under the hood,
Bridgehub,L1AssetRouter, and the Asset Handler contracts verify the validity of the provided data, value, and allowances. If everything checks out, thebridgehubRequestL2Transactionmethod is called on the ZK Chain, appending a priority transaction toL2AssetRouter.finalizeDeposit. - The operator picks up the priority transaction. If it executes successfully, the transfer completes. Otherwise, the user can reclaim their assets via the
claimFailedDepositfunction inL1AssetRouter, providing proof that the transaction indeed failed on L2.
A visualization of steps 1–2 can be seen here:
RequestL2TransactionTwoBridges for token deposit. - The user calls
-
From L2 to L1
- The user calls
L2AssetRouter.withdraw(assetId, assetData)directly. Here,assetDatavaries by Asset Handler; it’s parsed by the handler into the format it requires. - The L2 handler burns the tokens, and
L2AssetRoutersends an L2→L1 message. - Once the L2→L1 message arrives on L1, the user calls
finalizeWithdrawalonL1AssetRouter, providing the chain ID where the withdrawal was initiated, the message’s position in that chain, and proof of its inclusion. TheL1Nullifiercontract verifies the proof, and if it’s valid, control returns toL1AssetRouter, which then calls the appropriate Asset Handler (based onassetId) to release the assets.
- The user calls
Read more
You can read more in the more in-depth about L1 and L2 asset routers and the default asset handler that is Native Token Vault here.
AssetRouter
Overview:
- On L1: The L1 Asset Router handles cross‑chain asset coordination and is complemented by the L1 Nullifier for additional finalization and recovery features.
- On L2: Only the L2 Asset Router is pre-deployed at the same address (
0x10003) on every L2 chain.
AssetRouter (L1/L2)
The main job of the asset router is to be the central point of coordination for asset bridging. All crosschain token bridging is done between asset routers only and once the message reaches asset router, it then routes it to the corresponding asset handler.
In order to make this easier, all L2 chains have the asset router located on the same address on every chain. It is 0x10003 and it is pre-deployed contract. More on how it is deployed can be seen in the Chain Genesis section.
The endgame is to have L1 asset router have the same functionality as the L2 one. This is not the case yet, but some progress has been made: L2AssetRouter can now bridge L2-native assets to L1, from which it could be bridged to other chains in the ecosystem.
Examples of differences in functionality are:
- Failed‐deposit recovery.
The
L1AssetRouterprovides on-chain recovery for failed L1→L2 deposits via itsbridgeRecoverFailedTransferandclaimFailedDepositfunctions. TheL2AssetRouterhas no equivalent, because L2→L1 withdrawals are atomic on L2: burning the L2 token and sending the L2→L1 withdrawal message occur in the same transaction. If anything goes wrong, the entire transaction reverts and no token is burned and no message is sent. - User-initiated L1→L2 deposits must go through Bridgehub (or the legacy bridge), not directly.
There is no public
deposit(...)onL1AssetRouteryou can call as a user—only, by contrast, on L2 you have a publicwithdraw(...)method. In case ofL1AssetRouteruser has to start deposit through eitherBridgehuborL1ERC20Bridge(legacy bridge). However in case ofL2AssetRouteruser is able to simply callwithdrawfunction inL2AssetRouter.
The specifics of the L2AssetRouter is the need to interact with the previously deployed L2SharedBridgeLegacy if it was already present. It has less “rights” than the L1AssetRouter: at the moment it is assumed that all asset deployment trackers are from L1, the only way to register an asset handler on L2 is to make an L1→L2 transaction.
Note, that today registering new asset deployment trackers is permissioned, but the plan is to make it permissionless in the future
The specifics of the L1AssetRouter come from the need to be backwards compatible with the old L1SharedBridge. Yes, it does not share the same storage, but it inherits the need to be backwards compatible with the current SDK. Also, L1AssetRouter needs to facilitate L1-only operations, such as recovering from failed deposits.
Also, L1AssetRouter is the only base token bridge contract that can participate in initiation of cross chain transactions via the bridgehub. This might change in the future.
L1Nullifier
While the endgoal is to unify L1 and L2 asset routers, in reality, it may not be that easy: while L2 asset routers get called by L1→L2 transactions, L1 ones don’t and require manual finalization of transactions, which involves proof verification, etc. To move this logic outside of the L1AssetRouter, it was moved into a separate L1Nullifier contract.
This is the contract the previous L1SharedBridge had been upgraded to, so it has the backwards compatible storage.
A separate L2Nullifier does not exist
The L1Nullifier stores two things:
-
finalized L2->L1 withdrawals
-
initiated L1->L2 priority transactions
-
is needed on L1 as L2->L1 txs are executed arbitrarily, so we need to record whether they happened or not to stop double spending. However, L1->L2 priority txs are enforced to be executed only once, so we don’t need a separate L2Nullifier.
-
The initiated L2->L1 and L2->L2 transactions are not stored. This is needed for L1->L2 txs, as priority transactions have to be executed by the system, and cannot be retried if they fail. So failed deposits have to be redeemable on L1. L2->L2 and L2->L1 txs might also fail, but if they fail due to gas reasons, they can be retried. If they fail due to contract error, then the receiving contract has to be fixed ( another way of explaining it, there can always be a contract error even for claiming failed deposits. So the only sustainable way of fixing contract errors is to fix the contract).
For this reason, on the L2 claiming failed deposits and bridgehubConfirmL2Transaction are not implemented.
L2SharedBridgeLegacy
L2AssetRouter is pre-deployed onto a specific address. The old L2SharedBridge is upgraded to L2SharedBridgeLegacy contract. The main purpose of this contract is to ensure compatibility with the incoming deposits and re-route them to the shared bridge.
This contract is never deployed for new chains.
Native Token Vault
NativeTokenVault (L1/L2)
NativeTokenVault is an asset handler that is available on all chains and is also predeployed. It provides the functionality of the most basic bridging: locking funds on one chain and minting the bridged equivalent on the other one. On L2 chains NTV is predeployed at the 0x10004 address. NativeTokenVault acts as the default AssetHandler, so regular ERC-20 tokens can use it unless custom bridging logic or special features are required.
The L1 and L2 versions of the NativeTokenVault share the same core functionality, but differ in their deployment mechanics and certain L1-specific responsibilities.
On L1, the contract is deployed using standard CREATE2, while on L2 it uses low-level calls to the CONTRACT_DEPLOYER system contract.
Also, the L1NTV has the following specifics:
- It operates the
chainBalancemapping, ensuring that the chains do not go beyond their balances. - It allows recovering from failed L1→L2 transfers.
- It needs to both be able to retrieve funds from the former L1SharedBridge (now this contract has L1Nullifier in its place), but also needs to support the old SDK that gives out allowance to the “l1 shared bridge” value returned from the API, i.e. in our case this is will the L1AssetRouter.
Summary
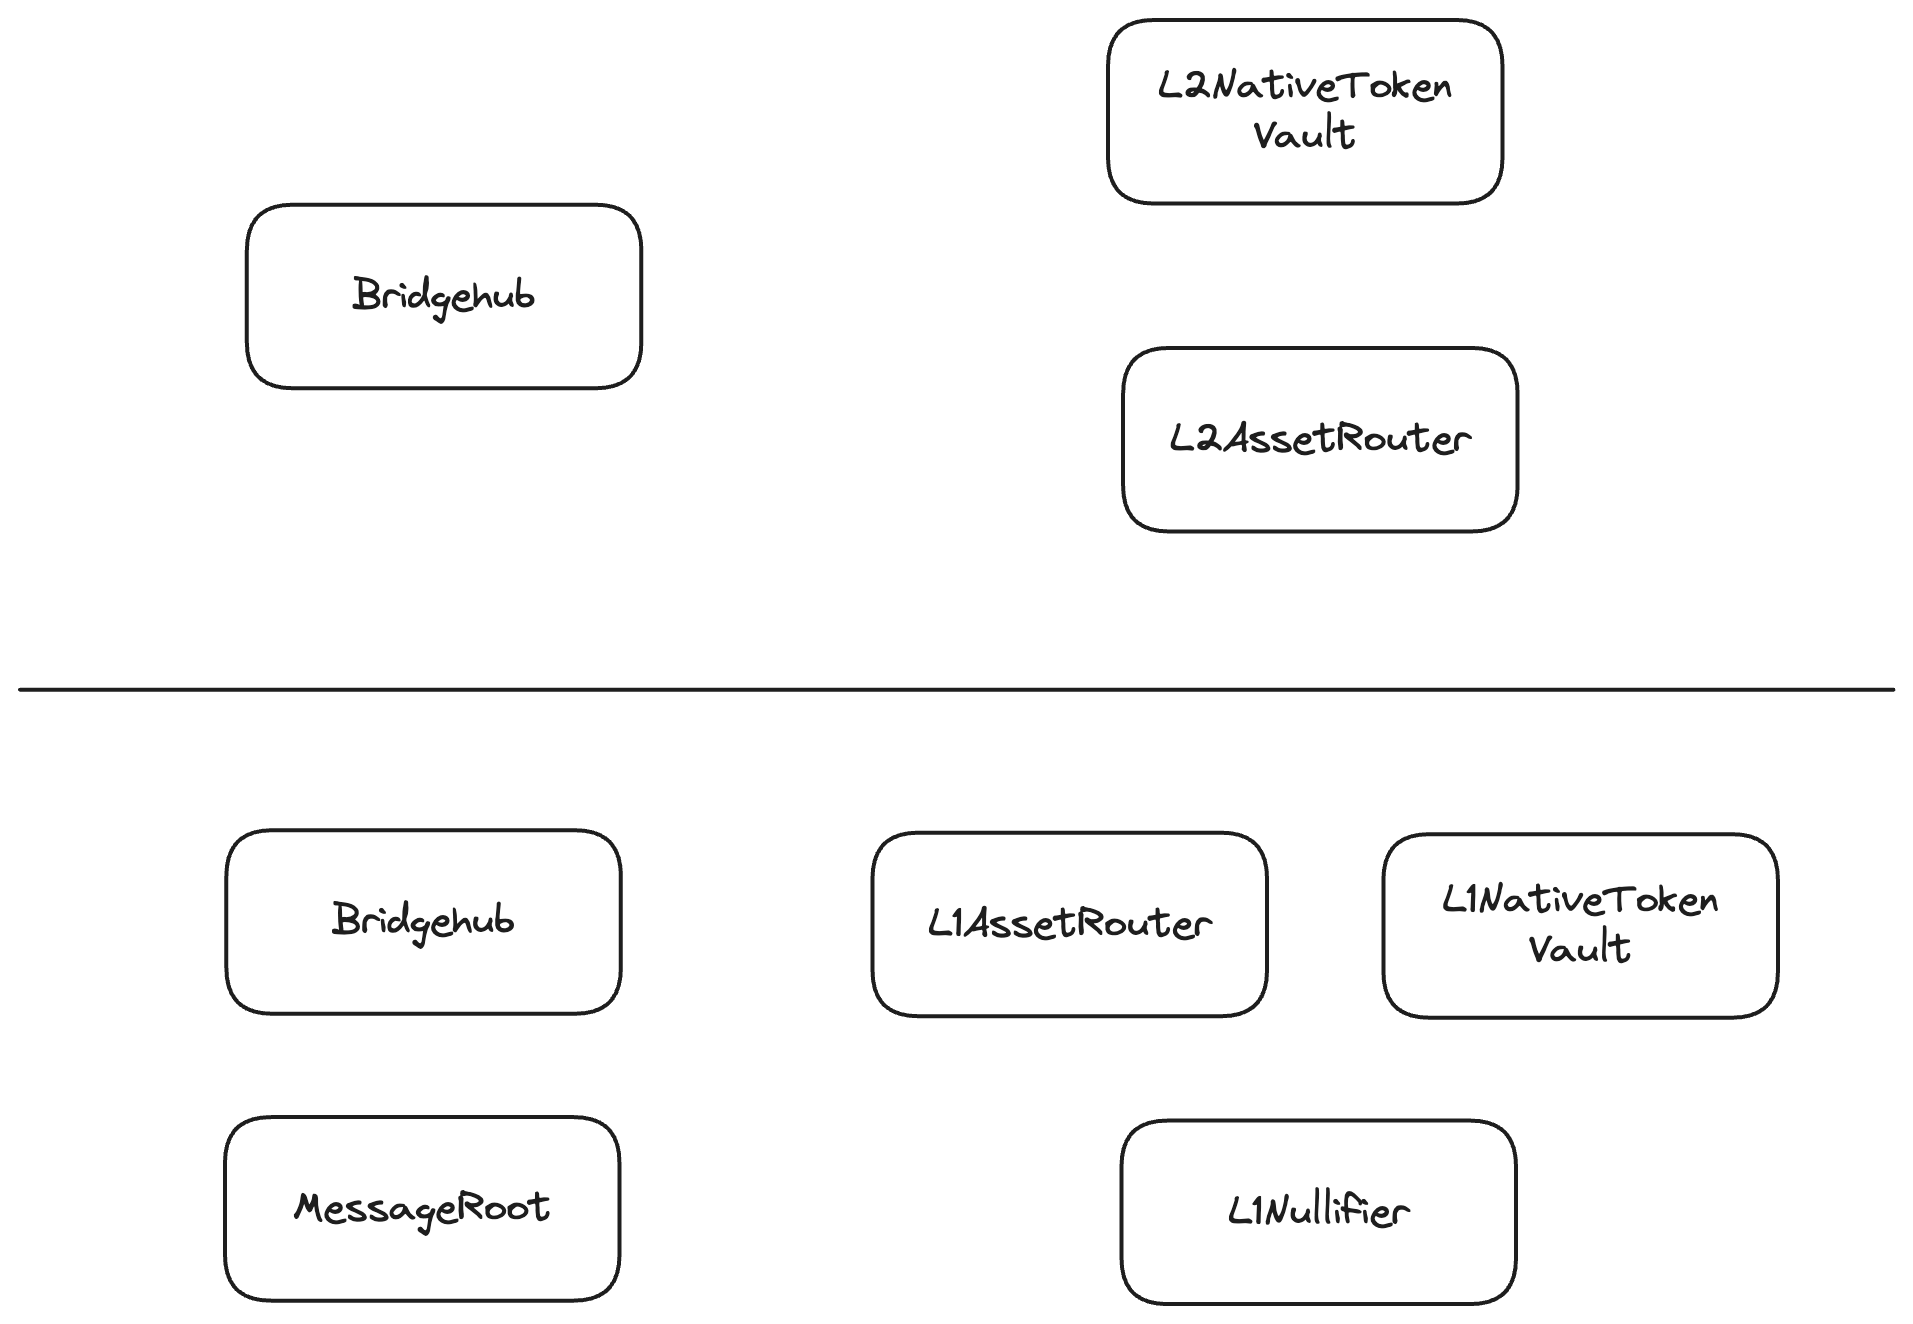
New bridge contracts
Interop Overview
Interop (short for interoperability) is the ability of different systems to exchange and make use of information.
In our case, interop refers specifically to seamless communication between ZKsync chains. That includes exchanging messages, and using the data gathered via exchanging the messages to enable more complex workflows.
This section provides up-to-date information about interop components (and components directly related to interop) that are either already part of mainnet or whose development is complete and awaiting a protocol upgrade for inclusion.
As a prerequisite to understanding the interop mechanism, the reader should familiarize themselves with the following documents:
To date, we have completed the implementation of the foundational layer for all interop functionality: cross-chain messages.
Once you’ve reviewed the above, you can explore examples of interop applications here.
MessageRoot
Introduction
The message root is the contract on ZKsync chains that collects messages from different chains and aggregates them into a single Merkle tree. This makes interop more efficient, since instead of having to import each individual message, chains can import the MessageRoot, which is an aggregate of messages in a single batch, then across batches of a single chain, and then across chains.
The MessageRoot contract is deployed both on L1 and all ZKsync chains, but on ZKsync chains it is only used on GW (which is now deprecated). On GW it is used to aggregate messages for chains that are settling on GW, in the same way that it is done on L1.
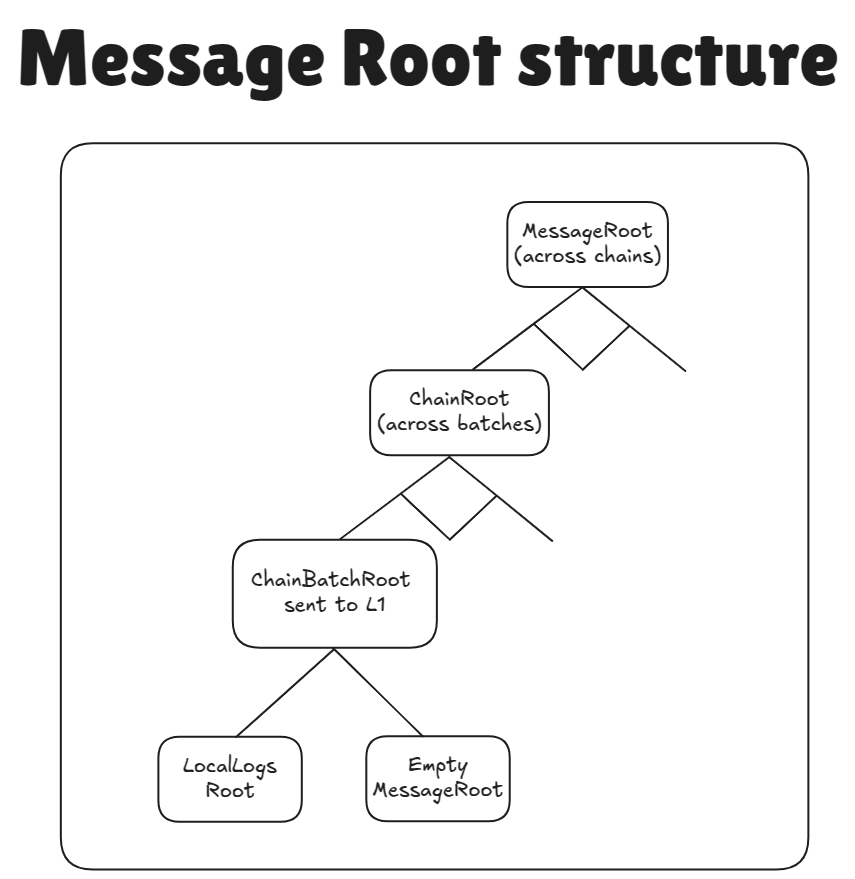
The tree forming the whole MessageRoot at one given chain is called sharedTree on implementation level. It’s the tree formed by taking MessageRoot node, and all of it’s children in the picture above.
The lines between
MessageRootandchainRootand between eachchainRootandChainBatchRootshow different binary merkle trees. TheMessageRootwill be the root of aFullMerkleTreeofchainRoot, whilechainRootis the merkle root of aDynamicIncrementalMerkleTreeofChainBatchRoot.
The root has the following format:
ChainBatchRoot = keccak256(LocalLogsRoot, MessageRoot)
where LocalLogsRoot is the root of the tree of messages that come from the chain itself in the given batch, while the MessageRoot is the root of aggregated messages from all of the chains that settle on top of the chain. For most chains the MessageRoot is empty. The ChainBatchRoot will be settled on the layer below, and be used to update the ChainRoot in the MessageRoot contract on that layer.
The structure has the following recursive format:
ChainBatchRoot = keccak256(LocalLogsRoot, MessageRoot)BatchRootLeaf = keccak256(BATCH_LEAF_PADDING, chainBatchRoot, batchNumber), where:BATCH_LEAF_PADDING: a constant padding, needed to ensure that the preimage of the BatchRootLeaf is larger than 64 bytes and so it can not be an internal node.
ChainRoot= the root of the binary dynamic incremental merkle treeBatchRootLeaf[].ChainIdLeaf = keccak256(CHAIN_ID_LEAF_PADDING, chainRoot, chainId), where:CHAIN_ID_LEAF_PADDING— it is a constant padding, needed to ensure that the preimage of the ChainIdLeaf is larger than 64 bytes and so it can not be an internal node.chain_id— the chain id of the chain the batches of which are aggregated.
MessageRoot— the root of the binary full merkle tree overChainIdLeaf[].
Note that the MessageRoot appears twice in the structure. So the structure is recursive, chains can aggregate other chains, this is used for the Gateway.
Appending new batch root leaves
At the end of each batch, the L1Messenger system contract would query the MessageRoot contract for the total aggregated root (i.e., the root of all ChainIdLeafs, which is the sharedTree root, the upmost node of the MessageRoot on the chain), calculate the LocalLogsRoot itself, and finally calculate the settled chain batch root ChainBatchRoot = keccak256(LocalLogsRoot, AggregatedRootHash) and propagate it to the settlement layer. We store ChainBatchRoot for each executed batch on settlement layer.
When ZKsync chain’s batch gets executed on the settlement layer, the chain calls the MessageRoot.addChainBatchRoot function, while providing the ChainBatchRoot for the chain. Then, the BatchRootLeaf will be calculated and appended to the incremental merkle tree with which the ChainRoot & ChainIdLeaf is calculated, which will be updated in the merkle tree of ChainIdLeafs.
Proving that a message belongs to a MessageRoot
Concepts
To prove that a message belongs to a MessageRoot, we need to understand the verification process conceptually. The proof system works through a hierarchical structure where messages are aggregated at multiple levels:
- Message to Batch: First, we prove that a specific message was included in a particular batch on its origin chain. This uses the same verification mechanism as standard L2->L1 log proofs.
- Batch to Chain: Next, we prove that the batch containing our message was included in the origin chain’s aggregated root (
ChainRoot). This involves proving theBatchRootLeaf’s inclusion in the chain’sDynamicIncrementalMerkletree. - Chain to MessageRoot: Finally, we prove that the origin chain’s root was included in the
MessageRoot’s shared tree. This involves proving theChainIdLeaf’s inclusion in theMessageRoot’s FullMerkle tree.
The verification process follows the hierarchical structure described earlier in this document, working up through the tree levels from individual messages to the final MessageRoot. Each level uses Merkle proofs to cryptographically verify inclusion, ensuring that the message authentically belongs to the claimed MessageRoot.
Technical Implementation
We construct concatenated Merkle proofs to prove that a message belongs to a MessageRoot. The process consists of two main steps:
- Construct the proof to the chain’s
ChainBatchRoot. This is the same proof that is used to verify L2->L1 logs. - Prove that it belonged to the
MessageRoot.
The concatenated proof is passed into the proveL2LogInclusion method. This will split the proof into the two parts listed above, and then verify the two merkle proofs. The first verification is done via the normal process of log inclusion, while the second uses proveL2LeafInclusion. The final root is checked to be stored in storage.
RPC Method and Proof Format
To avoid breaking changes to SDKs, the zks_getL2ToL1LogProof RPC method returns the proof data in a format directly supported by the proveL2LogInclusion contract method:
First bytes32 corresponds to the metadata of the proof. The zero-th byte should tell the version of the metadata and must be equal to the SUPPORTED_PROOF_METADATA_VERSION (a constant of 0x01).
Then, it should contain the number of 32-byte words that are needed to restore the current BatchRootLeaf , i.e. logLeafProofLen (it is called this way as it proves that a leaf belongs to the ChainBatchRoot). The second byte contains the batchLeafProofLen. It is the length of the merkle path to prove that the BatchRootLeaf belonged to the ChainRoot. The third byte, isFinalNode, is a boolean value representing if the proof is for the top level in the aggregation.
Proof Verification Process
Then, the following happens:
- We consume the
logLeafProofLenitems to produce theChainBatchRoot. The last word is typically the aggregated root for the chain.
If we were verifying ChainBatchRoot inclusion we would end here: isFinalNode would be set to true, and batchLeafProofLen to zero. To continue to MessageRoot inclusion we would set isFinalNode to be false, define batchLeafProofLen accordingly, and:
- Compute
BatchRootLeaf = keccak256(BATCH_LEAF_PADDING, chainBatchRoot, batchNumber). - Consume one element from the
_proofsarray to get the mask for the Merkle path of the batch leaf in the chain ID tree. - Consume
batchLeafProofLenelements to construct theChainRoot - Compute the
chainIdLeaf = keccak256(CHAIN_ID_LEAF_PADDING, chainRoot, chainId)
Now, we have the supposed chainIdRoot for the chain inside its settlement layer. The only thing left to prove is that this root belonged to some batch of the settlement layer.
Then, the following happens:
- One element from
_proofarray is consumed and expected to maintain the block number of the settlement layer when this chain IDChainBatchRootwas present concatenated with the mask for the reconstruction of the Merkle tree. - The second element read from
_proofcontains the settlement layer Chain ID.
The proveL2LeafInclusion function will be internally used by the existing _proveL2LogInclusion function to prove that a certain node existed in the tree.
Now, we can call the function to verify that the batch belonged to the settlement layer’s MessageRoot:
    proveL2LeafInclusion(
        settlementLayerChainId,
        settlementLayerBlockNumber,
        settlementLayerBlockRootMask,
        chainIdLeaf,
        // Basically pass the rest of the `_proof` array
        extractSliceUntilEnd(_proof, ptr)
    );
The other slice of the _proof array is expected to have the same structure as before:
- Metadata
- Merkle path to construct the
ChainBatchRoot - In case there are any more aggregation layers, additional info to prove that the batch belonged to it.
Additional notes on security
Redundance of data
Currently, we never clear the MessageRoot in other words, the aggregated root contains more and more batches’ settlement roots, leading to the following two facts:
- The aggregated proofs’ length starts to logarithmically depend on the number of total batches ever finalized on top of this settlement layer (it also depends logarithmically on the number of chains in the settlement layer). I.e. it is
O(log(total_chains) + log(total_batches) + log(total_logs_in_the_batch))in case of a single aggregation layer. - The same data may be referenced from multiple final aggregated roots.
It is the responsibility of the chain to ensure that each message has a unique id and can not be replayed. Currently a tuple of chain_batch_number, chain_message_id is used. While there are multiple message roots from which such a tuple could be proven from, it is still okay as it will be nullified only once.
Another notable example of the redundancy of data, is that we also have total MessageRoot on L1, which contains the aggregated root of all chains, while for chains that settle on L1, we still store the ChainBatchRoot for the efficiency.
What if Chain doesn’t provide the proof
If the chain doesn’t respond, users can manually re-create the Merkle proof using data available on its settlement layer.
Message roots change frequently
Yes, message roots update continuously as new chains prove their blocks. However, chains retain historical message roots for a reasonable period (around 24 hours) to ensure that recently generated Merkle paths remain valid.
Is this secure? Could a chain operator, like Chain D, use a different message root
Yes, it’s secure. If a malicious operator on Chain D attempted to use a different message root, they wouldn’t be able to submit the proof for their new batch to the Gateway. This is because the proof’s public inputs must include the valid message root.
Other Features
Dependency Set
- In ElasticChain, this is implicitly handled by the Gateway. Any chain that is part of the message root can exchange messages with any other chain, effectively forming an undirected graph.
Forms of finality
Interop requires the importing of a MessageRoot from some other chain. The MessageRoot commits to the interop tx. This can be done in different ways, depending on the security trust between the chains.
- Proof based interop
- Commit based interop
- Pre-commit based interop.
Note, that currently, we’re only working with proof based interop in production. Though, commit and pre-commit based interop might also be implemented in the future releases.
Proof based interop
The batch where the interop tx is emitted is sealed and committed to the chain’s settlement layer (Gateway or L1, for now only those are whitelisted as SLs). Proof is posted on the SL, and the batch is fully finalized and cannot be reverted. When this happens the SL’s MessageRoot is updated. The receiving chain imports this MessageRoot. When the receiving chain settles using the Executor facet, its imported MessageRoot is checked against the MessageRoot.sol contract.
This solution is the most trustless, but it is the slowest, since proofs have to be generated. To use this kind of interop, we specify the proof_based_gw interop mode when interacting with the SDK: this will serve a Merkle proof of inclusion of the log of interest inside Gateway’s MessageRoot.
Commit/Batch based interop
The batch has to be sealed and committed to the SL. We do not wait for the MessageRoot to be updated. We get the ChainBatchRoot of the source chain from the DiamondProxy of the chain itself. When the receiving chain commits the batch, the imported ChainBatchRoot is stored as a dependency. When the batch is executed, it is checked that all the dependencies have been executed.
This is faster than proof based interop, but not as fast as pre-commit based interop. It is also the middle ground in security.
Pre-commit/parallel building interop
Batches are not sealed, but built in parallel. L2ToL1LogsRoot is updated mid batch after each block. The receiving chain can read the current L2ToL1LogsRoot from the L1Messenger contract of the source chain. This can be two way, i.e. both chains can read from each other. It can happen multiple times inside a batch as well. If multiple roots were imported from the same batch, when settling they are aggregated and only the last node is sent. When settling, the imported L2ToL1LogsRoot might not be the final one that is settled by the source chain. An additional merkle proof will have to complete the root. This final root can be checked against the pending root of the other chain. If the roots match, then the batches of the chains have to be executed in parallel.
- Note: this solution can also be used for Shared Sequencing.
- Note: the L2ToL1 messages are aggregated in a Dynamic Incramental Merkle tree, see here.
This solution is the fastest.
Security considerations for Precommit based interop
When doing interop between chains, the receiving chain needs to ensure that it can safely receive interop txs. For this it needs two things, it needs to know that the execution of the block is correct, and that the block will be finalized.
To make sure that the block was executed correctly, the chains can run ENs for each other. In the future, this might be replaced with TEEs.
To make sure that the blocks are finalized, there will be an onchain way to commit to the execution of the blocks. If the block is not executed in a timely fashion, an emergency mode will be activated, during which anybody can execute batches corresponding to the corresponding blocks.
Interop Messages
In this section, we cover the lowest level of the interop stack: Interop Messages—the interface that forms the foundation for everything else.
This is an advanced document. While most users and app developers typically interact with higher layers of interop, understanding the internals remains valuable.
Basics
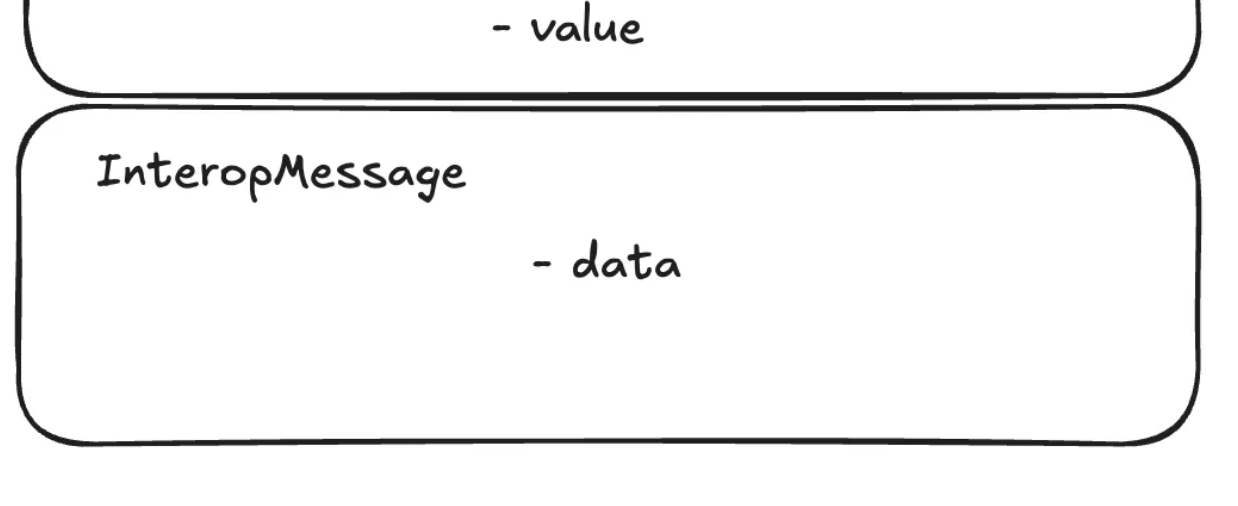
InteropMessages are the base layer of our interop stack.
An InteropMessage consists of arbitrary data (bytes) and has two simple properties:
- Anyone can send a message.
- Anyone can verify that a given message was successfully sent on some chain.
The message itself has no destination chain or address—it’s simply a payload created by a user (or contract). Think of it as a broadcast.
To send a message, a user calls the sendToL1 function on the L1Messenger contract, which is pre-deployed on every ZKsync chain at address 0x00..008008:
function sendToL1(bytes calldata _message)
When you call sendToL1, the L1Messenger returns a hash, which is the keccak256 of the message. This hash serves as a globally unique identifier and is required to verify the message’s inclusion on other chains via verifyInteropMessage.
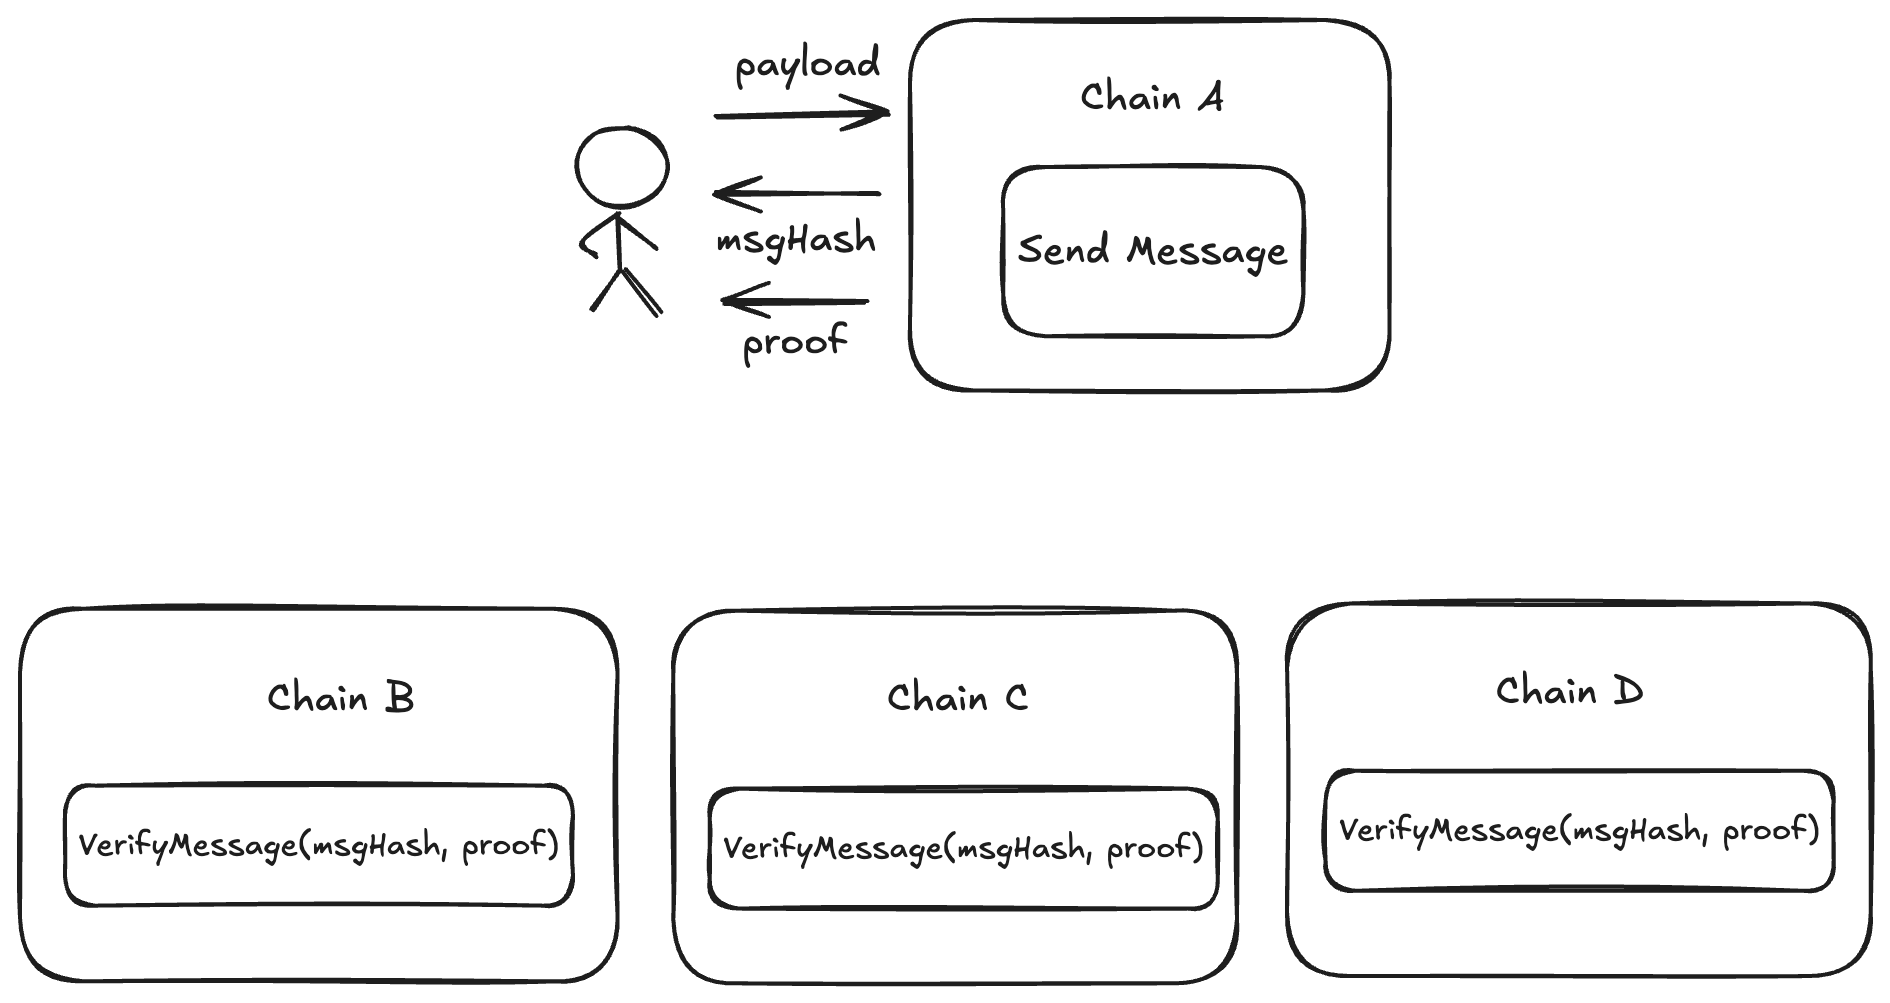
What happens under the hood?
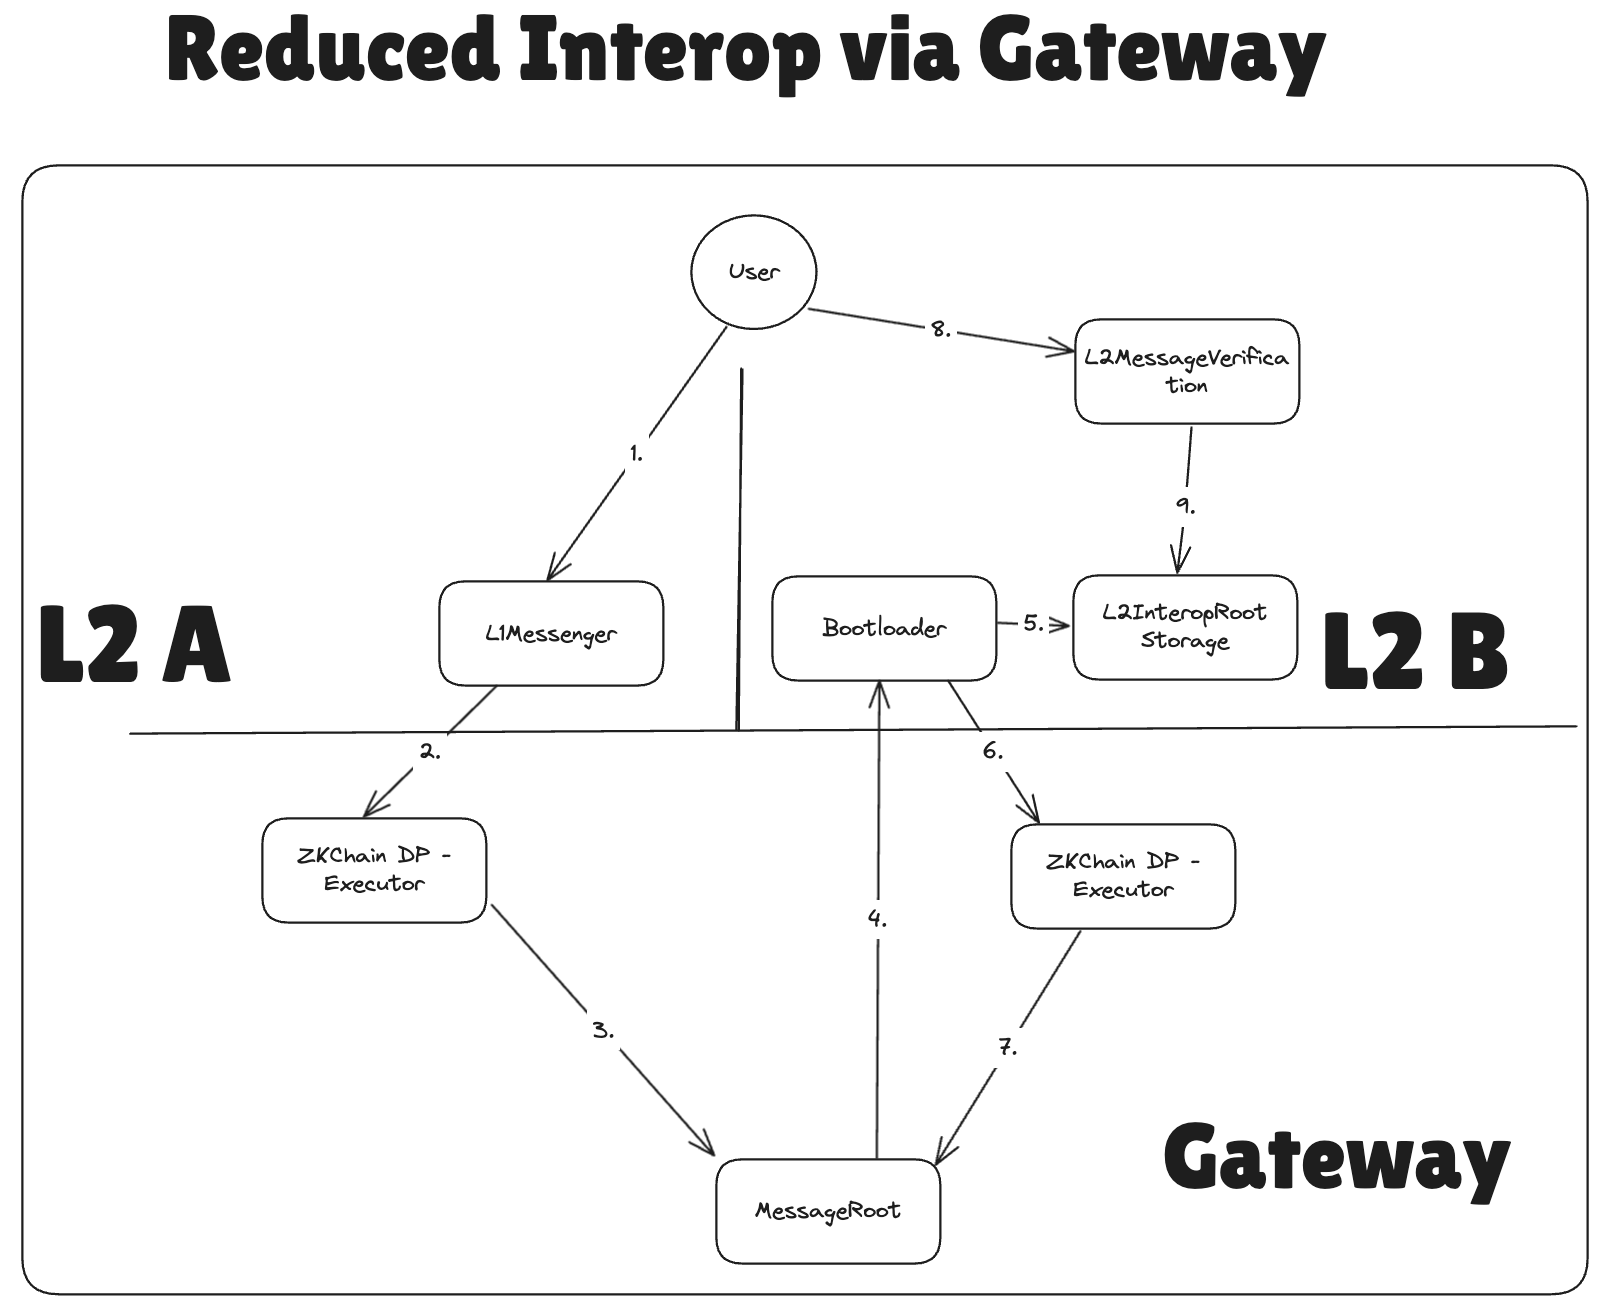
Note, that currently only message flow between chains settling on Gateway is possible, so we’ll have this in mind while going over step-by-step process.
A high-level overview of the send-and-verify flow:
- Send.
The user calls
sendToL1on chain L2_A via theL1Messengercontract. - Batch Execution. When the batch containing the message executes on the Gateway, the Executor facet appends L2_A’s chain-batch root (which includes the log for the message) to the Gateway’s global message root.
- Event Emission.
The Gateway’s
MessageRootcontract emits an event indicating that a new interop root (the updatedsharedTreeroot) was generated. - Event Capture. The server for the listening chain (L2B) uses EthWatch to detect this event, stores it in its database, and includes it in the next batch’s bootloader state.
- Root Storage.
On L2_B, the Bootloader component calls
L2InteropRootStorageto update its stored interop roots with the latest root from step 4. - Dependency Verification.
During settlement on L2_B, the batch’s dependency roots are verified against the Gateway’s
MessageRoot. - Verification Complete. At this point, the interop root for the batch is confirmed.
- User Proof Submission.
The user calls
proveL2MessageInclusionSharedon L2_B’sL2_MESSAGE_VERIFICATION_ADDRESS(0x..10009), supplying the message data and a proof of inclusion (see below). Note, that this step could be done in the same batch as steps 6-7, not necessarily strictly later. - Final Verification.
This triggers
L2InteropRootStorageto verify the corresponding interop-root inclusion on L2_B.
How do I get the proof?
The proveL2MessageInclusionShared function requires a Merkle-tree proof (see message root). You can obtain it by:
- Querying the chain via the zksync RPC API
- Generating it off-chain from the SL state
How does this differ from other layers (InteropTransactions, InteropCalls)?
As the most basic layer, Interop Messages:
- Do not support selecting destination chains
- Lack nullifiers or replay protection
- Offer no cancellation mechanism
They represent a simple, broadcast-style communication primitive.
Timestamps and Expiration
- On ElasticChain, older messages can become harder to validate as gathering the required Merkle-proof data grows more challenging over time.
- Nevertheless, if you can obtain the proof for the corresponding leaf, there is no expiration—messages remain technically verifiable indefinitely.
Example
Please see the Advanced Guide for example with exact commands.
Interop Examples
Here, the examples of applying the interop can be found. As we add more functionality, the section will grow.
Interop Message Simple Use Case
For this example, imagine you want to allow users to signup on multiple chains - but you want to coordinate when the signup starts.
With the help of interop, you only have to open the signup once, on one chain, no need to do that as many times as there are chains you want to open the signup on!
An example of this being done:
// Contract deployed on chain A.
contract SignupManager {
  public bytes32 sigup_open_msg_hash;
  function signup_open() onlyOwner {
    // We are open for business
    signup_open_msg_hash = L1Messenger(L2_TO_L1_MESSENGER_SYSTEM_CONTRACT_ADDR).sendToL1("We are open");
  }
}

// Contract deployed on all other chains.
contract SignupContract {
  public bool signupIsOpen;
  // Anyone can call it.
  function openSignup(uint256 _chainId, uint256 _batchNumber, uint256 _index, L2Message calldata _message, bytes32[] calldata _proof) {
    IZKChain(zkChain).proveL2MessageInclusionShared(_chainId, _batchNumber, _index, _message, proof);
    require(_chainId_ == CHAIN_A_ID);
    require(_message.sender == SIGNUP_MANAGER_ON_CHAIN_A);
    require(_message.data == "We are open");
    signupIsOpen = true;
  }

  function signup() {
     require(signupIsOpen);
     signedUpUser[msg.sender] = true;
  }
}
In the example above, the signupManager on chain A calls the signup_open method. After that, any user on other
chains can retrieve the signup_open_msg_hash, obtain the necessary proof from the Gateway (or another source), and
call the openSignup function on any destination chain.
More details on the overall process can be read here.
You can also see another example in Advanced guides.
Settlement Contracts
Settlement contracts enable ZKsync chains to settle transaction batches and communicate with Ethereum L1.
- L1 <> L2 communication: Handles deposits, withdrawals, and censorship-resistant message passing between L1 and L2
- Data availability: Manages how L2 state data is made available, supporting various modes from full on-chain data to custom DA solutions
For the broader context of how these contracts fit into the L1 architecture and more details on settlement process itself, see L1 Smart Contracts.
L1 <> L2 communication
Handling L1→L2 ops
The transactions on ZKsync can be initiated not only on L2, but also on L1. There are two types of transactions that can be initiated on L1:
- Priority operations. These are the kind of operations that any user can create.
- Upgrade transactions. These can be created only during upgrades.
Prerequisites
Please read articles on the general system contracts / bootloader structure as well as the pubdata structure with Boojum system to understand the difference between system and user logs.
Priority operations
Initiation
A new priority operation is submitted by calling Bridgehub.requestL2TransactionDirect or Bridgehub.requestL2TransactionTwoBridges on L1. These route through to Mailbox.bridgehubRequestL2Transaction (gated onlyBridgehub), which performs several checks on the transaction (processability, sufficient fee) and appends it to the priority tree. Service transactions can be submitted via requestL2ServiceTransaction. The legacy requestL2Transaction method still exists on the Mailbox as an Era-only shim and is marked for removal.
Bootloader
Whenever an operator sees a priority operation, it can include the transaction into the batch. While for normal L2
transaction the account abstraction protocol will ensure that the msg.sender has indeed agreed to start a transaction
out of this name, for L1→L2 transactions there is no signature verification. In order to verify that the operator
includes only transactions that were indeed requested on L1, the bootloader
maintains
two variables:
numberOfPriorityTransactions(maintained atPRIORITY_TXS_L1_DATA_BEGIN_BYTEof bootloader memory)priorityOperationsRollingHash(maintained atPRIORITY_TXS_L1_DATA_BEGIN_BYTE + 32of the bootloader memory)
Whenever a priority transaction is processed, the numberOfPriorityTransactions gets incremented by 1, while
priorityOperationsRollingHash is assigned to keccak256(priorityOperationsRollingHash, processedPriorityOpHash),
where processedPriorityOpHash is the hash of the priority operations that has been just processed.
Also, for each priority transaction, we emit a user L2→L1 log with its hash and result, which basically means that it will get Merklized and users will be able to prove on L1 that a certain priority transaction has succeeded or failed (which can be helpful to reclaim your funds from bridges if the L2 part of the deposit has failed).
Then, at the end of the batch, we submit and 2 L2→L1 log system log with these values.
Batch commit
During block commit, the contract will remember those values, but not validate them in any way.
Batch execution
During batch execution, we would pop numberOfPriorityTransactions from the top of priority queue and
verify
that their rolling hash does indeed equal to priorityOperationsRollingHash.
Upgrade transactions
Initiation
Upgrade transactions can only be created during a system upgrade. It is done if the DiamondProxy delegatecalls to the
implementation that manually puts this transaction into the storage of the DiamondProxy. Note, that since it happens
during the upgrade, there is no “real” checks on the structure of this transaction. We do have
some validation,
but it is purely on the side of the implementation which the DiamondProxy delegatecalls to and so may be lifted if the
implementation is changed.
The hash of the currently required upgrade transaction is
stored
under l2SystemContractsUpgradeTxHash.
We will also track the batch where the upgrade has been committed in the l2SystemContractsUpgradeBatchNumber
variable.
We can not support multiple upgrades in parallel, i.e. the next upgrade should start only after the previous one has been complete.
Bootloader
The upgrade transactions are processed just like with priority transactions, with only the following differences:
- We can have only one upgrade transaction per batch & this transaction must be the first transaction in the batch.
- The system contracts upgrade transaction is not appended to
priorityOperationsRollingHashand doesn’t incrementnumberOfPriorityTransactions. Instead, its hash is calculated via a system L2→L1 log before it gets executed. Note, that it is an important property. More on it below.
Commit
After an upgrade has been initiated, it will be required that the next commit batches operation already contains the system upgrade transaction. It is checked by verifying the corresponding L2→L1 log.
We also remember that the upgrade transaction has been processed in this batch (by amending the
l2SystemContractsUpgradeBatchNumber variable).
Revert
In a very rare event when the team needs to revert the batch with the upgrade on ZKsync, the
l2SystemContractsUpgradeBatchNumber is
reset.
Note, however, that we do not “remember” that certain batches had a version before the upgrade, i.e. if the reverted batches will have to be re-executed, the upgrade transaction must still be present there, even if some of the deleted batches were committed before the upgrade and thus didn’t contain the transaction.
Execute
Once batch with the upgrade transaction has been executed, we delete them from storage for efficiency to signify that the upgrade has been fully processed and that a new upgrade can be initiated.
Security considerations
Since the operator can put any data into the bootloader memory and for L1→L2 transactions the bootloader has to blindly trust it and rely on L1 contracts to validate it, it may be a very powerful tool for a malicious operator. Note, that while the governance mechanism is generally trusted, we try to limit our trust for the operator as much as possible, since in the future anyone would be able to become an operator.
Some time ago, we used to have a system where the upgrades could be done via L1→L2 transactions, i.e. the
implementation of the DiamondProxy upgrade would
include
a priority transaction (with from equal to for instance FORCE_DEPLOYER) with all the upgrade params.
In the Boojum though having such logic would be dangerous and would allow for the following attack:
- Let’s say that we have at least 1 priority operations in the priority queue. This can be any operation, initiated by anyone.
- The operator puts a malicious priority operation with an upgrade into the bootloader memory. This operation was never included in the priority operations queue / and it is not an upgrade transaction. However, as already mentioned above the bootloader has no idea what priority / upgrade transactions are correct and so this transaction will be processed.
The most important caveat of this malicious upgrade is that it may change implementation of the Keccak256 precompile
to return any values that the operator needs.
- When the
priorityOperationsRollingHashwill be updated, instead of the “correct” rolling hash of the priority transactions, the one which would appear with the correct topmost priority operation is returned. The operator can’t amend the behaviour ofnumberOfPriorityTransactions, but it won’t help much, since the thepriorityOperationsRollingHashwill match on L1 on the execution step.
That’s why the concept of the upgrade transaction is needed: this is the only transaction that can initiate transactions out of the kernel space and thus change bytecodes of system contracts. That’s why it must be the first one and that’s why emit its hash via a system L2→L1 log before actually processing it.
Why it doesn’t break on the previous version of the system
This section is not required for Boojum understanding but for those willing to analyze the production system that is deployed at the time of this writing.
Note that the hash of the transaction is calculated before the transaction is executed: https://github.com/matter-labs/era-system-contracts/blob/3e954a629ad8e01616174bde2218241b360fda0a/bootloader/bootloader.yul#L1055
And then we publish its hash on L1 via a system L2→L1 log: https://github.com/matter-labs/era-system-contracts/blob/3e954a629ad8e01616174bde2218241b360fda0a/bootloader/bootloader.yul#L1133
In the new upgrade system, the priorityOperationsRollingHash is calculated on L2 and so if something in the middle
changes the implementation of Keccak256, it may lead to the full priorityOperationsRollingHash be maliciously
crafted. In the pre-Boojum system, we publish all the hashes of the priority transactions via system L2→L1 and then the
rolling hash is calculated on L1. This means that if at least one of the hash is incorrect, then the entire rolling hash
will not match also.
L2→L1 communication
The L2→L1 communication is more fundamental than the L1→L2 communication, as the second relies on the first. L2→L1
communication happens by the L1 smart contract verifying messages alongside the proofs. The only “provable” part of the
communication from L2 to L1 are native L2→L1 logs emitted by VM. These can be emitted by the to_l1
opcode.
Each log consists of the following fields:
struct L2Log {
  uint8 l2ShardId;
  bool isService;
  uint16 txNumberInBatch;
  address sender;
  bytes32 key;
  bytes32 value;
}
Where:
l2ShardIdis the id of the shard the opcode was called (it is currently always 0).isServicea boolean flag that is not used right nowtxNumberInBatchthe number of the transaction in the batch where the log has happened. This number is taken from the internal counter which is incremented each time theincrement_tx_counteris called.senderis the value ofthisin the frame where the L2→L1 log was emitted.keyandvalueare just two 32-byte values that could be used to carry some data with the log.
The hashed array of these opcodes is then included into the batch commitment. Because of that we know that if the proof verifies, then the L2→L1 logs provided by the operator were correct, so we can use that fact to produce more complex structures. Before Boojum such logs were also Merklized within the circuits and so the Merkle tree’s root hash was included into the batch commitment also.
Important system values
Two key and value fields are enough for a lot of system-related use-cases, such as sending timestamp of the batch,
previous batch hash, etc. They were and are used
used
to verify the correctness of the batch’s timestamps and hashes. You can read more about block processing
here.
Long L2→L1 messages & bytecodes
However, sometimes users want to send long messages beyond 64 bytes which key and value allow us. But as already
said, these L2→L1 logs are the only ways that the L2 can communicate with the outside world. How do we provide long
messages?
Let’s add an sendToL1 method in L1Messenger, where the main idea is the following:
- Let’s submit an L2→L1 log with
key = msg.sender(the actual sender of the long message) andvalue = keccak256(message). - Now, during batch commitment the operator will have to provide an array of such long L2→L1 messages and it will be checked on L1 that indeed for each such log the correct preimage was provided.
A very similar idea is used to publish uncompressed bytecodes on L1 (the compressed bytecodes were sent via the long L1→L2 messages mechanism as explained above).
Note, however, that whenever someone wants to prove that a certain message was present, they need to compose the L2→L1 log and prove its presence.
Priority operations
Also, for each priority operation, we would send its hash and it status via an L2→L1 log. On L1 we would then
reconstruct the rolling hash of the processed priority transactions, allowing to correctly verify during the
executeBatches method that indeed the batch contained the correct priority operations.
Importantly, the fact that both hash and status were sent, it made it possible to prove that the L2 part of a deposit has failed and ask the bridge to release funds.
Overview - Deposits and Withdrawals
The zkEVM supports general message passing for L1<->L2 communication. Proofs are settled on L1, so core of this process is the L2->L1 message passing process. L1->L2 messages are recorded on L1 inside a priority queue, the sequencer picks it up from here and executes it in the zkEVM. The zkEVM sends an L2->L1 message of the L1 transactions that it processed, and the rollup’s proof is only valid if the processed transactions were exactly right.
There is an asymmetry in the two directions however, in the L1->L2 direction we support starting message calls by having a special transaction type called L1 transactions. In the L2->L1 direction we only support message passing.
In particular, deposits and withdrawals of ether also use the above methods. For deposits the L1->L2 transaction is sent with empty calldata, the recipients address and the deposited value. When withdrawing, an L2->L1 message is sent. This is then processed by the smart contract holding the ether on L1, which releases the funds.
Priority Operations: Merkle Tree
Overview
The priority tree is the live mechanism for handling L1→L2 priority operations. Mailbox._writePriorityOpHash appends each new priority op into s.priorityTree (an incremental Merkle tree), and batch execution verifies priority ops via Merkle proofs (s.priorityTree.processBatch) over PriorityOpsBatchInfo against historical roots.
Motivation for migration to Merkle Tree
Gateway was introduced, requiring support for one more operation:
- migrating priority queue from L1 to Gateway (and back)
Current implementation takes O(n) space and is vulnerable to spam attacks during migration
(e.g. an attacker can insert a lot of priority operations and migration of all of them would have been impossible due to gas limits).
Hence, we required an implementation with a small (constant- or log-size) space imprint that could be migrated to Gateway and back that would still allow us to perform the other 2 operations.
Merkle tree of priority operations is perfect for this since the latest root hash can simply be migrated to Gateway and back.
- It can still efficiently (in
O(height)) insert new operations. - It can also still efficiently (in
O(n)compute andO(n + height)calldata) check that the batch’spriorityOperationsHashcorresponds to the operations from the queue.
Note that n here is the number of priority operations in the batch, not 2^height.
The implementation details are described below.
FAQ
- Q: Why can’t we just migrate the rolling hash of the operations in the existing priority queue?
- A: The rolling hash is not enough to check that the operations from the executed batch are indeed from the priority queue. That would have required storing all historical rolling hashes, which would have been
O(n)space and would not have solve the spam attack problem.
Implementation
The implementation consists of two parts:
- Merkle tree on L1 contracts, to replace the existing priority queue (while still supporting the existing operations)
- Merkle tree off-chain on the server, to generate the merkle proofs for the executed priority operations.
Contracts
On the contracts, the Merkle tree is implemented as an Incremental (append-only) Merkle Tree (example implementation), meaning that it can efficiently (in O(height) compute) append new elements to the right, while only storing O(height) nodes at all times.
It is also dynamically sized, meaning that it doubles in size when the current size is not enough to store the new element.
Server
On the server, the Merkle tree is implemented as an extension of MiniMerkleTree currently used for L2->L1 logs.
It has the following properties:
- in-memory: the tree is stored in memory and is rebuilt on each restart (details below).
- dynamically sized (to match the contracts implementation)
- append-only (to match the contracts implementation)
The tree does not need to be super efficient, since we process on average 7 operations per batch.
Why in-memory?
Having the tree in-memory means rebuilding the tree on each restart. This is fine because on mainnet after >1 year since release we have only 3.2M priority operations. We only have to fully rebuild the tree once and then simply cache the already executed operations (which are the majority). Having the tree in-memory has an added benefit of not having to have additional infrastructure to store it on disk and not having to be bothered to rollback its state manually if we ever have to (as we do for e.g. for the storage logs tree).
Note: If even rebuilding it once becomes a problem, it can be easily mitigated by only persisting the cache nodes.
Caching
Why do we need caching? After a batch is successfully executed, we no longer need to have the ability to generate merkle paths for those operations. This means that we can save space and compute by only fully storing the operations that are not yet executed, and caching the leaves corresponding to the already executed operations.
We only cache some prefix of the tree, meaning nodes in the interval [0; N) where N is the number of executed priority operations. The cache stores the rightmost cached left-child node on each level of the tree (see diagrams).
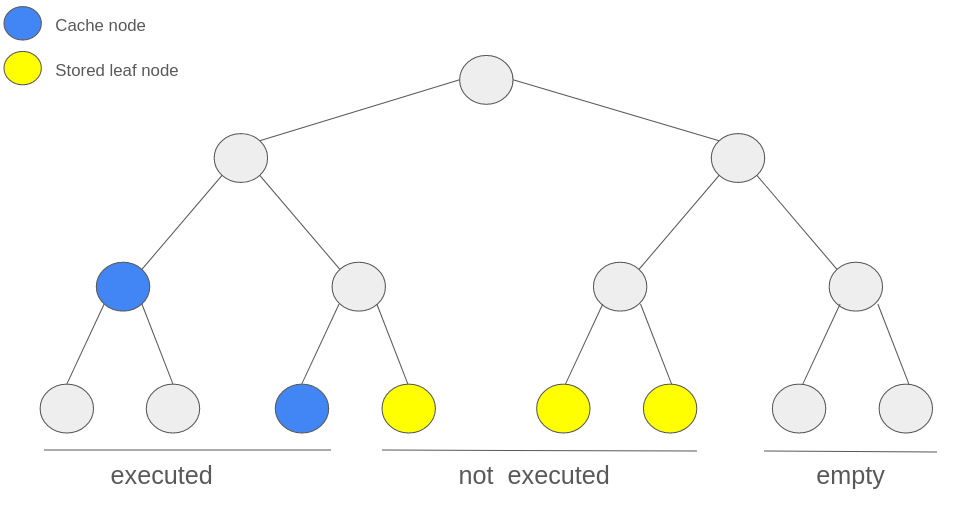
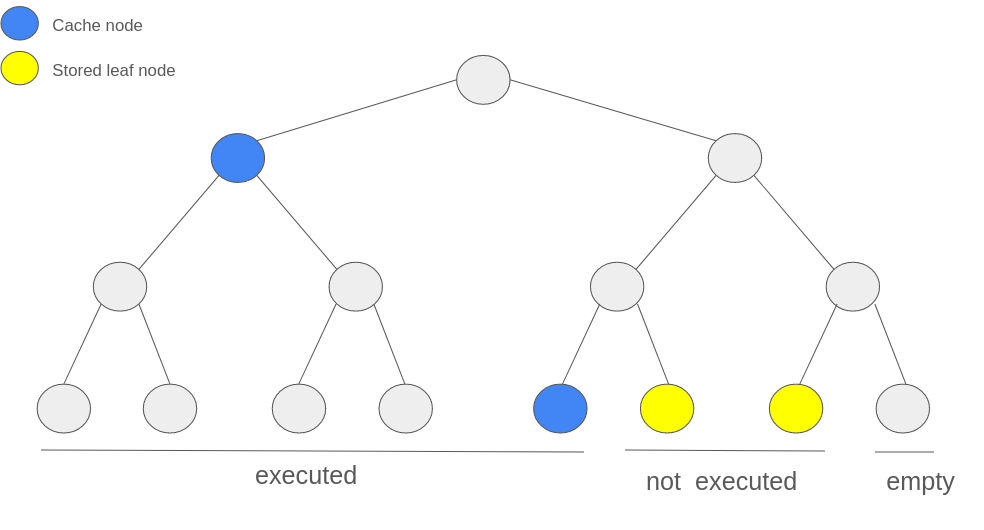

This means that we are not able to generate merkle proofs for the cached nodes (and since they are already executed, we don’t need to). This structure allows us to save a lot of space, since it only takes up O(height) space instead of linear space for all executed operations. This is a big optimization since there are currently 3.2M total operations but <10 non-executed operations in the mainnet priority queue, which means most of the tree is cached.
This also means we don’t really have to store non-leaf nodes other than cache, since we can calculate merkle root / merkle paths in O(n) where n is the number of non-executed operations (and not total number of operations), and since n is so small, it is really fast.
Adding new operations
On the contracts, appending a new operation to the tree is done by simply calling append on the Incremental Merkle Tree, which updates at most height slots. Actually, it works almost exactly like the cache described above. Once again: tornado-cash implementation.
On the server, eth_watch listens for NewPriorityRequest events as it does now, and appends the new operation to the tree on the server.
Checking validity
To check that the executed batch indeed took its priority operations from the queue, we have to make sure that if we take first numberOfL1Txs non-executed operations from the tree, their rolling hash matches priorityOperationsHash . Since we don’t store the hashes of these operations onchain anymore, we provide them as calldata. Additionally in calldata, we should provide merkle proofs for the first and last operations in that batch (hence O(n + height) calldata). This makes it possible to prove onchain that that contiguous interval of hashes indeed exists in the merkle tree.
This can be done simply by constructing the part of the tree above this interval using the provided paths to first and last elements of the interval checking that computed merkle root matches with stored one (in O(n) where n is number of priority operations in a batch). We also need to track the index of the first unexecuted operation onchain to properly calculate the merkle root and ensure that batches don’t execute some operations out of order or multiple times.
We also need to prove that the rolling hash of provided hashes matches with priorityOperationsHash which is also O(n)
It is important to note that we store some number of historical root hashes, since the Merkle tree on the server might lag behind the contracts a bit, and hence merkle paths generated on the server-side might become invalid if we compare them to the latest root hash on the contracts. These historical root hashes are not necessary to migrate to and from Gateway though.
Legacy: Priority Queue
Previously, priority operations were stored in a linear queue (PriorityQueue library) using pushBack/popFront, with batch execution verifying ops via a rolling hash loop. This was replaced by the Merkle tree to support Gateway migration. The old library remains in storage as s.__DEPRECATED_priorityQueue but is no longer in the request/execute path.
Data availability
- Pubdata
- Compression
- Reconstruction
- Validium and zkPorter
- Custom DA support
- Rollup DA support
- Standard pubdata format
- State diff compression
Handling pubdata in Boojum
Pubdata in ZKsync can be divided up into 4 different categories:
- L2 to L1 Logs
- L2 to L1 Messages
- Smart Contract Bytecodes
- Storage writes
Using data corresponding to these 4 facets, across all executed batches, we’re able to reconstruct the full state of L2. With the upgrade to our new proof system, Boojum, the way this data is represented will change. At a high level, in the pre-Boojum system these are represented as separate fields while for boojum they will be packed into a single bytes array. Once 4844 gets integrated this bytes array will move from being part of the calldata to blob data.
While the structure of the pubdata changes, the way in which one can go about pulling the information will remain the
same. Basically, we just need to filter all of the transactions to the L1 ZKsync contract for only the commitBatchesSharedBridge
transactions where the proposed block has been referenced by a corresponding executeBatchesSharedBridge call (the reason for this
is that a committed or even proven block can be reverted but an executed one cannot). Once we have all the committed
batches that have been executed, we then will pull the transaction input and the relevant fields, applying them in order
to reconstruct the current state of L2.
L2→L1 communication
L2→L1 communication before Boojum
While there were quite some changes during Boojum upgrade, most of the scheme remains the same and so explaining how it worked before gives some background on why certain decisions are made and kept for backward compatibility.
L2→L1 communication before Boojum
The most important feature that we’ll need to maintain in Boojum for backward compatibility is to provide a similar Merkle tree of L2→L1 logs with the long L2→L1 messages and priority operations’ status.
Before Boojum, whenever we sent an L2→L1 long message, a log was appended to the Merkle tree of L2→L1 messages on L1 due to necessity. In Boojum we’ll have to maintain this fact. Having the priority operations’ statuses is important to enable proving failed deposits for bridges.
Changes with Boojum
Problems with the previous approach
- There was a limit of 512 L2→L1 logs per batch, which is very limiting. It causes our block to be forcefully closed based on the number of these messages instead of having the pubdata as the only limit.
- In the ideal world, we would like to have the tree adapt to the requirements of the batch, with any number of leaves possible (in practice, a maximum of 2048 would likely be enough for the foreseeable future).
- Extending the tree in the circuits will be hard to do and hard to maintain.
- The hash of the contents of the L2→L1 messages needs to be rehashed to support the danksharding blobs, so we want to keep only the essential logs as parts of calldata and the rest should be separated so that they could be moved the EIP4844 blob in the future.
Solution
We will implement the calculation of the Merkle root of the L2→L1 messages via a system contract as part of the
L1Messenger. Basically, whenever a new log emitted by users that needs to be Merklized is created, the L1Messenger
contract will append it to its rolling hash and then at the end of the batch, during the formation of the blob it will
receive the original preimages from the operator, verify, and include the logs to the blob.
We will now call the logs that are created by users and are Merklized user logs and the logs that are emitted by natively by VM system logs. Here is a short comparison table for better understanding:
| System logs | User logs |
|---|---|
| Emitted by VM via an opcode. | VM knows nothing about them. |
| Consistency and correctness is enforced by the verifier on L1 (i.e. their hash is part of the block commitment. | Consistency and correctness is enforced by the L1Messenger system contract. The correctness of the behavior of the L1Messenger is enforced implicitly by prover in a sense that it proves the correctness of the execution overall. |
| We don’t calculate their Merkle root. | We calculate their Merkle root on the L1Messenger system contract. |
| We have constant small number of those. | We can have as much as possible as long as the commitBatchesSharedBridge function on L1 remains executable (it is the job of the operator to ensure that only such transactions are selected) |
| In EIP4844 they will remain part of the calldata. | In EIP4844 they will become part of the blobs. |
Backwards-compatibility
Note, that to maintain a unified interface with the previous version of the protocol, the leaves of the Merkle tree will have to maintain the following structure:
struct L2Log {
  uint8 l2ShardId;
  bool isService;
  uint16 txNumberInBlock;
  address sender;
  bytes32 key;
  bytes32 value;
}
While the leaf will look the following way:
bytes32 hashedLog = keccak256(
    abi.encodePacked(_log.l2ShardId, _log.isService, _log.txNumberInBlock, _log.sender, _log.key, _log.value)
);
keccak256 will continue being the function for the merkle tree.
To put it shortly, the proofs for L2→L1 log inclusion will continue having exactly the same format as they did in the pre-Boojum system, which avoids breaking changes for SDKs and bridges alike.
Implementation of L1Messenger
The L1Messenger contract will maintain a rolling hash of all the L2ToL1 logs chainedLogsHash as well as the rolling
hashes of messages chainedMessagesHash. Whenever a contract wants to send an L2→L1 log, the following operation will
be
applied:
chainedLogsHash = keccak256(chainedLogsHash, hashedLog). L2→L1 logs have the same 88-byte format as in the current
version of ZKsync.
Note, that the user is charged for necessary future the computation that will be needed to calculate the final merkle root. It is roughly 4x higher than the cost to calculate the hash of the leaf, since the eventual tree might have be 4x times the number nodes. In any case, this will likely be a relatively negligible part compared to the cost of the pubdata.
At the end of the execution, the bootloader will
provide
a list of all the L2ToL1 logs as well as the messages in this block to the L1Messenger (this will be provided by the
operator in the memory of the bootloader). The L1Messenger checks that the rolling hash from the provided logs is the
same as in the chainedLogsHash and calculate the merkle tree of the provided messages. Right now, we always build the
Merkle tree of size 2048, but we charge the user as if the tree was built dynamically based on the number of leaves in
there. The implementation of the dynamic tree has been postponed until the later upgrades.
Long L2→L1 messages & bytecodes
Before, the fact that the correct preimages for L2→L1 messages as bytecodes were provided was checked on the L1 side. Now, it will be done on L2.
If the user wants to send an L2→L1 message, its preimage is
appended
to the message’s rolling hash too chainedMessagesHash = keccak256(chainedMessagesHash, keccak256(message)).
A very similar approach for bytecodes is used, where their rolling hash is calculated and then the preimages are provided at the end of the batch to form the full pubdata for the batch.
Note, that in for backward compatibility, just like before any long message or bytecode is accompanied by the corresponding user L2→L1 log.
Using system L2→L1 logs vs the user logs
The content of the L2→L1 logs by the L1Messenger will go to the blob of EIP4844. Meaning, that all the data that belongs to the tree by L1Messenger’s L2→L1 logs should not be needed during block commitment. Also, note that in the future we will remove the calculation of the Merkle root of the built-in L2→L1 messages.
The only places where the built-in L2→L1 messaging should continue to be used:
- Logs by SystemContext (they are needed on commit to check the previous block hash).
- Logs by L1Messenger for the merkle root of the L2→L1 tree as well as the hash of the
totalPubdata. chainedPriorityTxsHashandnumberOfLayer1Txsfrom the bootloader (read more about it below).
Obtaining txNumberInBlock
To have the same log format, the txNumberInBlock must be obtained. While it is internally counted in the VM, there is
currently no opcode to retrieve this number. We will have a public variable txNumberInBlock in the SystemContext,
which will be incremented with each new transaction and retrieve this variable from there. It is
zeroed out
at the end of the batch.
Bootloader implementation
The bootloader has a memory segment dedicated to the ABI-encoded data of the L1ToL2Messenger to perform the
publishPubdataAndClearState call.
At the end of the execution of the batch, the operator should provide the corresponding data into the bootloader memory,
i.e user L2→L1 logs, long messages, bytecodes, etc. After that, the
call
is performed to the L1Messenger system contract, that should validate the adherence of the pubdata to the required
format
Bytecode Publishing
Within pubdata, bytecodes are published in 1 of 2 ways: (1) uncompressed via factoryDeps (pre-boojum this is within
its own field, and post-boojum as part of the totalPubdata) and (2) compressed via long l2 → l1 messages.
Uncompressed Bytecode Publishing
With Boojum, factoryDeps are included within the totalPubdata bytes and have the following format:
number of bytecodes || forEachBytecode (length of bytecode(n) || bytecode(n)) .
Compressed Bytecode Publishing
This part stays the same in a pre and post boojum ZKsync. Unlike uncompressed bytecode which are published as part of
factoryDeps, compressed bytecodes are published as long l2 → l1 messages which can be seen
here.
Bytecode Compression Algorithm — Server Side
This is the part that is responsible for taking bytecode, that has already been chunked into 8 byte words, performing validation, and compressing it.
Each 8 byte word from the chunked bytecode is assigned a 2 byte index (constraint on size of dictionary of chunk → index is 2^16 - 1 elements). The length of the dictionary, dictionary entries (index assumed through order), and indexes are all concatenated together to yield the final compressed version.
For bytecode to be considered valid it must satisfy the following:
- Bytecode length must be at most 2097120 ((2^16 - 1) * 32) bytes
- Bytecode length must be a multiple of 32.
- Number of 32-byte words cannot be even.
The following is a simplified version of the algorithm:
statistic: Map[chunk, (count, first_pos)]
dictionary: Map[chunk, index]
encoded_data: List[index]

for position, chunk in chunked_bytecode:
 if chunk is in statistic:
  statistic[chunk].count += 1
 else:
  statistic[chunk] = (count=1, first_pos=pos)

# We want the more frequently used bytes to have smaller ids to save on calldata (zero bytes cost less)
statistic.sort(primary=count, secondary=first_pos, order=desc)

for index, chunk in enumerated(sorted_statistics):
  dictionary[chunk] = index

for chunk in chunked_bytecode:
 encoded_data.append(dictionary[chunk])

return [len(dictionary), dictionary.keys(order=index asc), encoded_data]
Verification And Publishing — L2 Contract
The function publishCompressBytecode takes in both the original _bytecode and the _rawCompressedData , the latter
of which comes from the output of the server’s compression algorithm. Looping over the encoded data, derived from
_rawCompressedData , the corresponding chunks are pulled from the dictionary and compared to the original byte code,
reverting if there is a mismatch. After the encoded data has been verified, it is published to L1 and marked accordingly
within the KnownCodesStorage contract.
Pseudo-code implementation:
length_of_dict = _rawCompressedData[:2]
dictionary = _rawCompressedData[2:2 + length_of_dict * 8] # need to offset by bytes used to store length (2) and multiply by 8 for chunk size
encoded_data = _rawCompressedData[2 + length_of_dict * 8:]

assert(len(dictionary) % 8 == 0) # each element should be 8 bytes
assert(num_entries(dictionary) <= 2^16)
assert(len(encoded_data) * 4 == len(_bytecode)) # given that each chunk is 8 bytes and each index is 2 bytes they should differ by a factor of 4

for (index, dict_index) in list(enumerate(encoded_data)):
 encoded_chunk = dictionary[dict_index]
 real_chunk = _bytecode.readUint64(index * 8) # need to pull from index * 8 to account for difference in element size
 verify(encoded_chunk == real_chunk)

# Sending the compressed bytecode to L1 for data availability
sendToL1(_rawCompressedBytecode)
markAsPublished(hash(_bytecode))
Storage diff publishing
ZKsync is a statediff-based rollup and so publishing the correct state diffs plays an integral role in ensuring data availability.
How publishing of storage diffs worked before Boojum
As always in order to understand the new system better, some information about the previous one is important.
Before, the system contracts had no clue about storage diffs. It was the job of the operator to provide the
initialStorageChanges and reapeatedStorageWrites (more on the differences will be explained below). The information
to commit the block looked the following way:
struct CommitBlockInfo {
  uint64 blockNumber;
  uint64 timestamp;
  uint64 indexRepeatedStorageChanges;
  bytes32 newStateRoot;
  uint256 numberOfLayer1Txs;
  bytes32 l2LogsTreeRoot;
  bytes32 priorityOperationsHash;
  bytes initialStorageChanges;
  bytes repeatedStorageChanges;
  bytes l2Logs;
  bytes[] l2ArbitraryLengthMessages;
  bytes[] factoryDeps;
}
These two fields would be then included into the block commitment and checked by the verifier.
Difference between initial and repeated writes
ZKsync publishes state changes that happened within the batch instead of transactions themselves. Meaning, that for
instance some storage slot S under account A has changed to value V, we could publish a triple of A,S,V. Users
by observing all the triples could restore the state of ZKsync. However, note that our tree unlike Ethereum’s one is not
account based (i.e. there is no first layer of depth 160 of the merkle tree corresponding to accounts and second layer
of depth 256 of the merkle tree corresponding to users). Our tree is “flat”, i.e. a slot S under account A is just
stored in the leaf number H(S,A). Our tree is of depth 256 + 8 (the 256 is for these hashed account/key pairs and 8 is
for potential shards in the future, we currently have only one shard and it is irrelevant for the rest of the document).
We call this H(S,A) derived key, because it is derived from the address and the actual key in the storage of the
account. Since our tree is flat, whenever a change happens, we can publish a pair DK, V, where DK=H(S,A).
However, these is an optimization that could be done:
- Whenever a change to a key is used for the first time, we publish a pair of
DK,Vand we assign some sequential id to this derived key. This is called an initial write. It happens for the first time and that’s why we must publish the full key. - If this storage slot is published in some of the subsequent batches, instead of publishing the whole
DK, we can use the sequential id instead. This is called a repeated write.
For instance, if the slots A,B (I’ll use latin letters instead of 32-byte hashes for readability) changed their
values to 12,13 accordingly, in the batch it happened they will be published in the following format:
(A, 12), (B, 13). Let’s say that the last sequential id ever used is 6. Then,Awill receive the id of7and B will receive the id of8.
Let’s say that in the next block, they changes their values to 13,14. Then, their diff will be published in the
following format:
(7, 13), (8,14).
The id is permanently assigned to each storage key that was ever published. While in the description above it may not
seem like a huge boost, however, each DK is 32 bytes long and id is at most 8 bytes long.
We call this id enumeration_index.
Note, that the enumeration indexes are assigned in the order of sorted array of (address, key), i.e. they are internally
sorted. The enumeration indexes are part of the state merkle tree, it is crucial that the initial writes are
published in the correct order, so that anyone could restore the correct enum indexes for the storage slots. In
addition, an enumeration index of 0 indicates that the storage write is an initial write.
State diffs after Boojum upgrade
Firstly, let’s define what we’ll call the stateDiffs. A state diff is an element of the following structure.
Basically, it contains all the values which might interest us about the state diff:
addresswhere the storage has been changed.key(the original key inside the address)derived_key—H(key, address)as described in the previous section.- Note, the hashing algorithm currently used here is
Blake2s
- Note, the hashing algorithm currently used here is
enumeration_index— Enumeration index as explained above. It is equal to 0 if the write is initial and contains the non-zero enumeration index if it is the repeated write (indexes are numerated starting from 1).initial_value— The value that was present in the key at the start of the batchfinal_value— The value that the key has changed to by the end of the batch.
We will consider stateDiffs an array of such objects, sorted by (address, key).
This is the internal structure that is used by the circuits to represent the state diffs. The most basic “compression” algorithm is the one described above:
- For initial writes, write the pair of (
derived_key,final_value) - For repeated writes write the pair of (
enumeration_index,final_value).
Note, that values like initial_value, address and key are not used in the “simplified” algorithm above, but they
will be helpful for the more advanced compression algorithms in the future. The
algorithm for Boojum will already utilize the difference between the initial_value
and final_value for saving up on pubdata.
How the new pubdata verification would work
L2
- The operator provides both full
stateDiffs(i.e. the array of the structs above) and the compressed state diffs (i.e. the array which contains the state diffs, compressed by the algorithm explained below). - The L1Messenger must verify that the compressed version is consistent with the original stateDiffs.
- Once verified, the L1Messenger will publish the hash of the original state diff via a system log. It will also include the compressed state diffs into the totalPubdata to be published onto L1.
L1
- During committing the block, the L1 verifies that the operator has provided the full preimage for the totalPubdata (which includes L2→L1 logs, L2→L1 messages, bytecodes as well as the compressed state diffs).
- The block commitment
includes
*the hash of the
stateDiffs. Thus, during ZKP verification will fail if the provided stateDiff hash is not correct.
It is a secure construction because the proof can be verified only if both the execution was correct and the hash of the
provided hash of the stateDiffs is correct. This means that the L1Messenger indeed received the array of correct
stateDiffs and, assuming the L1Messenger is working correctly, double-checked that the compression is of the correct
format, while L1 contracts on the commit stage double checked that the operator provided the preimage for the compressed
state diffs.
State diff compression format
The following algorithm is used for the state diff compression:
General pubdata format
At the end of the execution of the batch, the bootloader provides the L1Messenger with the preimages for the user
L2→L1 logs, L2→L1 long messages as well as uncompressed bytecodes. It also provides with compressed state diffs as well
as the original expanded state diff entries.
It will check that the preimages are correct as well as the fact that the compression is correct. It will output the following three values via system logs:
- The root of the L2→L1 log Merkle tree. It will be stored and used for proving withdrawals.
- The hash of the
totalPubdata(i.e. the pubdata that contains the preimages above as well as packed state diffs). - The hash of the state diffs provided by the operator (it later on be included in the block commitment and its will be enforced by the circuits).
The totalPubdata has the following structure:
- First 4 bytes — the number of user L2→L1 logs in the batch
- Then, the concatenation of packed L2→L1 user logs.
- Next, 4 bytes — the number of long L2→L1 messages in the batch.
- Then, the concatenation of L2→L1 messages, each in the format of
<4 byte length || actual_message>. - Next, 4 bytes — the number of uncompressed bytecodes in the batch.
- Then, the concatenation of uncompressed bytecodes, each in the format of
<4 byte length || actual_bytecode>. - Next, 4 bytes — the length of the compressed state diffs.
- Then, state diffs are compressed by the spec above.
With Boojum, the interface for committing batches is the following one:
/// @notice Data needed to commit new batch
/// @param batchNumber Number of the committed batch
/// @param timestamp Unix timestamp denoting the start of the batch execution
/// @param indexRepeatedStorageChanges The serial number of the shortcut index that's used as a unique identifier for storage keys that were used twice or more
/// @param newStateRoot The state root of the full state tree
/// @param numberOfLayer1Txs Number of priority operations to be processed
/// @param priorityOperationsHash Hash of all priority operations from this batch
/// @param bootloaderHeapInitialContentsHash Hash of the initial contents of the bootloader heap. In practice it serves as the commitment to the transactions in the batch.
/// @param eventsQueueStateHash Hash of the events queue state. In practice it serves as the commitment to the events in the batch.
/// @param systemLogs concatenation of all L2 -> L1 system logs in the batch
/// @param operatorDAInput The data-availability input provided by the operator, processed by the L1DAValidator. Its contents depend on the DA mode (for rollups: the state-diff hash, the pubdata, and blob commitment data).
struct CommitBatchInfo {
  uint64 batchNumber;
  uint64 timestamp;
  uint64 indexRepeatedStorageChanges;
  bytes32 newStateRoot;
  uint256 numberOfLayer1Txs;
  bytes32 priorityOperationsHash;
  bytes32 bootloaderHeapInitialContentsHash;
  bytes32 eventsQueueStateHash;
  bytes systemLogs;
  bytes operatorDAInput;
}
State diff Compression
The most basic strategy to publish state diffs is to publish those in either of the following two forms:
- When a key is updated for the first time —
<key, value>, where key is 32-byte derived key and the value is new 32-byte value of the slot. - When a key is updated for the second time and more —
<enumeration_index, value>, where theenumeration_indexis an 8-byte id of the slot and the value is the new 32-byte value of the slot.
This compression strategy will utilize a similar idea for treating keys and values separately and it will be focused on the efficient compression of keys and values separately.
Keys
Keys will be packed in the same way as they were before. The only change is that we’ll avoid using the 8-byte enumeration index and will pack it to the minimal necessary number of bytes. This number will be part of the pubdata. Once a key has been used, it can already use the 4 or 5 byte enumeration index and it is very hard to have something cheaper for keys that has been used already. The opportunity comes when remembering the ids for accounts to spare some bytes on nonce/balance key, but ultimately the complexity may not be worth it.
There is some room for optimization of the keys that are being written for the first time, however, optimizing those is more complex and achieves only a one-time effect (when the key is published for the first time), so they may be in scope of the future upgrades.
Values
Values are much easier to compress since they usually contain only zeroes. Also, we can leverage the nature of how those values are changed. For instance, if nonce has been increased only by 1, we do not need to write the entire 32-byte new value, we can just tell that the slot has been increased and then supply only the 1-byte value by which it was increased. This way instead of 32 bytes we need to publish only 2 bytes: first byte to denote which operation has been applied and the second by to denote the number by which the addition has been made.
We have the following 4 types of changes: Add, Sub, Transform, NoCompression where:
NoCompressiondenotes that the whole 32 byte will be provided.Adddenotes that the value has been increased. (modulo 2^256)Subdenotes that the value has been decreased. (modulo 2^256)Transformdenotes the value just has been changed (i.e. we disregard any potential relation between the previous and the new value, though the new value might be small enough to save up on the number of bytes).
Where the byte size of the output can be anywhere from 0 to 31 (also 0 makes sense for Transform, since it denotes
that it has been zeroed out). For NoCompression the whole 32 byte value is used.
So the format of the pubdata is the following:
Part 1. Header.
<version = 1 byte>— this will enable easier automated unpacking in the future. Currently, it will be only equal to1.<total_logs_len = 3 bytes>— we need only 3 bytes to describe the total length of the L2→L1 logs.<the number of bytes used for derived keys = 1 byte>. It should be equal to the minimal required bytes to represent the enum indexes for repeated writes.
Part 2. Initial writes.
<num_of_initial_writes = 2 bytes>- the number of initial writes. Since each initial write publishes at least 32 bytes for key, then2^16 * 32 = 2097152will be enough for a lot of time (right now with the limit of 120kb it will take more than 15 L1 txs to use up all the space there).- Then for each
<key, value>pair for each initial write:- print key as 32-byte derived key.
- packing type as a 1 byte value, which consists of 5 bits to denote the length of the packing and 3 bits to denote
the type of the packing (either
Add,Sub,TransformorNoCompression). - The packed value itself.
Part 3. Repeated writes.
Note, that there is no need to write the number of repeated writes, since we know that until the end of the pubdata, all the writes will be repeated ones.
- For each
<key, value>pair for each repeated write:- print key as derived key by using the number of bytes provided in the header.
- packing type as a 1 byte value, which consists of 5 bits to denote the length of the packing and 3 bits to denote
the type of the packing (either
Add,Sub,TransformorNoCompression). - The packed value itself.
Impact
This setup allows us to achieve nearly 75% packing for values, and 50% gains overall in terms of the storage logs based on historical data.
Encoding of packing type
Since we have 32 * 3 + 1 ways to pack a state diff, we need at least 7 bits to present the packing type. To make
parsing easier, we will use 8 bits, i.e. 1 byte.
We will use the first 5 bits to represent the length of the bytes (from 0 to 31 inclusive) to be used. The other 3 bits
will be used to represent the type of the packing: Add, Sub , Transform, NoCompression.
Worst case scenario
The worst case scenario for such packing is when we have to pack a completely random new value, i.e. it will take us 32 bytes to pack + 1 byte to denote which type it is. However, for such a write the user will anyway pay at least for 32 bytes. Adding an additional byte is roughly 3% increase, which will likely be barely felt by users, most of which use storage slots for balances, etc, which will consume only 7-9 bytes for packed value.
Why do we need to repeat the same packing method id
You might have noticed that for each pair <key, value> to describe value we always first write the packing type and
then write the packed value. However, the reader might ask, it is more efficient to just supply the packing id once and
then list all the pairs <key, value> which use such packing.
I.e. instead of listing
(key = 0, type = 1, value = 1), (key = 1, type = 1, value = 3), (key = 2, type = 1, value = 4), …
Just write:
type = 1, (key = 0, value = 1), (key = 1, value = 3), (key = 2, value = 4), …
There are two reasons for it:
- A minor reason: sometimes it is less efficient in case the packing is used for very few slots (since for correct unpacking we need to provide the number of slots for each packing type).
- A fundamental reason: currently enum indices are stored directly in the merkle tree & have very strict order of
incrementing enforced by the circuits and (they are given in order by pairs
(address, key)), which are generally not accessible from pubdata.
All this means that we are not allowed to change the order of “first writes” above, so indexes for them are directly recoverable from their order, and so we can not permute them. If we were to reorder keys without supplying the new enumeration indices for them, the state would be unrecoverable. Always supplying the new enum index may add additional 5 bytes for each key, which might negate the compression benefits in a lot of cases. Even if the compression will still be beneficial, the added complexity may not be worth it.
That being said, we could rearrange those for repeated writes, but for now we stick to the same value compression format for simplicity.
L2 State Reconstruction Tool
Given that we post all data to L1, there is a tool, created by the Equilibrium Team that solely uses L1 pubdata for reconstructing the state and verifying that the state root on L1 can be created using pubdata. A link to the repo can be found here. The way the tool works is by parsing out all the L1 pubdata for an executed batch, comparing the state roots after each batch is processed.
Validium and zkPorter
The may choose not to post their data to L1, in which case they become a validium. This makes transactions there much cheaper, but less secure. Because the ZK Stack uses state diffs to post data, it can combine the rollup and validium features, by separating storage slots that need to post data from the ones that don’t. This construction combines the benefits of rollups and validiums, and it is called a zkPorter.
Custom DA Support
Intro
We introduced modularity into our contracts to support multiple DA layers, to support Validium and Rollup modes more easily, and to enable settlement via the Gateway
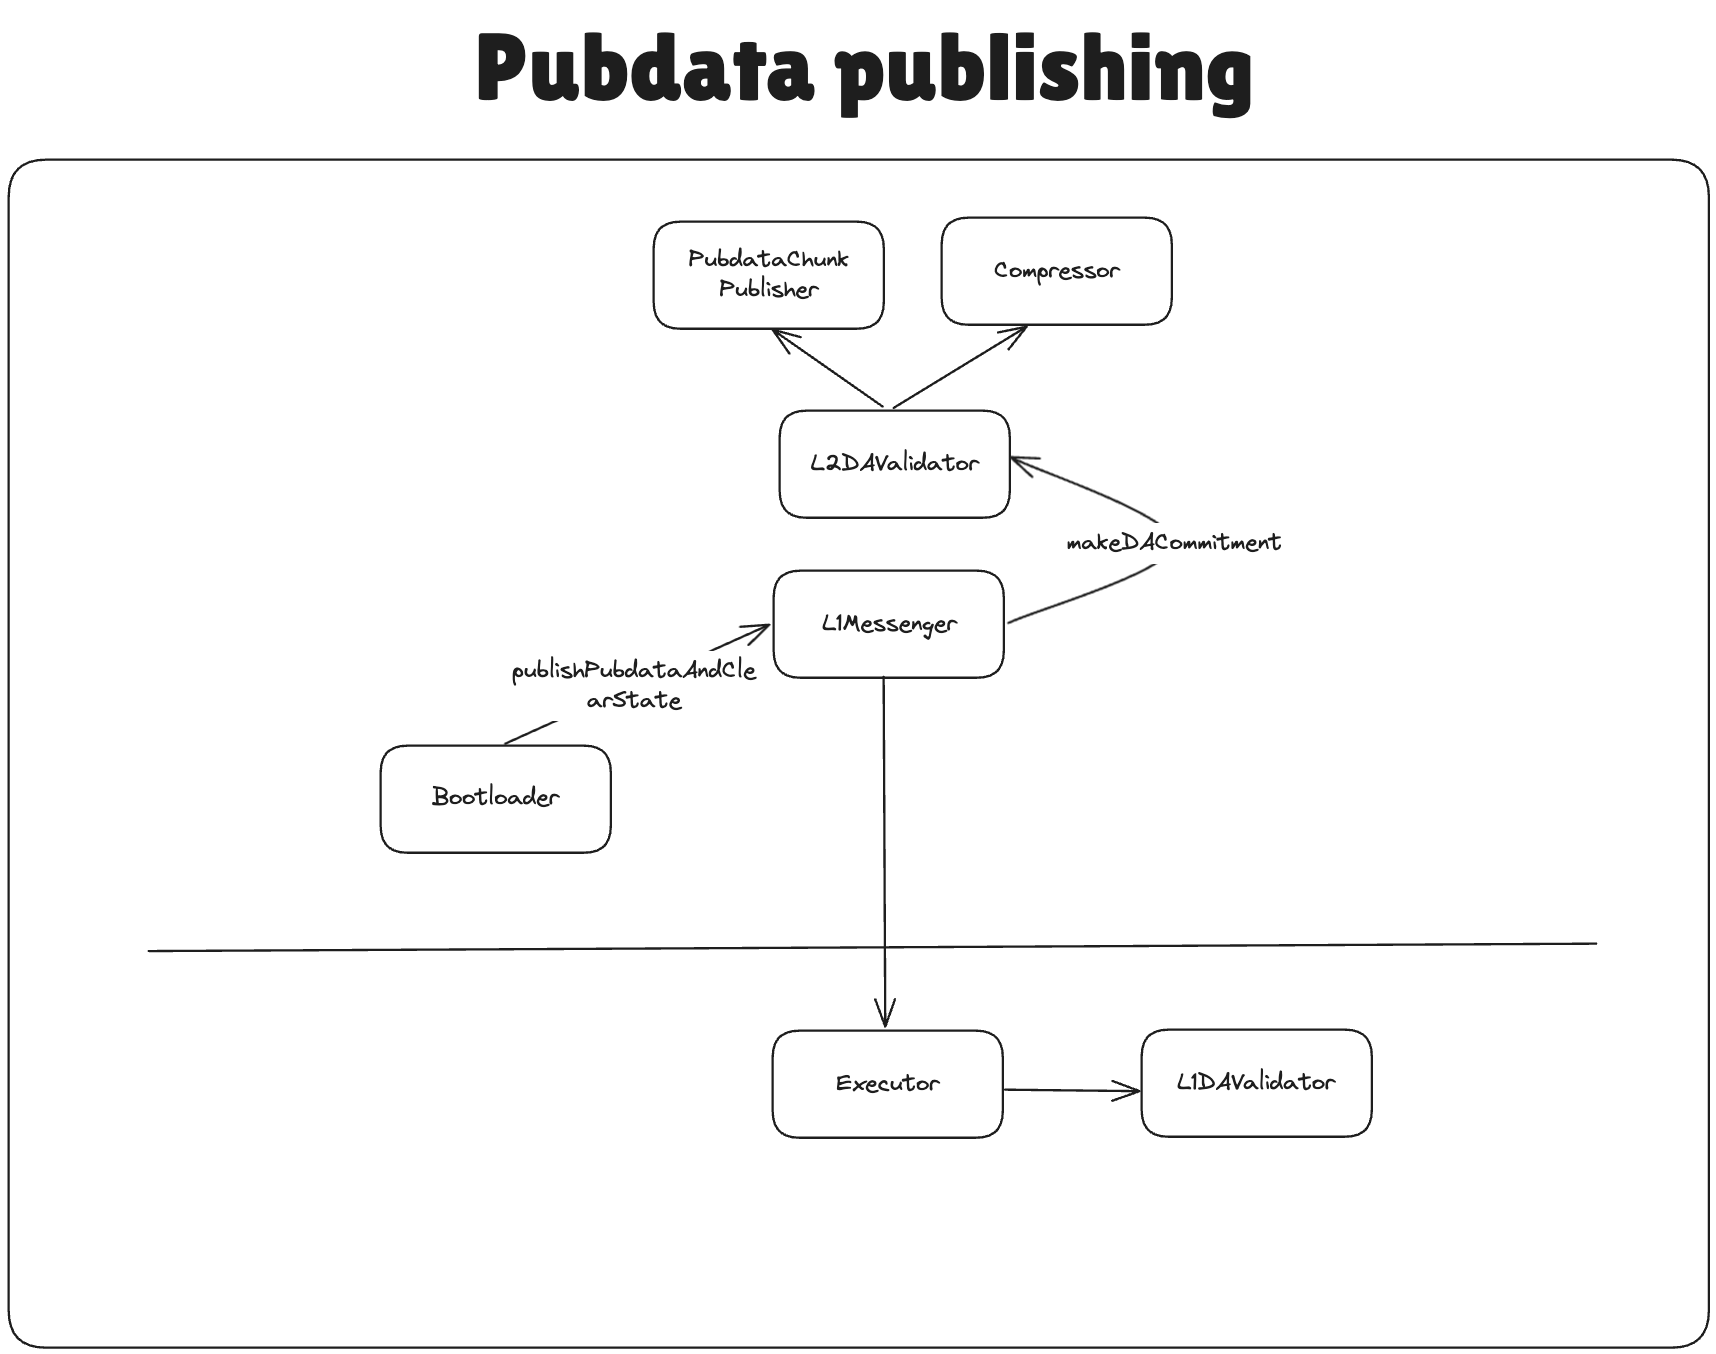
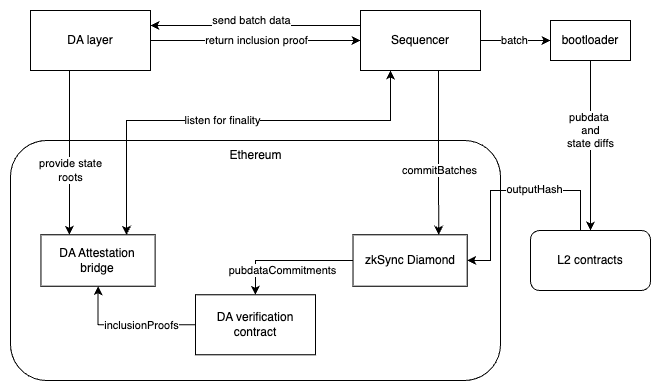
Background
Pubdata – information published by the ZK Chain that can be used to reconstruct its state; it consists of L2→L1 logs, L2→L1 messages, contract bytecodes, and compressed state diffs.
struct PubdataInput {
    pub(crate) user_logs: Vec<L1MessengerL2ToL1Log>,
    pub(crate) l2_to_l1_messages: Vec<Vec<u8>>,
    pub(crate) published_bytecodes: Vec<Vec<u8>>,
    pub(crate) state_diffs: Vec<StateDiffRecord>,
}
The current version of ZK Chains supports the following Data Availability commitment schemes:
-
EMPTY_NO_DA (Validium)
No on-chain DA enforcement: all commitments arebytes32(0). -
PUBDATA_KECCAK256
Commitment =keccak256(uncompressedStateDiffHash || keccak256(pubdata))Suitable for calldata or external DA layers that can verify a simple keccak-based proof.
-
BLOBS_AND_PUBDATA_KECCAK256 Includes EIP-4844 blobs. Commitment =
keccak256( uncompressedStateDiffHash || keccak256(pubdata) || uint8(blobLinearHashes.length) || blobLinearHashes ) -
NONE A placeholder for “no scheme” (should never be chosen).
This means that a separate solution like AvailDA, EigenDA, Celestia, etc. could be used to store the pubdata. Each DA layer provides an inclusion proof of our pubdata in its storage, and that proof can later be verified on Ethereum. This gives stronger guarantees than No DA Validium, but lower fees than Blobs when Ethereum usage grows.
This allows for a general-purpose solution that ensures DA consistency and verifiability, on top of which we build what partners need—on-chain games, DEXes, and more: Validium with Abstract DA.
Implementation overview
-
Configuration In Admin facet of ZK Chain, the desired pair of
L2DACommitmentSchemeand the address of the L1 DA validator can be set by admin. -
L2 commitment generation
All commitment logic lives in theL2DAValidatorlibrary, which computes thepubdataDACommitmentbased on the chosen scheme. -
Emission Bootloader performs L1 Messenger pubdata “publishing” call to
L1Messengerafter executing the batch.L1Messenger.publishPubdataAndClearState()emits two DA-related system logs per batch:USED_L2_DA_VALIDATION_COMMITMENT_SCHEME_KEY(the scheme index)L2_DA_VALIDATOR_OUTPUT_HASH_KEY(the commitment)
-
L1 verification
On L1 the Committer facet calls the L1 DA validator during batch commitment, providing it with chain ID and batch number of the chain for which the DA must be verified, along withl2DAValidatorOutputHash,operatorDAInputand_maxBlobsSupportedvalue. It’s then L1 DA Validator job to verify the correctness of the DA on L1.
Rollup DA
Prerequisites
Before reading this document, it is recommended to understand how the custom DA works in general.
EIP-4844 Support
EIP-4844, commonly known as Proto-Danksharding, is an upgrade to the Ethereum protocol that introduces a new data availability solution embedded in layer 1. More information about it can be found here.
To facilitate EIP-4844 blob support, our circuits allow providing two arrays in our public input to the circuit:
blobCommitments– the commitment that helps to check the correctness of the blob content. The formula on how it is computed will be explained below in the document.blobHash– thekeccak256hash of the inner contents of the blob.
Note that our circuits require that each blob contains exactly 4096 * 31 bytes. The maximal number of blobs that are supported by our proving system is 16, but the system contracts support only 6 blobs at most for now.
When committing a batch, the L1DAValidator is called with the data provided by the operator and it should return the two arrays described above. These arrays are put inside the batch commitment and then the correctness of the commitments will be verified at the proving stage.
Note that the Executor.sol (and the contract itself) is not responsible for checking that the provided blobHash and blobCommitments in any way correspond to the pubdata inside the batch as it is the job of the DA Validation in corresponding contracts on L1 (L1DAValidator) and L2 (L2DAValidator library).
Publishing pubdata to L1
Let’s see an example of how the approach above works in rollup DA validators.
Rollup use case of L2DAValidator library
Let’s consider BLOBS_AND_PUBDATA_KECCAK256 commitment scheme. This is the one that’s being used in default RollupL1DAValidator. In this case, the following will happen:
L2DAValidator library accepts the preimages for the data to publish as well as their compressed format. After verifying the compression, it forms the _totalPubdata bytes array, which represents the entire blob of data that should be published to L1.
It calls the PubdataChunkPublisher system contract to split this pubdata into multiple “chunks” of size 4096 * 31 bytes and return the keccak256 hash of those, These will be the blobHash of from the section before.
To give the flexibility of checking different DA, we send the following data to L1:
l2DAValidatorOutputHashthat was returned byL2DAValidatorlibrary. This hash includesuncompressedStateDiffHash,pubdata, the number of blobs, andblobLinearHashes. This hash, alongside the_operatorDAInputwill be provided toL1DAValidator(RollupL1DAValidator.solis the one that acceptsBLOBS_AND_PUBDATA_KECCAK256, for example)._l2DACommitmentSchemethat denotes the commitment scheme that was used. In the case we’re looking into, it’s theBLOBS_AND_PUBDATA_KECCAK256.
RollupL1DAValidator
When committing the batch, the operator will provide the _operatorDAInput and _l2DAValidatorOutputHash. Using these values, RollupL1DAValidator parses the input that the L2 DA validator has provided to it into stateDiffHash, fullPubdataHash, blobsLinearHashes, blobsProvided, l1DaInput. This l1DaInput will be used to prove that the pubdata was indeed provided in this batch.
The first byte of the l1DaInput denotes which way of pubdata publishing was used: calldata or blobs.
In case it is calldata it will be just checked that the provided calldata matches the hash of the fullPubdataHash that was sent by the L2 counterpart. Note that calldata may still contain the blob information as we typically start generating proofs before we know which way of calldata will be used. Note that in case the calldata is used for DA, we do not verify the blobCommitments as the presence of the correct pubdata has been verified already.
In case it is blobs, we need to construct the blobCommitments correctly for each of the blob of data.
For each of the blobs the operator provides so called _commitment that consists of the following packed structure: opening point (16 bytes) || claimed value (32 bytes) || commitment (48 bytes) || proof (48 bytes).
The verification of the _commitment can be summarized in the following snippet:
// The opening point is passed as 16 bytes as that is what our circuits expect and use when verifying the new batch commitment
// PUBDATA_COMMITMENT_SIZE = 144 bytes
pubdata_commitments <- [opening point (16 bytes) || claimed value (32 bytes) || commitment (48 bytes) || proof (48 bytes)] from calldata
opening_point = bytes32(pubdata_commitments[:16])
versioned_hash <- from BLOBHASH opcode

// Given that we needed to pad the opening point for the precompile, append the data after.
point_eval_input = versioned_hash || opening_point || pubdata_commitments[16: PUBDATA_COMMITMENT_SIZE]

// this part handles the following:
// verify versioned_hash == hash(commitment)
// verify P(z) = y
res <- point_valuation_precompile(point_eval_input)

assert uint256(res[32:]) == BLS_MODULUS
The final blobCommitment is calculated as the hash between the blobVersionedHash, opening point and the claimed value. The zero knowledge circuits will verify that the opening point and the claimed value were calculated correctly and correspond to the data that was hashed under the blobHash.
Structure of the pubdata
Rollups maintain the same structure of pubdata and apply the same rules for compression as those that were used in the previous versions of the system. These can be read here.
Standard pubdata format
With the introduction of custom DA validation, different pubdata logic can be applied for each chain (including calldata-based pubdata); however, ZK chains are generally optimized for a state-diffs–based rollup model.
This document describes how the standard pubdata format looks. This is the format that is enforced for permanent rollup chains.
Pubdata in ZKsync can be divided up into 4 categories:
- L2 to L1 Logs
- L2 to L1 Messages
- Smart Contract Bytecodes
- Storage Writes
Using data corresponding to these 4 facets across all executed batches, we’re able to reconstruct the full state of L2. To restore the state we just need to filter all of the transactions to the L1 ZKsync contract for only the commitBatchesSharedBridge transactions where the proposed block has been referenced by a corresponding executeBatchesSharedBridge call (the reason for this is that a committed or even proven block can be reverted but an executed one cannot). Once we have all the committed batches that have been executed, we will then pull the transaction input and the relevant fields, applying them in order to reconstruct the current state of L2.
L2→L1 communication
We will implement the calculation of the Merkle root of the L2→L1 messages via a system contract as part of the L1Messenger. Basically, whenever a new user-emitted log that needs to be Merklized is created, the L1Messenger contract will append it to its rolling hash and then, at the end of the batch during the formation of the blob, it will receive the original preimages from the operator, verify their consistency, and send those to the L2DAValidator library to facilitate the DA protocol.
We will now refer to the logs that are created by users and Merklized as user logs, and the logs that are emitted natively by the VM as system logs. Here is a short comparison table for better understanding:
| System logs | User logs |
|---|---|
| Emitted by VM via an opcode. | VM knows nothing about them. |
| Consistency and correctness are enforced by the verifier on L1 (i.e. their hash is part of the block commitment). | Consistency and correctness is enforced by the L1Messenger system contract. The correctness of the behavior of the L1Messenger is enforced implicitly by the prover in the sense that it proves the correctness of the execution overall. |
| We don’t calculate their Merkle root. | We calculate their Merkle root on the L1Messenger system contract. |
| There is a constant small number of these logs. | We can have as many as possible as long as the commitBatchesSharedBridge function on L1 remains executable (it is the job of the operator to ensure that only such transactions are selected). |
| In EIP-4844 they will remain part of the calldata. | In EIP-4844 they will become part of the blobs. |
Backwards-compatibility
Note that to maintain a unified interface with the previous version of the protocol, the leaves of the Merkle tree will have to maintain the following structure:
struct L2Log {
  uint8 l2ShardId;
  bool isService;
  uint16 txNumberInBlock;
  address sender;
  bytes32 key;
  bytes32 value;
}
The leaf will look as follows:
bytes32 hashedLog = keccak256(
    abi.encodePacked(_log.l2ShardId, _log.isService, _log.txNumberInBlock, _log.sender, _log.key, _log.value)
);
keccak256 will continue being the function for the Merkle tree.
To put it shortly, the proofs for L2→L1 log inclusion will continue to have exactly the same format as they did in the pre-Boojum system, which avoids breaking changes for SDKs and bridges alike.
Implementation of L1Messenger
The L1Messenger contract will maintain a rolling hash of all the L2ToL1 logs chainedLogsHash as well as the rolling hash of messages chainedMessagesHash. Whenever a contract wants to send an L2→L1 log, the following operation will be applied:
chainedLogsHash = keccak256(chainedLogsHash, hashedLog)
L2→L1 logs have the same 88-byte format as in the current version of ZKsync.
Note that the user is charged for the future computation needed to calculate the final Merkle root. It is roughly 4× higher than the cost to calculate the hash of the leaf, since the eventual tree might be 4× the number of nodes. In any case, this will likely be a relatively negligible part compared to the cost of the pubdata.
At the end of the execution, the bootloader will provide a list of all the L2ToL1 logs (this will be provided by the operator in the memory of the bootloader). The L1Messenger checks that the rolling hash from the provided logs is the same as in the chainedLogsHash and calculates the Merkle tree of the provided messages. Right now, we always build the Merkle tree of size 16384, but we charge the user as if the tree were built dynamically based on the number of leaves. The implementation of the dynamic tree has been postponed until later upgrades.
Note that, unlike most other parts of pubdata, the user L2→L1 must always be validated by the trusted
L1Messengersystem contract. If we moved this responsibility toL2DAValidatorlibrary it would be possible for a malicious operator to provide incorrect data and forge transactions out of names of certain users.
Long L2→L1 messages & bytecodes
If the user wants to send an L2→L1 message, its preimage is appended to the message’s rolling hash to:
chainedMessagesHash = keccak256(abi.encode(chainedMessagesHash, hash));
A very similar approach for bytecodes is used, where their rolling hash is calculated and then the preimages are provided at the end of the batch to form the full pubdata for the batch.
Note that for backward compatibility, just like before, any long message or bytecode is accompanied by the corresponding user L2→L1 log.
Using system L2→L1 logs vs the user logs
The content of the L2→L1 logs by the L1Messenger will go to the blob of EIP-4844. Meaning that all the data that belongs to the tree by L1Messenger’s L2→L1 logs should not be needed during block commitment. Also, note that in the future we will remove the calculation of the Merkle root of the built-in L2→L1 messages.
The only places where the built-in L2→L1 messaging should continue to be used:
- Logs by SystemContext (they are needed on commit to check the previous block hash).
- Logs by L1Messenger for the Merkle root of the L2→L1 tree as well as the data needed for
L1DAValidator. chainedPriorityTxsHashandnumberOfLayer1Txsfrom the bootloader (read more about it below).
Obtaining txNumberInBlock
To have the same log format, the txNumberInBlock must be obtained. While it is internally counted in the VM, there is currently no opcode to retrieve this number. We will have a public variable txNumberInBlock in the SystemContext, which will be incremented with each new transaction and from which it can be retrieved. It is zeroed out at the end of the batch.
Bootloader implementation
The bootloader has a memory segment dedicated to the ABI-encoded data of the L1ToL2Messenger to perform the publishPubdataAndClearState call.
At the end of the execution of the batch, the operator should provide the corresponding data in the bootloader memory, i.e., user L2→L1 logs, long messages, bytecodes, etc. After that, the call is performed to the L1Messenger system contract, which would call the L2DAValidator library to check the adherence of the pubdata to the specified format.
Bytecode Publishing
Within pubdata, bytecodes are published in one of two ways:
(1) uncompressed as part of the bytecodes array and
(2) compressed via long L2→L1 messages.
Uncompressed Bytecode Publishing
Uncompressed bytecodes are included within the totalPubdata bytes and have the following format:
number of bytecodes || forEachBytecode (length of bytecode(n) || bytecode(n))
Compressed Bytecode Publishing
Unlike uncompressed bytecode, which is published as part of factoryDeps, compressed bytecodes are published as long L2→L1 messages, which can be seen here.
Bytecode Compression Algorithm — Server Side
This is the part that is responsible for taking bytecode that has already been chunked into 8-byte words, performing validation, and compressing it.
Each 8-byte word from the chunked bytecode is assigned a 2-byte index (constraint on size of dictionary of chunk → index is 2^16 – 1 elements). The length of the dictionary, dictionary entries (index assumed through order), and indexes are all concatenated together to yield the final compressed version.
For bytecode to be considered valid, it must satisfy the following:
- Bytecode length must be at most 2097120 ((2^16 - 1) * 32) bytes
- Bytecode length must be a multiple of 32.
- Number of 32-byte words cannot be even.
The following is a simplified version of the algorithm:
statistic: Map[chunk, (count, first_pos)]
dictionary: Map[chunk, index]
encoded_data: List[index]

for position, chunk in chunked_bytecode:
 if chunk is in statistic:
  statistic[chunk].count += 1
 else:
  statistic[chunk] = (count=1, first_pos=pos)

# We want the more frequently used bytes to have smaller ids to save on calldata (zero bytes cost less)
statistic.sort(primary=count, secondary=first_pos, order=desc)

for index, chunk in enumerated(sorted_statistics):
  dictionary[chunk] = index

for chunk in chunked_bytecode:
 encoded_data.append(dictionary[chunk])

return [len(dictionary), dictionary.keys(order=index asc), encoded_data]
Verification And Publishing — L2 Contract
The function publishCompressBytecode takes in both the original _bytecode and the _rawCompressedData, the latter of which comes from the output of the server’s compression algorithm. Looping over the encoded data derived from _rawCompressedData, the corresponding chunks are pulled from the dictionary and compared to the original bytecode, reverting if there is a mismatch. After the encoded data has been verified, it is published to L1 and marked accordingly within the KnownCodesStorage contract.
Pseudo-code implementation:
length_of_dict = _rawCompressedData[:2]
dictionary = _rawCompressedData[2:2 + length_of_dict * 8] # need to offset by bytes used to store length (2) and multiply by 8 for chunk size
encoded_data = _rawCompressedData[2 + length_of_dict * 8:]

assert(len(dictionary) % 8 == 0) # each element should be 8 bytes
assert(num_entries(dictionary) <= 2^16)
assert(len(encoded_data) * 4 == len(_bytecode)) # given that each chunk is 8 bytes and each index is 2 bytes they should differ by a factor of 4

for (index, dict_index) in list(enumerate(encoded_data)):
 encoded_chunk = dictionary[dict_index]
 real_chunk = _bytecode.readUint64(index * 8) # need to pull from index * 8 to account for difference in element size
 verify(encoded_chunk == real_chunk)

# Sending the compressed bytecode to L1 for data availability
sendToL1(_rawCompressedBytecode)
markAsPublished(hash(_bytecode))
Storage diff publishing
ZKsync is a state-diff–based rollup and so publishing the correct state diffs plays an integral role in ensuring data availability.
Difference between initial and repeated writes
ZKsync publishes state changes that happened within the batch instead of transactions themselves. Meaning that, for instance, some storage slot S under account A has changed to value V, we could publish a triple of A,S,V. Users, by observing all the triples, could restore the state of ZKsync. However, note that our tree, unlike Ethereum’s one, is not account based (i.e. there is no first layer of depth 160 of the Merkle tree corresponding to accounts and a second layer of depth 256 of the Merkle tree corresponding to users). Our tree is “flat,” i.e. a slot S under account A is just stored in the leaf number H(S,A). Our tree is of depth 256 + 8 (the 256 is for these hashed account/key pairs and 8 is for potential shards in the future; we currently have only one shard and it is irrelevant for the rest of the document).
We call this H(S,A) a derived key, because it is derived from the address and the actual key in the storage of the account. Since our tree is flat, whenever a change happens, we can publish a pair DK, V, where DK=H(S,A).
However, there is an optimization that can be done:
- Whenever a change to a key is used for the first time, we publish a pair of
DK,Vand we assign some sequential id to this derived key. This is called an initial write. It happens for the first time and that’s why we must publish the full key. - If this storage slot is published in some of the subsequent batches, instead of publishing the whole
DK, we can use the sequential id instead. This is called a repeated write.
For instance, if the slots A, B (I’ll use Latin letters instead of 32-byte hashes for readability) changed their values to 12, 13 accordingly in the batch, they will be published in the following format:
(A, 12), (B, 13). Let’s say that the last sequential id ever used is 6. Then,Awill receive the id of 7 andBwill receive the id of 8.
Let’s say that in the next block, they change their values to 13, 14. Then, their diff will be published in the following format:
(7, 13), (8, 14).
The id is permanently assigned to each storage key that was ever published. While in the description above it may not seem like a huge boost, each DK is 32 bytes long and the id is at most 8 bytes long.
We call this id enumeration_index.
Note that the enumeration indexes are assigned in the order of a sorted array of (address, key) pairs, i.e. they are internally sorted. The enumeration indexes are part of the state Merkle tree; it is crucial that the initial writes are published in the correct order, so that anyone could restore the correct enumeration indexes for the storage slots. In addition, an enumeration index of 0 indicates that the storage write is an initial write.
State diffs structure
Firstly, let’s define what we mean by state diffs. A state diff is an element of the following structure.
Basically, it contains all the values which might interest us about the state diff:
addresswhere the storage has been changed.key(the original key inside the address).derived_key—H(key, address)as described in the previous section.- Note: the hashing algorithm currently used here is
Blake2s.
- Note: the hashing algorithm currently used here is
enumeration_index— enumeration index as explained above. It is equal to 0 if the write is initial and contains the non-zero enumeration index if it is a repeated write (indexes start from 1).initial_value— the value that was present in the key at the start of the batch.final_value— the value that the key has changed to by the end of the batch.
We will consider stateDiffs an array of such objects, sorted by (address, key).
This is the internal structure that is used by the circuits to represent the state diffs. The most basic “compression” algorithm is the one described above:
- For initial writes, write the pair (
derived_key,final_value). - For repeated writes, write the pair (
enumeration_index,final_value).
Note that values like initial_value, address, and key are not used in the “simplified” algorithm above, but they will be helpful for more advanced compression algorithms in the future. The algorithm for Boojum already utilizes the difference between the initial_value and final_value to save on pubdata.
How the new pubdata verification works
L2
- The operator provides both full
stateDiffs(i.e. the array of the structs above) and the compressed state diffs (i.e. the array containing the state diffs, compressed by the algorithm explained below). - The
L2DAValidatorlibrary must verify that the compressed version is consistent with the original stateDiffs and send the hash of thestateDiffsto its L1 counterpart. It will also include the compressed state diffs in the totalPubdata to be published onto L1.
L1
- During block commitment, the standard DA protocol follows and the
L1DAValidatoris responsible for checking that the operator has provided the preimage for the_totalPubdata. More on how this is checked can be seen here. - The block commitment includes the hash of the
stateDiffs. Thus, ZKP verification will fail if the provided stateDiffs hash is not correct.
It is a secure construction because the proof can be verified only if both the execution was correct and the hash of the stateDiffs is correct. This means that the L2DAValidator library indeed received the array of correct stateDiffs and, assuming the L2DAValidator is working correctly, double-checked that the compression is in the correct format, while L1 contracts at the commit stage double-checked that the operator provided the preimage for the compressed state diffs.
State diff compression format
The following algorithm is used for the state diff compression:
General pubdata format
The totalPubdata has the following structure:
- First 4 bytes — the number of user L2→L1 logs in the batch.
- Then, the concatenation of packed L2→L1 user logs.
- Next, 4 bytes — the number of long L2→L1 messages in the batch.
- Then, the concatenation of L2→L1 messages, each in the format
<4 byte length || actual_message>. - Next, 4 bytes — the number of uncompressed bytecodes in the batch.
- Then, the concatenation of uncompressed bytecodes, each in the format
<4 byte length || actual_bytecode>. - Next, 4 bytes — the length of the compressed state diffs.
- Then, state diffs are compressed by the spec above.
The interface for committing batches is the following:
/// @notice Data needed to commit new batch
/// @param batchNumber Number of the committed batch
/// @param timestamp Unix timestamp denoting the start of the batch execution
/// @param indexRepeatedStorageChanges The serial number of the shortcut index that's used as a unique identifier for storage keys that were used twice or more
/// @param newStateRoot The state root of the full state tree
/// @param numberOfLayer1Txs Number of priority operations to be processed
/// @param priorityOperationsHash Hash of all priority operations from this batch
/// @param bootloaderHeapInitialContentsHash Hash of the initial contents of the bootloader heap. In practice it serves as the commitment to the transactions in the batch.
/// @param eventsQueueStateHash Hash of the events queue state. In practice it serves as the commitment to the events in the batch.
/// @param systemLogs Concatenation of all L2→L1 system logs in the batch
/// @param operatorDAInput The data-availability input provided by the operator, processed by the L1DAValidator. Its contents depend on the DA mode (for rollups: the state-diff hash, the pubdata, and blob commitment data).
struct CommitBatchInfo {
  uint64 batchNumber;
  uint64 timestamp;
  uint64 indexRepeatedStorageChanges;
  bytes32 newStateRoot;
  uint256 numberOfLayer1Txs;
  bytes32 priorityOperationsHash;
  bytes32 bootloaderHeapInitialContentsHash;
  bytes32 eventsQueueStateHash;
  bytes systemLogs;
  bytes operatorDAInput;
}
zkEVM
The zkEVM is used to execute transactions. It is similar in construction to the EVM, so it executes transactions similarly, but it plays a fundamentally different role in the zkStack than the EVM does in Ethereum. The EVM is used to execute smart contracts in Ethereum’s state transition function. This STF needs a client to implement and run it.
Rollups have a different set of requirements, they need to produce a proof that some client executed the STF correctly. This client is the zkEVM, it is made to run the STF efficiently. The STF is the Bootloader.
The smart contracts are native zkEVM bytecode, zkEVM can execute these easily. In the future the ZK Stack will also support EVM bytecode by running an efficient interpreter inside the zkEVM.
The zkEVM has a lot of special features compared to the EVM that are needed for the rollup’s STF, storage, gas metering, precompiles etc. These functions are either built into the zkEVM, or there are special system contracts for them. The system contracts are deployed at predefined addresses, they are called by the Bootloader, and they have special permissions compared to normal user contracts. These are not to be confused with the precompiles, which are also pre-deployed contracts with special support from the zkEVM, but these contract do not have special permissions and are called by the users and not the Bootloader.
The zkEVM also has user-facing features. For the best possible UX the ZK Stack supports native account abstraction. This means users can fully customize how they pay the fees needed to execute their transactions.
All transactions need to pay fees. The requirements to run a rollup are different than the ones needed to run Ethereum, so the ZK Stack has a different fee model. The fee model is designed to consider all the components that are needed to run the rollup: data and proof execution costs on L1, sequencer costs, and prover costs.
Batches & L2 blocks on ZKsync
Glossary
- Batch – a set of transactions that the bootloader processes (
commitBatches,proveBatches, andexecuteBatcheswork on it). A batch consists of multiple transactions. - L2 blocks – non-intersecting subsets of consecutively executed transactions in a batch. This is the kind of block you see in the API and the one used for
block.number/block.timestamp/etc.
Note that sometimes in code you can see the notion of “virtual blocks.” In the past, we returned batch information for
block.number/block.timestamp. However, due to DevEx issues, we decided to move to returning these values for L2 blocks. Virtual blocks were used during migration but are not used anymore. You should consider that there is one virtual block per L2 block and it has exactly the same properties.
Motivation
L2 blocks were created for fast soft confirmation in wallets and block explorers. For example, MetaMask shows transactions as confirmed only after the block in which the transaction execution was mined. So, if the user needs to wait for batch confirmation, it would take at least a few minutes (for soft confirmation) and hours for full confirmation, which is very bad UX. But the API can return soft confirmation much earlier through L2 blocks.
Adapting for Solidity
In order to get the returned value for block.number, block.timestamp, blockhash, our compiler used the following functions:
getBlockNumbergetBlockTimestampgetBlockHashEVM
These return values for L2 blocks.
Blocks’ processing and consistency checks
Our SystemContext contract allows retrieval of information about batches and L2 blocks. Some of the information is hard to calculate on-chain—for instance, time. The timing information (for both batches and L2 blocks) is provided by the operator. To check that the operator provided realistic values, certain checks are done on L1. Generally, though, we try to check as much as we can on L2.
Initializing L1 batch
At the start of a batch, the operator provides the batch timestamp, its number, and the hash of the previous batch. The root hash of the Merkle tree serves as the root hash of the batch.
The SystemContext can immediately check whether the provided number is the correct batch number. It also immediately sends the previous batch hash to L1, where it will be checked during the commit operation. Additionally, some general consistency checks are performed. This logic can be found here.
L2 blocks processing and consistency checks
setL2Block
Before each transaction, we call the setL2Block method. Here, we provide data about the L2 block that the transaction belongs to:
_l2BlockNumber– the number of the new L2 block._l2BlockTimestamp– the timestamp of the new L2 block._expectedPrevL2BlockHash– the expected hash of the previous L2 block._isFirstInBatch– whether this method is called for the first time in the batch._maxVirtualBlocksToCreate– the maximum number of virtual blocks to create with this L2 block. This is a legacy field that is always either 0 or 1.
If two transactions belong to the same L2 block, only the first one may have a non-zero _maxVirtualBlocksToCreate. The rest of the data must be the same.
The setL2Block performs many consistency checks similar to those for the L1 batch.
L2 blockhash calculation and storage
Unlike the L1 batch’s hash, L2 block hashes can be checked on-chain. The hash of an L2 block is computed as:
The hash of an L2 block is keccak256(abi.encode(_blockNumber, _blockTimestamp, _prevL2BlockHash, _blockTxsRollingHash)). Where _blockTxsRollingHash is defined in the following way:
_blockTxsRollingHash = 0for an empty block._blockTxsRollingHash = keccak256(abi.encodePacked(0, tx1_hash))for a block with one transaction._blockTxsRollingHash = keccak256(abi.encodePacked(keccak256(abi.encodePacked(0, tx1_hash)), tx2_hash))for a block with two transactions, etc.
To add a transaction hash to the current miniblock, we use the appendTransactionToCurrentL2Block function of the SystemContext contract.
Since ZKsync is a state-diff-based rollup, there is no way to deduce L2 block hashes based on the transactions in the batch (because there is no access to the transaction hashes). At the same time, to execute the blockhash method, the VM requires knowledge of some previous L2 block hashes. To save on pubdata (by reusing the same storage slots, i.e. only having repeated writes), we store only the last 257 block hashes. You can read more about repeated writes and how pubdata is processed here.
We store only the last 257 blocks because the EVM requires only 256 previous hashes, and we use 257 as a safe margin.
Legacy blockhash
For L2 blocks that were created before we switched to the formulas above, we use the following formula for their hash:
keccak256(abi.encodePacked(uint32(_blockNumber)))
These are only very old blocks on ZKsync Era; other ZK chains do not have such blocks.
Timing invariants
While the timestamp of each L2 block is provided by the operator, the system preserves these timing invariants:
- For each L2 block, its timestamp should be greater than the timestamp of the previous L2 block.
- For each L2 block, its timestamp should be ≥ the timestamp of the batch it belongs to.
- Each batch must start with a new L2 block (i.e. an L2 block cannot span across batches).
- The timestamp of a batch must be ≥ the timestamp of the latest L2 block from the previous batch.
- The timestamp of the last miniblock in a batch cannot go too far into the future. This is enforced by publishing an L2→L1 log with the timestamp, which is then checked on L1.
Fictive L2 block & finalizing the batch
At the end of a batch, the bootloader calls setL2Block one more time to allow the operator to create a new empty block. This is done for technical reasons inside the node, where each batch ends with an empty L2 block.
We do not enforce that the last block is empty explicitly, as that complicates development and testing. In practice, it is empty, and either way, the system remains secure.
Also, at the end of a batch, we send both the batch timestamp and the timestamp of the last miniblock so that L1 can verify those two values are realistic. Checking any other L2 block’s timestamp is not required since all of them are enforced to lie between those two.
Additional note on blockhashes
In the past, we had to apply different formulas based on whether the migration from batch environment info to L2 block info had finished. You can find these checks here. But note that the migration ended quite some time ago, so only two cases remain:
- When the block is out of the readable range.
- When it is a normal L2 block, and its hash must be used.
The only edge case is when we ask for a miniblock block number for which the base hash is returned. This edge case will be removed in future releases.
Bootloader
On standard Ethereum clients, the workflow for executing blocks is the following:
- Pick a transaction, validate the transactions & charge the fee, execute it
- Gather the state changes (if the transaction has not reverted), apply them to the state.
- Go back to step (1) if the block gas limit has not been yet exceeded.
However, having such flow on ZKsync (i.e. processing transaction one-by-one) would be too inefficient, since we have to run the entire proving workflow for each individual transaction. That’s why we need the bootloader: instead of running N transactions separately, we run the entire batch (set of blocks, more can be found here) as a single program that accepts the array of transactions as well as some other batch metadata and processes them inside a single big “transaction”. The easiest way to think about bootloader is to think in terms of EntryPoint from EIP4337: it also accepts the array of transactions and facilitates the Account Abstraction protocol.
The hash of the code of the bootloader is stored on L1 and can only be changed as a part of a system upgrade. Note, that
unlike system contracts, the bootloader’s code is not stored anywhere on L2. That’s why we may sometimes refer to the
bootloader’s address as formal. It only exists for the sake of providing some value to this / msg.sender/etc. When
someone calls the bootloader address (e.g. to pay fees) the EmptyContract’s code is actually invoked.
Bootloader is the program that accepts an array of transactions and executes the entire ZKsync batch. This section will expand on its invariants and methods.
Playground bootloader vs proved bootloader
For convenience, we use the same implementation of the bootloader both in the mainnet batches and for emulating ethCalls or other testing activities. Only proved bootloader is ever used for batch-building and thus this document only describes it.
Start of the batch
It is enforced by the ZKPs, that the state of the bootloader is equivalent to the state of a contract transaction with empty calldata. The only difference is that it starts with all the possible memory pre-allocated (to avoid costs for memory expansion).
For additional efficiency (and our convenience), the bootloader receives its parameters inside its memory. This is the only point of non-determinism: the bootloader starts with its memory pre-filled with any data the operator wants. That’s why it is responsible for validating the correctness of it and it should never rely on the initial contents of the memory to be correct & valid.
For instance, for each transaction, we check that it is properly ABI-encoded and that the transactions go exactly one after another. We also ensure that transactions do not exceed the limits of the memory space allowed for transactions.
Transaction types & their validation
While the main transaction format is the internal Transaction
format,
it is a struct that is used to represent various kinds of transactions types. It contains a lot of reserved fields
that could be used depending in the future types of transactions without need for AA to change the interfaces of their
contracts.
The exact type of the transaction is marked by the txType field of the transaction type. There are 6 types currently
supported:
txType: 0. It means that this transaction is of legacy transaction type. The following restrictions are enforced:maxFeePerErgs=getMaxPriorityFeePerErgsince it is pre-EIP1559 tx type.reserved1..reserved4as well aspaymasterare 0.paymasterInputis zero.- Note, that unlike type 1 and type 2 transactions,
reserved0field can be set to a non-zero value, denoting that this legacy transaction is EIP-155-compatible and its RLP encoding (as well as signature) should contain thechainIdof the system. txType: 1. It means that the transaction is of type 1, i.e. transactions access list. ZKsync does not support access lists in any way, so no benefits of fulfilling this list will be provided. The access list is assumed to be empty. The same restrictions as for type 0 are enforced, but alsoreserved0must be 0.txType: 2. It is EIP1559 transactions. The same restrictions as for type 1 apply, but nowmaxFeePerErgsmay not be equal togetMaxPriorityFeePerErg.txType: 113. It is ZKsync transaction type. This transaction type is intended for AA support. The only restriction that applies to this transaction type: fieldsreserved0..reserved4must be equal to 0.txType: 254. It is a transaction type that is used for upgrading the L2 system. This is the only type of transaction is allowed to start a transaction out of the name of the contracts in kernel space.txType: 255. It is a transaction that comes from L1. There are almost no restrictions explicitly imposed upon this type of transaction, since the bootloader at the end of its execution sends the rolling hash of the executed priority transactions. The L1 contract ensures that the hash did indeed match the hashes of the priority transactions on L1.
You can also read more on L1->L2 transactions and upgrade transactions here.
However, as already stated, the bootloader’s memory is not deterministic and the operator is free to put anything it wants there. For all of the transaction types above the restrictions are imposed in the following (method), which is called before starting processing the transaction.
Structure of the bootloader’s memory
The bootloader expects the following structure of the memory (here by word we denote 32-bytes, the same machine word as on EVM):
Batch information
The first 8 words are reserved for the batch information provided by the operator.
0word — the address of the operator (the beneficiary of the transactions).1word — the hash of the previous batch. Its validation will be explained later on.2word — the timestamp of the current batch. Its validation will be explained later on.3word — the number of the new batch.4word — the L1 gas price provided by the operator.5word — the “fair” price for L2 gas, i.e. the price below which thebaseFeeof the batch should not fall. For now, it is provided by the operator, but it in the future it may become hardcoded.6word — the base fee for the batch that is expected by the operator. While the base fee is deterministic, it is still provided to the bootloader just to make sure that the data that the operator has coincides with the data provided by the bootloader.7word — reserved word. Unused on proved batch.
The batch information slots are used at the beginning of the batch. Once read, these slots can be used for temporary data.
Temporary data for debug & transaction processing purposes
[8..39]– reserved slots for debugging purposes[40..72]– slots for holding the paymaster context data for the current transaction. The role of the paymaster context is similar to the EIP4337’s one. You can read more about it in the account abstraction documentation.[73..74]– slots for signed and explorer transaction hash of the currently processed L2 transaction.[75..110]– 36 slots for the calldata for the KnownCodesContract call.[111..1134]– 1024 slots for the refunds for the transactions.[1135..2158]– 1024 slots for the overhead for batch for the transactions. This overhead is suggested by the operator, i.e. the bootloader will still double-check that the operator does not overcharge the user.[2159..3182]– slots for the “trusted” gas limits by the operator. The user’s transaction will have at its disposalmin(MAX_TX_GAS(), trustedGasLimit), whereMAX_TX_GASis a constant guaranteed by the system. Currently, it is equal to 80 million gas. In the future, this feature will be removed.[3183..7282]– slots for storing L2 block info for each transaction. You can read more on the difference L2 blocks and batches here.[7283..40050]– slots used for compressed bytecodes each in the following format:- 32 bytecode hash
- 32 zeroes (but then it will be modified by the bootloader to contain 28 zeroes and then the 4-byte selector of the
publishCompressedBytecodefunction of theBytecodeCompressor) - The calldata to the bytecode compressor (without the selector).
[40051..40052]– slots where the hash and the number of current priority ops is stored. More on it in the priority operations section.
L1Messenger Pubdata
[40053..248052]– slots where the final batch pubdata is supplied to be verified by the L1Messenger. More on how the L1Messenger system contracts handles the pubdata can be read here.
But briefly, this space is used for the calldata to the L1Messenger’s publishPubdataAndClearState function, which
accepts the list of the user L2→L1 logs, published L2→L1 messages as well as bytecodes. It also takes the list of full
state diff entries, which describe how each storage slot has changed as well as compressed state diffs. This method will
then check the correctness of the provided data and publish the hash of the correct pubdata to L1.
Note, that while the realistic number of pubdata that can be published in a batch is 120kb, the size of the calldata to
L1Messenger may be a lot larger due to the fact that this method also accepts the original uncompressed state diff
entries. These will not be published to L1, but will be used to verify the correctness of the compression. The
worst-case number of bytes that may be needed for this scratch space is if all the pubdata consists of repeated writes
(i.e. we’ll need only 4 bytes to include key) that turn into 0 (i.e. they’ll need only 1 byte to describe it). However,
each of these writes in the uncompressed form will be represented as 272 byte state diff entry and so we get the number
of diffs is 120k / 5 = 24k. This means that they will have accommodate 24k * 272 = 6528000 bytes of calldata for the
uncompressed state diffs. Adding 120k on top leaves us with roughly 6650000 bytes needed for calldata. 207813 slots
are needed to accommodate this amount of data. We round up to 208000 slots to give space for constant-size factors for
ABI-encoding, like offsets, lengths, etc.
In theory though much more calldata could be used (if for instance 1 byte is used for enum index). It is the responsibility of the operator to ensure that it can form the correct calldata for the L1Messenger.
Transaction’s meta descriptions
[248053..250100]words — 2048 slots for 1024 transaction’s meta descriptions (their structure is explained below).
For internal reasons related to possible future integrations of zero-knowledge proofs about some of the contents of the bootloader’s memory, the array of the transactions is not passed as the ABI-encoding of the array of transactions, but:
- We have a constant maximum number of transactions. At the time of this writing, this number is 1024.
- Then, we have 1024 transaction descriptions, each ABI encoded as the following struct:
struct BootloaderTxDescription {
  // The offset by which the ABI-encoded transaction's data is stored
  uint256 txDataOffset;
  // Auxiliary data on the transaction's execution. In our internal versions
  // of the bootloader it may have some special meaning, but for the
  // bootloader used on the mainnet it has only one meaning: whether to execute
  // the transaction. If 0, no more transactions should be executed. If 1, then
  // we should execute this transaction and possibly try to execute the next one.
  uint256 txExecutionMeta;
}
Reserved slots for the calldata for the paymaster’s postOp operation
[252149..252188]words — 40 slots which could be used for encoding the calls for postOp methods of the paymaster.
To avoid additional copying of transactions for calls for the account abstraction, we reserve some of the slots which
could be then used to form the calldata for the postOp call for the account abstraction without having to copy the
entire transaction’s data.
The actual transaction’s descriptions
[252189..523261]
Starting from the 487312 word, the actual descriptions of the transactions start. (The struct can be found by this link). The bootloader enforces that:
- They are correctly ABI encoded representations of the struct above.
- They are located without any gaps in memory (the first transaction starts at word 653 and each transaction goes right after the next one).
- The contents of the currently processed transaction (and the ones that will be processed later on are untouched).
Note, that we do allow overriding data from the already processed transactions as it helps to preserve efficiency by
not having to copy the contents of the
Transactioneach time we need to encode a call to the account.
VM hook pointers
[523261..523263]
These are memory slots that are used purely for debugging purposes (when the VM writes to these slots, the server side can catch these calls and give important insight information for debugging issues).
Result ptr pointer
- [523264..524287]
These are memory slots that are used to track the success status of a transaction. If the transaction with number i
succeeded, the slot 2^19 - 1024 + i will be marked as 1 and 0 otherwise.
General flow of the bootloader’s execution
- At the start of the batch it reads the initial batch information and sends the information about the current batch to the SystemContext system contract.
- It goes through each of
transaction’s descriptions
and checks whether the
executefield is set. If not, it ends processing of the transactions and ends execution of the batch. If the execute field is non-zero, the transaction will be executed and it goes to step 3. - Based on the transaction’s type it decides whether the transaction is an L1 or L2 transaction and processes them accordingly. More on the processing of the L1 transactions can be read here. More on L2 transactions can be read here.
L2 transactions
On ZKsync, every address is a contract. Users can start transactions from their EOA accounts, because every address that
does not have any contract deployed on it implicitly contains the code defined in the
DefaultAccount.sol
file. Whenever anyone calls a contract that is not in kernel space (i.e. the address is ≥ 2^16) and does not have any
contract code deployed on it, the code for DefaultAccount will be used as the contract’s code.
Note, that if you call an account that is in kernel space and does not have any code deployed there, right now, the transaction will revert.
We process the L2 transactions according to our account abstraction protocol: https://v2-docs.zksync.io/dev/tutorials/custom-aa-tutorial.html#prerequisite.
- We deduct the transaction’s upfront payment for the overhead for the block’s processing. You can read more on how that works in the fee model description.
- Then we calculate the gasPrice for these transactions according to the EIP1559 rules.
- We conduct the validation step of the AA protocol:
- We calculate the hash of the transaction.
- If enough gas has been provided, we near_call the validation function in the bootloader. It sets the tx.origin to the address of the bootloader, sets the ergsPrice. It also marks the factory dependencies provided by the transaction as marked and then invokes the validation method of the account and verifies the returned magic.
- Calls the accounts and, if needed, the paymaster to receive the payment for the transaction. Note, that accounts may
not use
block.baseFeecontext variable, so they have no way to know what exact sum to pay. That’s why the accounts typically firstly sendtx.maxFeePerErg * tx.ergsLimitand the bootloader refunds for any excess funds sent.
- We perform the execution of the transaction.
Note, that if the sender is an EOA, tx.origin is set equal to the
fromthe value of the transaction. During the execution of the transaction, the publishing of the compressed bytecodes happens: for each factory dependency if it has not been published yet and its hash is currently pointed to in the compressed bytecodes area of the bootloader, a call to the bytecode compressor is done. Also, at the end the call to the KnownCodeStorage is done to ensure all the bytecodes have indeed been published. - We refund the user for any excess funds he spent on the transaction:
- Firstly, the postTransaction operation is called to the paymaster.
- The bootloader asks the operator to provide a refund. During the first VM run without proofs the provide directly inserts the refunds in the memory of the bootloader. During the run for the proved batches, the operator already knows what which values have to be inserted there. You can read more about it in the documentation of the fee model.
- The bootloader refunds the user.
- We notify the operator about the refund that was granted to the user. It will be used for the correct displaying of gasUsed for the transaction in explorer.
L1->L2 transactions
L1->L2 transactions are transactions that were initiated on L1. We assume that from has already authorized the L1→L2
transactions. It also has its L1 pubdata price as well as ergsPrice set on L1.
Most of the steps from the execution of L2 transactions are omitted and we set tx.origin to the from, and
ergsPrice to the one provided by transaction. After that, we use
mimicCall
to provide the operation itself from the name of the sender account.
Note, that for L1→L2 transactions, reserved0 field denotes the amount of ETH that should be minted on L2 as a result
of this transaction. reserved1 is the refund receiver address, i.e. the address that would receive the refund for the
transaction as well as the msg.value if the transaction fails.
There are two kinds of L1->L2 transactions:
- Priority operations, initiated by users (they have type
255). - Upgrade transactions, that can be initiated during system upgrade (they have type
254).
You can read more about differences between those in the corresponding document.
End of the batch
At the end of the batch we set tx.origin and tx.gasprice context variables to zero to save L1 gas on calldata and
send the entire bootloader balance to the operator, effectively sending fees to him.
Also, we
set
the fictive L2 block’s data. Then, we call the system context to ensure that it publishes the timestamp of the L2 block
as well as L1 batch. We also reset the txNumberInBlock counter to avoid its state diffs from being published on L1.
You can read more about block processing on ZKsync
here.
After that, we publish the hash as well as the number of priority operations in this batch. More on it here.
Then, we call the L1Messenger system contract for it to compose the pubdata to be published on L1. You can read more about the pubdata processing here.
System contracts
While most of the primitive EVM opcodes can be supported out of the box (i.e. zero-value calls,
addition/multiplication/memory/storage management, etc), some of the opcodes are not supported by the VM by default and
they are implemented via “system contracts” — these contracts are located in a special kernel space, i.e. in the
address space in the range [0..2^16-1], and they have some special privileges, which users’ contracts don’t have. These
contracts are pre-deployed at genesis and updating their code can be done only via system upgrade, managed from L1.
The use of each system contract will be explained down below.
Most of the details on the implementation and the requirements for the execution of system contracts can be found in the doc-comments of their respective code bases. This chapter serves only as a high-level overview of such contracts.
All of the system contracts’ code (including DefaultAccounts) are part of the protocol and can only be changed via a
system upgrade through L1.
SystemContext
This contract is used to support various system parameters not included in the VM by default, i.e. chainId, origin,
ergsPrice, blockErgsLimit, coinbase, difficulty, baseFee, blockhash, block.number, block.timestamp.
It is important to note that the constructor is not run for system contracts upon genesis, i.e. the constant context values are set on genesis explicitly. Notably, if in the future we want to upgrade the contracts, we will do it via ContractDeployer and so the constructor will be run.
This contract is also responsible for ensuring validity and consistency of batches, L2 blocks and virtual blocks. The implementation itself is rather straightforward, but to better understand this contract, please take a look at the page about the block processing on ZKsync.
AccountCodeStorage
The code hashes of accounts are stored inside the storage of this contract. Whenever a VM calls a contract with address
address, it retrieves the value under storage slot address of this system contract; if this value is non-zero, it
uses this as the code hash of the account.
Whenever a contract is called, the VM asks the operator to provide the preimage for the codehash of the account. That is why data availability of the code hashes is paramount.
Constructing vs Non-constructing code hash
In order to prevent contracts from being able to call a contract during its construction, we set the marker (i.e. second
byte of the bytecode hash of the account) as 1. This way, the VM will ensure that whenever a contract is called
without the isConstructor flag, the bytecode of the default account (i.e. EOA) will be substituted instead of the
original bytecode.
BootloaderUtilities
This contract contains some of the methods which are needed purely for the bootloader functionality but were moved out from the bootloader itself for the convenience of not writing this logic in Yul.
DefaultAccount
Whenever a contract does not both belong to kernel space and have any code deployed on it (the value stored under the
corresponding storage slot in AccountCodeStorage is zero), the code of the default account is used. The main purpose
of this contract is to provide an EOA-like experience for both wallet users and contracts that call it, i.e. it should
not be distinguishable (apart from spent gas) from EOA accounts on Ethereum.
Ecrecover
The implementation of the ecrecover precompile. It is expected to be used frequently, so written in pure Yul with a custom memory layout.
The contract accepts the calldata in the same format as the EVM precompile, i.e. the first 32 bytes are the hash, the next 32 bytes are the v, the next 32 bytes are the r, and the last 32 bytes are the s.
It also validates the input by the same rules as the EVM precompile:
- The v should be either 27 or 28,
- The r and s should be less than the curve order.
After that, it makes a precompile call and returns empty bytes if the call failed, and the recovered address otherwise.
Empty contracts
Some of the contracts are relied upon to have EOA-like behavior, i.e. they can always be called and get the success value in return. An example of such an address is the 0 address. We also require the bootloader to be callable so that the users could transfer ETH to it.
For these contracts, we insert the EmptyContract code upon genesis. It is basically a no-op code, which does nothing
and returns success=1.
SHA256 & Keccak256
Note that, unlike Ethereum, keccak256 is a precompile (not an opcode) on ZKsync.
These system contracts act as wrappers for their respective crypto precompile implementations. They are expected to be used frequently, especially keccak256, since Solidity computes storage slots for mapping and dynamic arrays with its help. That’s why we wrote contracts in pure Yul optimized for the short-input case.
The system contracts accept the input and transform it into the format that the zk-circuit expects. This way, some of the work is shifted from the crypto to smart contracts, which are easier to audit and maintain.
Both contracts should apply padding to the input according to their respective specifications, and then make a precompile call with the padded data. All other hashing work will be done in the zk-circuit. It’s important to note that the crypto part of the precompiles expects to work with padded data. This means that a bug in applying padding may lead to an unprovable transaction.
L2BaseToken & MsgValueSimulator
Unlike Ethereum, zkEVM does not have any notion of any special native token. That’s why we have to simulate operations
with Ether via two contracts: L2BaseToken & MsgValueSimulator.
L2BaseToken is a contract that holds the balances of ETH for the users. This contract does NOT provide ERC20
interface. The only method for transferring Ether is transferFromTo. It permits only some system contracts to transfer
on behalf of users. This is needed to ensure that the interface is as close to Ethereum as possible, i.e. the only way
to transfer ETH is by doing a call to a contract with some msg.value. This is what MsgValueSimulator system contract
is for.
Whenever anyone wants to do a non-zero value call, they need to call MsgValueSimulator with:
- The calldata for the call equal to the original one.
- Pass
valueand whether the call should be marked withisSystemin the first extra abi params. - Pass the address of the callee in the second extraAbiParam.
More information on the extraAbiParams can be read here.
Support for .send/.transfer
On Ethereum, whenever a call with non-zero value is done, some additional gas is charged from the caller’s frame and in return a 2300 gas stipend is given out to the callee frame. This stipend is usually enough to emit a small event, but it is enforced that it is not possible to change storage within these 2300 gas. This also means that in practice some users might opt to do call with 0 gas provided, relying on the 2300 stipend to be passed to the callee. This is the case for .call/.transfer.
While using .send/.transfer is generally not recommended, as a step towards better EVM compatibility, since vm1.5.0 a partial support of these functions is present with ZKsync Era. It is the done via the following means:
- Whenever a call is done to the
MsgValueSimulatorsystem contract,27000gas is deducted from the caller’s frame and it passed to theMsgValueSimulatoron top of whatever gas the user has originally provided. The number was chosen to cover for the execution of the transferring of the balances as well as other constant size operations by theMsgValueSimulator. Note, that since it will be the frame ofMsgValueSimulatorthat will actually call the callee, the constant must also include the cost for decommitting the code of the callee. Decoding bytecode of any size would be prohibitevely expensive and so we support only callees of size up to100000bytes. MsgValueSimulatorensures that no more than2300out of the stipend above gets to the callee, ensuring the reentrancy protection invariant for these functions holds.
Note that, unlike EVM, any unused gas from such calls will be refunded.
The system preserves the following guarantees about .send/.transfer:
- No more than
2300gas will be received by the callee. Note that a smaller, but a close amount may be passed. - It is not possible to do any storage changes within this stipend. This is enforced by having cold writes cost more than
2300gas. Also, cold writes always have to be prepaid whenever executing storage writes. - Any callee with bytecode size of up to
100000will work.
The system does not guarantee the following:
- That callees with bytecode size larger than
100000will work. Note, that a malicious operator can fail any call to a callee with large bytecode even if it has been decommitted before.
As a conclusion, using .send/.transfer should be generally avoided, but when avoiding is not possible it should be used with small callees, e.g. EOAs, which implement DefaultAccount.
KnownCodeStorage
This contract is used to store whether a certain code hash is “known”, i.e. can be used to deploy contracts. On ZKsync, the L2 stores the contract’s code hashes and not the codes themselves. Therefore, it must be part of the protocol to ensure that no contract with unknown bytecode (i.e. hash with an unknown preimage) is ever deployed.
The factory dependencies field provided by the user for each transaction contains the list of the contract’s bytecode hashes to be marked as known. We can not simply trust the operator to “know” these bytecodehashes as the operator might be malicious and hide the preimage. We ensure the availability of the bytecode in the following way:
- If the transaction comes from L1, i.e. all its factory dependencies have already been published on L1, we can simply mark these dependencies as “known”.
- If the transaction comes from L2, i.e. (the factory dependencies are yet to publish on L1), we make the user pays by burning ergs proportional to the bytecode’s length. After that, we send the L2→L1 log with the bytecode hash of the contract. It is the responsibility of the L1 contracts to verify that the corresponding bytecode hash has been published on L1.
It is the responsibility of the ContractDeployer system contract to deploy only those code hashes that are known.
The KnownCodesStorage contract is also responsible for ensuring that all the “known” bytecode hashes are also valid.
ContractDeployer & ImmutableSimulator
ContractDeployer is a system contract responsible for deploying contracts on ZKsync. It is better to understand how it
works in the context of how the contract deployment works on ZKsync. Unlike Ethereum, where create/create2 are
opcodes, on ZKsync these are implemented by the compiler via calls to the ContractDeployer system contract.
For additional security, we also distinguish the deployment of normal contracts and accounts. That’s why the main
methods that will be used by the user are create, create2, createAccount, create2Account, which simulate the
CREATE-like and CREATE2-like behavior for deploying normal and account contracts respectively.
Address derivation
Each rollup that supports L1→L2 communications needs to make sure that the addresses of contracts on L1 and L2 do not overlap during such communication (otherwise it would be possible that some evil proxy on L1 could mutate the state of the L2 contract). Generally, rollups solve this issue in two ways:
- XOR/ADD some kind of constant to addresses during L1→L2 communication. That’s how rollups closer to full EVM-equivalence solve it, since it allows them to maintain the same derivation rules on L1 at the expense of contract accounts on L1 having to redeploy on L2.
- Have different derivation rules from Ethereum. That is the path that ZKsync has chosen, mainly because since we have different bytecode than on EVM, CREATE2 address derivation would be different in practice anyway.
You can see the rules for our address derivation in getNewAddressCreate2/getNewAddressCreate methods in the
ContractDeployer.
Note, that we still add a certain constant to the addresses during L1→L2 communication in order to allow ourselves some way to support EVM bytecodes in the future.
Deployment nonce
On Ethereum, the same nonce is used for CREATE for accounts and EOA wallets. On ZKsync this is not the case, we use a separate nonce called “deploymentNonce” to track the nonces for accounts. This was done mostly for consistency with custom accounts and for having multicalls feature in the future.
General process of deployment
- After incrementing the deployment nonce, the contract deployer must ensure that the bytecode that is being deployed is available.
- After that, it puts the bytecode hash with a special constructing marker as code for the address of the to-be-deployed contract.
- Then, if there is any value passed with the call, the contract deployer passes it to the deployed account and sets the
msg.valuefor the next as equal to this value. - Then, it uses
mimic_callfor calling the constructor of the contract out of the name of the account. - It parses the array of immutables returned by the constructor (we’ll talk about immutables in more details later).
- Calls
ImmutableSimulatorto set the immutables that are to be used for the deployed contract.
Note how it is different from the EVM approach: on EVM when the contract is deployed, it executes the initCode and returns the deployedCode. On ZKsync, contracts only have the deployed code and can set immutables as storage variables returned by the constructor.
Constructor
On Ethereum, the constructor is only part of the initCode that gets executed during the deployment of the contract and
returns the deployment code of the contract. On ZKsync, there is no separation between deployed code and constructor
code. The constructor is always a part of the deployment code of the contract. In order to protect it from being called,
the compiler-generated contracts invoke the constructor only if the isConstructor flag is provided (it is only
available for the system contracts). You can read more about flags
here.
After execution, the constructor must return an array of:
struct ImmutableData {
  uint256 index;
  bytes32 value;
}
basically denoting an array of immutables passed to the contract.
Immutables
Immutables are stored in the ImmutableSimulator system contract. The way the index of each immutable is defined is
part of the compiler specification. This contract treats it simply as a mapping from index to value for each particular
address.
Whenever a contract needs to access a value of some immutable, they call the
ImmutableSimulator.getImmutable(getCodeAddress(), index). Note that on ZKsync it is possible to get the current
execution address. You can read more about getCodeAddress()
here.
Return value of the deployment methods
If the call succeeded, the address of the deployed contract is returned. If the deploy fails, the error bubbles up.
DefaultAccount
The implementation of the default account abstraction. This is the code that is used by default for all addresses that are not in kernel space and have no contract deployed on them. This address:
- Contains a minimal implementation of our account abstraction protocol. Note that it supports the built-in paymaster flows.
- When anyone (except bootloader) calls it, it behaves in the same way as a call to an EOA, i.e. it always returns
success = 1, returndatasize = 0for calls from anyone except for the bootloader.
L1Messenger
A contract used for sending arbitrary-length L2→L1 messages from ZKsync to L1. While ZKsync natively supports a rather limited number of L1→L2 logs, which can transfer only roughly 64 bytes of data at a time, we allow sending nearly- arbitrary-length L2→L1 messages with the following trick:
The L1 messenger receives a message, hashes it and sends only its hash as well as the original sender via L2→L1 log. Then, it is the duty of the L1 smart contracts to make sure that the operator has provided full preimage of this hash in the commitment of the batch.
The L1Messenger is also responsible for validating the total pubdata to be sent on L1. You can read more about it
here.
NonceHolder
Serves as storage for nonces for our accounts. Besides making it easier for operator to order transactions (i.e. by reading the current nonces of account), it also serves a separate purpose: making sure that the pair (address, nonce) is always unique.
It provides a function validateNonceUsage which the bootloader uses to check whether the nonce has been used for a
certain account or not. Bootloader enforces that the nonce is marked as non-used before validation step of the
transaction and marked as used one afterwards. The contract ensures that once marked as used, the nonce can not be set
back to the “unused” state.
Note that nonces do not necessarily have to be monotonic (this is needed to support more interesting applications of account abstractions, e.g. protocols that can start transactions on their own, tornado-cash like protocols, etc). That’s why there are two ways to set a certain nonce as “used”:
- By incrementing the
minNoncefor the account (thus making all nonces that are lower thanminNonceas used). - By setting some non-zero value under the nonce via
setValueUnderNonce. This way, this key will be marked as used and will no longer be allowed to be used as a nonce for accounts. This way it is also rather efficient, since these 32 bytes could be used to store some valuable information.
The accounts, upon creation, can also specify which type of nonce ordering they want: Sequential (i.e. it should be expected that the nonces grow one by one, just like EOA) or Arbitrary, where the nonces may have any values. This ordering is not enforced in any way by system contracts, but it is more of a suggestion to the operator on how they should order the transactions in the mempool.
EventWriter
A system contract responsible for emitting events.
It accepts in its 0-th extra ABI data param the number of topics. In the rest of the extra ABI params, it accepts topics
for the event to emit. Note that, in reality, the first topic of the event contains the address of the account. Generally,
the users should not interact with this contract directly, but only through Solidity syntax of emit-ing new events.
Compressor
One of the most expensive resources for a rollup is data availability, so in order to reduce costs for the users we compress the published pubdata in several ways:
- We compress published bytecodes.
- We compress state diffs.
This contract contains utility methods that are used to verify the correctness of either bytecode or state diff compression. You can read more on how we compress state diffs and bytecodes.
Pubdata Chunk Publisher
This contract is responsible for separating pubdata into chunks that each fit into a 4844 blob and calculating the hash of the preimage of said blob. If a chunk’s size is less than the total number of bytes for a blob, we pad it on the right with zeroes, since the circuits require the chunk to be of the exact size.
This contract can be used by L2DAValidators, e.g. RollupL2DAValidator uses it to compress the pubdata into blobs.
CodeOracle
It is a contract that accepts a versioned hash of bytecode and returns its preimage. It is similar to the extcodecopy functionality on Ethereum.
It works as follows:
- It accepts a versioned hash and double checks that it is marked as “known”, i.e. the operator must know the preimage for such hash.
- After that, it uses the
decommitopcode, which accepts the versioned hash and the number of ergs to spend, which is proportional to the length of the preimage. If the preimage has been decommitted before, the requested cost will be refunded to the user.
Note, that the decommitment process does not only happen using the decommit opcode, but during calls to contracts. Whenever a contract is called, its code is decommitted into a memory page dedicated to contract code. We never decommit the same preimage twice, regardless of whether it was decommitted via an explicit opcode or during a call to another contract, the previous unpacked bytecode memory page will be reused. When executing decommit inside the CodeOracle contract, the user will be first precharged with the maximum possible cost and then it will be refunded in case the bytecode has been decommitted before.
- The
decommitopcode returns a slice of the decommitted bytecode. Note, that the returned pointer always has length of 2^21 bytes, regardless of the length of the actual bytecode. So it is the job of theCodeOraclesystem contract to shrink the length of the returned data.
P256Verify
This contract exerts the same behavior as the P256Verify precompile from RIP-7212. Note, that since Era has different gas schedule, we do not comply with the gas costs, but otherwise the interface is identical.
GasBoundCaller
This is not a system contract, but it will be predeployed on a fixed user space address. This contract allows users to set an upper bound for how much pubdata a subcall can take, regardless of the gas per pubdata. You can read more about how pubdata works on ZKsync here.
Note, that it is a deliberate decision not to deploy this contract in the kernel space, since it can relay calls to any contracts and so may break the assumption that all system contracts can be trusted.
ComplexUpgrader
Usually an upgrade is performed by calling the forceDeployOnAddresses function of ContractDeployer out of the name of the FORCE_DEPLOYER constant address. However some upgrades may require more complex interactions, e.g. query something from a contract to determine which calls to make etc.
For cases like this ComplexUpgrader contract has been created. The assumption is that the implementation of the upgrade is predeployed and the ComplexUpgrader will delegatecall to it.
Note, that while
ComplexUpgraderexisted even in the previous upgrade, it lacked theforceDeployAndUpgradefunction. This caused some serious limitations. You can read more about how the gateway upgrade process will work here.
Create2Factory
Just a built-in Create2Factory. It allows to deterministically deploy contracts to the same address on multiple chains.
L2GenesisUpgrade
A contract that is responsible for facilitating initialization of a newly created chain. This is part of a chain creation flow.
Bridging-related contracts
L2Bridgehub, L2AssetRouter, L2NativeTokenVault, as well as L2MessageRoot.
These contracts are used to facilitate cross-chain communication as well as value bridging. You can read more about them in the asset router spec.
Note, that L2AssetRouter and L2NativeTokenVault have unique code, however the L2Bridgehub and L2MessageRoot share the same source code with their L1 precompiles, i.e. the L2Bridgehub has this code and L2MessageRoot has this code.
SloadContract
During the L2GatewayUpgrade, the system contracts will need to read the storage of some other contracts, despite the fact that they lack getters.. How it is implemented can be read in the forcedSload function of the SystemContractHelper contract.
While it is only used for the upgrade, it was decided to leave it as a predeployed contract for future use-cases as well.
L2WrappedBaseTokenImplementation
Although bridging wrapped base tokens (e.g., WETH) is not yet supported, its address is enshrined within the native token vault (both the L1 and L2 ones). For consistency with other networks, our WETH token is deployed as a TransparentUpgradeableProxy. To make the deployment process easier, we predeploy the implementation.
Known issues to be resolved
The protocol, while conceptually complete, contains some known issues which will be resolved in the short to middle term.
- Fee modeling is yet to be improved. More on it in the document on the fee model.
- We may add some kind of default implementation for the contracts in the kernel space (i.e. if called, they wouldn’t revert but behave like an EOA).
Account abstraction
One of the other important features of ZKsync is the support of account abstraction. It is highly recommended to read the documentation on our AA protocol here: https://docs.zksync.io/build/developer-reference/account-abstraction
Account versioning
Each account can also specify which version of the account abstraction protocol do they support. This is needed to allow breaking changes of the protocol in the future.
Currently, two versions are supported: None (i.e. it is a simple contract and it should never be used as from field
of a transaction), and Version1.
Nonce ordering
Accounts can also signal to the operator which nonce ordering it should expect from these accounts: Sequential or
Arbitrary.
Sequential means that the nonces should be ordered in the same way as in EOAs. This means, that, for instance, the
operator will always wait for a transaction with nonce X before processing a transaction with nonce X+1.
Arbitrary means that the nonces can be ordered in arbitrary order. It is supported by the server right now, i.e. if
there is a contract with arbitrary nonce ordering, its transactions will likely either be rejected or get stuck in the
mempool due to nonce mismatch.
Note, that this is not enforced by system contracts in any way. Some sanity checks may be present, but the accounts are allowed to do however they like. It is more of a suggestion to the operator on how to manage the mempool.
Returned magic value
Now, both accounts and paymasters are required to return a certain magic value upon validation. This magic value will be enforced to be correct on the mainnet, but will be ignored during fee estimation. Unlike Ethereum, the signature verification + fee charging/nonce increment are not included as part of the intrinsic costs of the transaction. These are paid as part of the execution and so they need to be estimated as part of the estimation for the transaction’s costs.
Generally, the accounts are recommended to perform as many operations as during normal validation, but only return the invalid magic in the end of the validation. This will allow to correctly (or at least as correctly as possible) estimate the price for the validation of the account.
ZKsync fee model
This document will assume that you already know how gas & fees work on Ethereum.
On Ethereum, all the computational, as well as storage costs, are represented via one unit: gas. Each operation costs a certain amount of gas, which is generally constant (though it may change during upgrades).
ZKsync as well as other L2s have the issue which does not allow to adopt the same model as the one for Ethereum so easily: the main reason is the requirement for publishing of the pubdata on Ethereum. This means that prices for L2 transactions will depend on the volatile L1 gas prices and can not be simply hardcoded.
High-level description
ZKsync, being a zkRollup is required to prove every operation with zero knowledge proofs. That comes with a few nuances.
gas_per_pubdata_limit
As already mentioned, the transactions on ZKsync depend on volatile L1 gas costs to publish the pubdata for batch,
verify proofs, etc. For this reason, ZKsync-specific EIP712 transactions contain the gas_per_pubdata_limit field in
them, denoting the maximum price in gas that the operator **can charge from users for a single byte of pubdata.
For Ethereum transactions (which do not contain this field), it is enforced that the operator will not use a value larger value than a certain constant.
Different opcode pricing
The operations tend to have different “complexity”/”pricing” in zero knowledge proof terms than in standard CPU terms.
For instance, keccak256 which was optimized for CPU performance, will cost more to prove.
That’s why you will find the prices for operations on ZKsync a lot different from the ones on Ethereum.
Different intrinsic costs
Unlike Ethereum, where the intrinsic cost of transactions (21000 gas) is used to cover the price of updating the
balances of the users, the nonce and signature verification, on ZKsync these prices are not included in the intrinsic
costs for transactions, due to the native support of account abstraction, meaning that each account type may have their
own transaction cost. In theory, some may even use more zk-friendly signature schemes or other kinds of optimizations to
allow cheaper transactions for their users.
That being said, ZKsync transactions do come with some small intrinsic costs, but they are mostly used to cover costs related to the processing of the transaction by the bootloader which can not be easily measured in code in real-time. These are measured via testing and are hard coded.
Batch overhead & limited resources of the batch
In order to process the batch, the ZKsync team has to pay for proving of the batch, committing to it, etc. Processing a batch involves some operational costs as well. All of these values we call “Batch overhead”. It consists of two parts:
- The L2 requirements for proving the circuits (denoted in L2 gas).
- The L1 requirements for the proof verification as well as general batch processing (denoted in L1 gas).
We generally try to aggregate as many transactions as possible and each transaction pays for the batch overhead proportionally to how close did the transaction bring the batch to being sealed, i.e. closed and prepared for proof verification and submission on L1. A transaction gets closer to sealing a batch by using the batch’s limited resources.
While on Ethereum, the main reason for the existence of batch gas limit is to keep the system decentralized & load low, i.e. assuming the existence of the correct hardware, only time would be a requirement for a batch to adhere to. In the case of ZKsync batches, there are some limited resources the batch should manage:
- Time. The same as on Ethereum, the batch should generally not take too much time to be closed in order to provide better UX. To represent the time needed we use a batch gas limit, note that it is higher than the gas limit for a single transaction.
- Slots for transactions. The bootloader has a limited number of slots for transactions, i.e. it can not take more than a certain transactions per batch.
- The memory of the bootloader. The bootloader needs to store the transaction’s ABI encoding in its memory & this fills it up. In practical terms, it serves as a penalty for having transactions with large calldata/signatures in case of custom accounts.
- Pubdata bytes. In order to fully appreciate the gains from the storage diffs, i.e. the fact that changes in a single slot happening in the same batch need to be published only once, we need to publish all the batch’s public data only after the transaction has been processed. Right now, we publish all the data with the storage diffs as well as L2→L1 messages, etc in a single transaction at the end of the batch. Most nodes have limit of 128kb per transaction and so this is the limit that each ZKsync batch should adhere to.
Each transaction spends the batch overhead proportionally to how close it consumes the resources above.
Note, that before the transaction is executed, the system can not know how many of the limited system resources the transaction will actually take, so we need to charge for the worst case and provide the refund at the end of the transaction.
How baseFee works on ZKsync
In order to protect us from DDoS attacks we need to set a limited MAX_TRANSACTION_GAS_LIMIT per transaction. Since the
computation costs are relatively constant for us, we could use a “fair” baseFee equal to the real costs for us to
compute the proof for the corresponding 1 erg. Note, that gas_per_pubdata_limit should be then set high enough to
cover the fees for the L1 gas needed to send a single pubdata byte on Ethereum. Under large L1 gas,
gas_per_pubdata_limit would also need be large. That means that MAX_TRANSACTION_GAS_LIMIT/gas_per_pubdata_limit
could become too low to allow for enough pubdata for lots of common use cases.
To make common transactions always executable, we must enforce that the users are always able to send at least
GUARANTEED_PUBDATA_PER_TX bytes of pubdata in their transaction. Because of that, the needed gas_per_pubdata_limit
for transactions should never grow beyond MAX_TRANSACTION_GAS_LIMIT/GUARANTEED_PUBDATA_PER_TX. Setting a hard bound on
gas_per_pubdata_limit also means that with the growth of L1 gas prices, the L2 baseFee will have to grow as well (to
ensure that base_fee * gas_per_pubdata_limit = L1_gas_price * l1_gas_per_pubdata)).
This does not actually matter a lot for normal transactions, since most of the costs will still go on pubdata for them. However, it may matter for computationally intensive tasks, meaning that for them a big upfront payment will be required, with the refund at the end of the transaction for all the overspent gas.
Trusted gas limit
While it was mentioned above that the MAX_TRANSACTION_GAS_LIMIT is needed to protect the operator from users stalling
the state keeper by using too much computation, in case the users may need to use a lot of pubdata (for instance to
publish the bytecode of a new contract), the required gasLimit may go way beyond the MAX_TRANSACTION_GAS_LIMIT (since
the contracts can be 10s of kilobytes in size). All the new contracts to be published are included as part of the
factory dependencies field of the transaction and so the operator already knows how much pubdata will have to published
& how much gas will have to spent on it.
That’s why, to provide the better UX for users, the operator may provide the
trusted gas limit,
i.e. the limit which exceeds MAX_TRANSACTION_GAS_LIMIT assuming that the operator knows what he is doing (e.g. he is
sure that the excess gas will be spent on the pubdata).
High-level: conclusion
The ZKsync fee model is meant to be the basis of the long-term fee model, which provides both robustness and security. One of the most distinctive parts of it is the existing of the batch overhead, which is proportional for the resources consumed by the transaction.
The other distinctive feature of the fee model used on ZKsync is the abundance of refunds, i.e.:
- For unused limited system resources.
- For overpaid computation.
This is needed because of the relatively big upfront payments required in ZKsync to provide DDoS security.
Formalization
After determining price for each opcode in gas according to the model above, the following formulas are to be used for
calculating baseFee and gasPerPubdata for a batch.
System-wide constants
These constants are to be hardcoded and can only be changed via either system contracts/bootloader or VM upgrade.
BATCH_OVERHEAD_L1_GAS (L1O)— The L1 gas overhead for a batch (proof verification, etc).
L1_GAS_PER_PUBDATA_BYTE (L1PUB) — The number of L1 gas needed for a single pubdata byte. It is slightly higher
than 16 gas needed for publishing a non-zero byte of pubdata on-chain (currently the value of 17 is used).
BATCH_OVERHEAD_L2_GAS (EO)— The constant overhead denominated in gas. This overhead is created to cover the
amortized costs of proving.
BLOCK_GAS_LIMIT (B) — The maximum number of computation gas per batch. This is the maximal number of gas that can be
spent within a batch. This constant is rather arbitrary and is needed to prevent transactions from taking too much time
from the state keeper. It can not be larger than the hard limit of 2^32 of gas for VM.
MAX_TRANSACTION_GAS_LIMIT (TM) — The maximal transaction gas limit. For i-th single instance circuit, the price of
each of its units is $SC_i = \lceil \frac{T_M}{CC_i} \rceil$ to ensure that no transaction can run out of these single
instance circuits.
MAX_TRANSACTIONS_IN_BATCH (TXM) — The maximum number of transactions per batch. A constant in bootloader. Can
contain almost any arbitrary value depending on the capacity of batch that we want to have.
BOOTLOADER_MEMORY_FOR_TXS (BM) — The size of the bootloader memory that is used for transaction encoding
(i.e. excluding the constant space, preallocated for other purposes).
GUARANTEED_PUBDATA_PER_TX (PG) — The guaranteed number of pubdata that should be possible to pay for in one ZKsync
batch. This is a number that should be enough for most reasonable cases.
Derived constants
Some of the constants are derived from the system constants above:
MAX_GAS_PER_PUBDATA (EPMax) — the gas_price_per_pubdata that should always be enough to cover for publishing a
pubdata byte:
$$ EP_{Max} = \lfloor \frac{T_M}{P_G} \rfloor $$
Externally-provided batch parameters
L1_GAS_PRICE (L1P) — The price for L1 gas in ETH.
FAIR_GAS_PRICE (Ef) — The “fair” gas price in ETH, that is, the price of proving one circuit (in Ether) divided by
the number we chose as one circuit price in gas.
$$ E_f = \frac{Price_C}{E_C} $$
where PriceC is the price for proving a circuit in ETH. Even though this price will generally be volatile (due to the
volatility of ETH price), the operator is discouraged to change it often, because it would volatile both volatile gas
price and (most importantly) the required gas_price_per_pubdata for transactions.
Both of the values above are currently provided by the operator. Later on, some decentralized/deterministic way to provide these prices will be utilized.
Determining base_fee
When the batch opens, we can calculate the FAIR_GAS_PER_PUBDATA_BYTE (EPf) — “fair” gas per pubdata byte:
$$ EP_f = \lceil \frac{L1_p * L1_{PUB}}{E_f} \rceil $$
There are now two situations that can be observed:
I.
$$ EP_f > EP_{Max} $$
This means that the L1 gas price is so high that if we treated all the prices fairly, then the number of gas required to publish guaranteed pubdata is too high, i.e. allowing at least PG pubdata bytes per transaction would mean that we would to support tx.gasLimit greater that the maximum gas per transaction TM, allowing to run out of other finite resources.
If $EP_f > EP_{Max}$, then the user needs to artificially increase the provided Ef to bring the needed tx.gasPerPubdataByte to EPmax
In this case we set the EIP1559 baseFee (Base):
$$ Base = max(E_f, \lceil \frac{L1_P * L1_{PUB}}{EP_{max}} \rceil) $$
Only transactions that have at least this high gasPrice will be allowed into the batch.
II.
Otherwise, we keep $Base* = E_f$
Note, that both cases are covered with the formula in case (1), i.e.:
$$ Base = max(E_f, \lceil \frac{L1_P * L1_{PUB}}{EP_{max}} \rceil) $$
This is the base fee that will be always returned from the API via eth_gasGasPrice.
Calculating overhead for a transaction
Let’s define by tx.actualGasLimit as the actual gasLimit that is to be used for processing of the transaction (including the intrinsic costs). In this case, we will use the following formulas for calculating the upfront payment for the overhead:
$$ S_O = 1/TX_M $$
$$ M_O(tx) = encLen(tx) / B_M $$
$$ E_{AO}(tx) = tx.actualGasLimit / T_M $$
$$ O(tx) = max(S_O, M_O(tx), E_O(tx)) $$
where:
SO — is the overhead for taking up 1 slot for a transaction
MO(tx) — is the overhead for taking up the memory of the bootloader
encLen(tx) — the length of the ABI encoding of the transaction’s struct.
EAO(tx) — is the overhead for potentially taking up the gas for single instance circuits.
O(tx) — is the total share of the overhead that the transaction should pay for.
Then we can calculate the overhead that the transaction should pay as the following one:
$$ L1_O(tx) = \lceil \frac{L1_O}{L1_{PUB}} \rceil * O(tx) \ E_O(tx) = E_O * O(tx) $$
Where
L1O(tx) — the number of L1 gas overhead (in pubdata equivalent) the transaction should compensate for gas.
EO(tx) — the number of L2 gas overhead the transaction should compensate for.
Then:
overhead_gas(tx) = EO(tx) + tx.gasPerPubdata ⋅ L1O(tx)
When a transaction is being estimated, the server returns the following gasLimit:
tx.gasLimit = tx.actualGasLimit + overhead_gas(tx)
Note, that when the operator receives the transaction, it knows only tx.gasLimit. The operator could derive the overheadgas(tx) and provide the bootloader with it. The bootloader will then derive tx.actualGasLimit = tx.gasLimit − overheadgas(tx) and use the formulas above to derive the overhead that the user should’ve paid under the derived tx.actualGasLimit to ensure that the operator does not overcharge the user.
Note on formulas
For the ease of integer calculation, we will use the following formulas to derive the overhead(tx):
$B_O(tx) = E_O + tx.gasPerPubdataByte \cdot \lfloor \frac{L1_O}{L1_{PUB}} \rfloor$
$B_O$ denotes the overhead for batch in gas that the transaction would have to pay if it consumed the resources for entire batch.
Then, overhead_gas(tx) is the maximum of the following expressions:
- $S_O = \lceil \frac{B_O}{TX_M} \rceil$
- $M_O(tx) = \lceil \frac{B_O \cdot encodingLen(tx)}{B_M} \rceil$
- $E_O(tx) = \lceil \frac{B_O \cdot tx.gasBodyLimit}{T_M} \rceil$
Deriving overhead_gas(tx) from tx.gasLimit
The task that the operator needs to do is the following:
Given the tx.gasLimit, it should find the maximal overhead_gas(tx), such that the bootloader will accept such
transaction, that is, if we denote by Oop the overhead proposed by the operator, the following equation should hold:
$$ O_{op} ≤ overhead_gas(tx) $$
for the $tx.bodyGasLimit$ we use the $tx.bodyGasLimit$ = $tx.gasLimit − O_{op}$.
There are a few approaches that could be taken here:
- Binary search. However, we need to be able to use this formula for the L1 transactions too, which would mean that binary search is too costly.
- The analytical way. This is the way that we will use and it will allow us to find such an overhead in O(1), which is acceptable for L1->L2 transactions.
Let’s rewrite the formula above the following way:
$$ O_{op} ≤ max(SO, MO(tx), EO(tx)) $$
So we need to find the maximal $O_{op}$, such that $O_{op} ≤ max(S_O, M_O(tx), E_O(tx))$. Note, that it means ensuring that at least one of the following is true:
- $O_{op} ≤ S_O$
- $O_{op} ≤ M_O(tx)$
- $O_{op} ≤ E_O(tx)$
So let’s find the largest Oop for each of these and select the maximum one.
- Solving for (1)
$$ O_{op} = \lceil \frac{B_O}{TX_M} \rceil $$
- Solving for (2)
$$ O_{op} = \lceil \frac{encLen(tx) \cdot B_O}{B_M} \rceil $$
- Solving for (3)
This one is somewhat harder than the previous ones. We need to find the largest O_{op}, such that:
$$ O_{op} \le \lceil \frac{tx.actualErgsLimit \cdot B_O}{T_M} \rceil \ $$
$$ O_{op} \le \lceil \frac{(tx.ergsLimit - O_{op}) \cdot B_O}{T_M} \rceil \ $$
$$ O_{op} ≤ \lceil \frac{B_O \cdot (tx.ergsLimit - O_{op})}{T_M} \rceil $$
Note, that all numbers here are integers, so we can use the following substitution:
$$ O_{op} -1 \lt \frac{(tx.ergsLimit - O_{op}) \cdot B_O}{T_M} \ $$
$$ (O_{op} -1)T_M \lt (tx.ergsLimit - O_{op}) \cdot B_O \ $$
$$ O_{op} T_M + O_{op} B_O \lt tx.ergsLimit \cdot B_O + T_M \ $$
$$ O_{op} \lt \frac{tx.ergsLimit \cdot B_O + T_M}{B_O + T_M} \ $$
Meaning, in other words:
$$ O_{op} = \lfloor \frac{tx.ergsLimit \cdot B_O + T_M - 1}{B_O + T_M} \rfloor $$
Then, the operator can safely choose the largest one.
Discounts by the operator
It is important to note that the formulas provided above are to withstand the worst-case scenario and these are the
formulas used for L1->L2 transactions (since these are forced to be processed by the operator). However, in reality, the
operator typically would want to reduce the overhead for users whenever it is possible. For instance, in the server, we
underestimate the maximal potential MAX_GAS_PER_TRANSACTION, since usually the batches are closed because of either
the pubdata limit or the transactions’ slots limit. For this reason, the operator also provides the operator’s proposed
overhead. The only thing that the bootloader checks is that this overhead is not larger than the maximal required one.
But the operator is allowed to provide a lower overhead.
Refunds
As you could see above, this fee model introduces quite some places where users may overpay for transactions:
- For the pubdata when L1 gas price is too low
- For the computation when L1 gas price is too high
- The overhead, since the transaction may not use the entire batch resources they could.
To compensate users for this, we will provide refunds for users. For all of the refunds to be provable, the counter counts the number of gas that was spent on pubdata (or the number of pubdata bytes published). We will denote this number by pubdataused. For now, this value can be provided by the operator.
The fair price for a transaction is
$$ FairFee = E_f \cdot tx.computationalGas + EP_f \cdot pubdataused $$
We can derive $tx.computationalGas = gasspent − pubdataused \cdot tx.gasPricePerPubdata$, where gasspent is the number of gas spent for the transaction (can be trivially fetched in Solidity).
Also, the FairFee will include the actual overhead for batch that the users should pay for.
The fee that the user has actually spent is:
$$ ActualFee = gasspent \cdot gasPrice $$
So we can derive the overpay as
$$ ActualFee − FairFee $$
In order to keep the invariant of $gasUsed \cdot gasPrice = fee$ , we will formally refund $\frac{ActualFee - FairFee}{Base}$ gas.
At the moment, this counter is not accessible within the VM and so the operator is free to provide any refund it wishes (as long as it is greater than or equal to the actual amount of gasLeft after the transaction execution).
Refunds for repeated writes
zkEVM is a statediff-based rollup, i.e. the pubdata is published not for transactions, but for storage changes. This means that whenever a user writes into a storage slot, he incurs certain amount of pubdata. However, not all writes are equal:
- If a slot has been already written to in one of the previous batches, the slot has received a short id, which allows it to require less pubdata in the state diff.
- Depending on the
valuewritten into a slot, various compression optimizations could be used and so we should reflect that too. - Maybe the slot has been already written to in this batch and so we don’t to charge anything for it.
You can read more about how we treat the pubdata here.
The important part here is that while such refunds are inlined (i.e. unlike the refunds for overhead they happen in-place during execution and not after the whole transaction has been processed), they are enforced by the operator. Right now, the operator is the one that decides what refund to provide.
Improvements in the upcoming releases
The fee model explained above, while fully functional, has some known issues. These will be tackled with the following upgrades.
The quadratic overhead for pubdata
Note, that the computational overhead is proportional to the tx.gasLimit and the amount of funds the user will have to
pay is proportional to the L1 gas price (recall the formula of B_O). We can roughly express the transaction overhead
from computation as tx.gasLimit * L1_GAS_PRICE * C where C is just some constant. Note, that since a transaction
typically contains some storage writes, and its
tx.gasLimit = gasSpentOnCompute + pubdataPublished * gasPricePerPubdata, tx.gasLimit is roughly proportional to
gasPricePerPubdata and so it is also proportional to L1_GAS_PRICE.
This means that formula tx.gasLimit * L1_GAS_PRICE * C becomes quadratic to the L1_GAS_PRICE.
gasUsed depends to gasLimit
While in general it shouldn’t be the case assuming the correct implementation of refunds, in practice it turned out that the formulas above, while robust, estimate for the worst case which can be very difference from the average one. In order to improve the UX and reduce the overhead, the operator charges less for the execution overhead. However, as a compensation for the risk, it does not fully refund for it.
L1->L2 transactions do not pay for their execution on L1
The executeBatches operation on L1 is executed in O(N) where N is the number of priority ops that we have in the
batch. Each executed priority operation will be popped and so it incurs cost for storage modifications. As of now, we do
not charge for it.
zkEVM Fee Components (Revenue & Costs)
- On-Chain L1 Costs
- L1 Commit Batches
- The commit batches transaction submits pubdata (which is the list of updated storage slots) to L1. The cost of a
commit transaction is calculated as
constant overhead + price of pubdata. Theconstant overheadcost is evenly distributed among L2 transactions in the L1 commit transaction, but only at higher transaction loads. As for theprice of pubdata, it is known how much pubdata each L2 transaction consumed, therefore, they are charged directly for that. Multiple L1 batches can be included in a single commit transaction.
- The commit batches transaction submits pubdata (which is the list of updated storage slots) to L1. The cost of a
commit transaction is calculated as
- L1 Prove Batches
- Once the off-chain proof is generated, it is submitted to L1 to make the rollup batch final. Currently, each proof contains only one L1 batch.
- L1 Execute Batches
- The execute batches transaction processes L2 -> L1 messages and marks executed priority operations as such. Multiple L1 batches can be included in a single execute transaction.
- L1 Finalize Withdrawals
- While not strictly part of the L1 fees, the cost to finalize L2 → L1 withdrawals are covered by Matter Labs. The finalize withdrawals transaction processes user token withdrawals from zkEVM to Ethereum. Multiple L2 withdrawal transactions are included in each finalize withdrawal transaction.
- L1 Commit Batches
- On-Chain L2 Revenue
- L2 Transaction Fee
- This fee is what the user pays to complete a transaction on zkEVM. It is calculated as
gasLimit x baseFeePerGas - refundedGas x baseFeePerGas, or more simply,gasUsed x baseFeePerGas.
- This fee is what the user pays to complete a transaction on zkEVM. It is calculated as
- L2 Transaction Fee
- Profit = L2 Revenue - L1 Costs - Off Chain Infrastructure Costs
EVM emulation technical overview
Intro
The EraVM differs from the EVM in several ways: it has a distinct set of instructions and a different overall design. As a result, while Solidity and Vyper can be compiled to bytecode for the EraVM, there are several peculiarities and behavioral differences that may require developers to modify their smart contracts. These differences can negatively impact the developer experience, especially due to inconsistencies in the tooling.
As an option to unblock developers that depend on EVM bytecode support, EVM execution mode is added as an emulation on top of EraVM:
- The core of the system is EraVM: EVM emulator is only a complementary functionality. It is still possible to deploy native EraVM contracts and the main unit of gas is EraVM one (it will be called ergs further so as not to confuse it with EVM gas).
- However, it is also possible to deploy and execute EVM contracts. These contracts’ bytecode hash is marked with a special marker. Whenever an EVM bytecode is invoked, instead of decommiting and executing EraVM bytecode, virtual machine uses fixed and predefined EvmEmulator bytecode. Internally, this emulator loads, interprets and executes EVM bytecode in accordance with the EVM rules (as close as possible).
The main invariant that emulation aims to preserve:
❗ Behavior inside emulated EVM environment (i.e. not only within one contract, but during any sort of EVM <> EVM contracts interaction chain) is the same as it would’ve been on widespread EVM implementation (Geth, REVM, etc.).
Note, that during EraVM <> EVM or EVM <> EraVM contract interaction can be different, but it is expected that this interaction does not break major security invariants.
❗ The EVM environment is agnostic about EraVM.
⚠️ This document is meant to cover the high level of the EVM emulation design as well as some of its rough edges and is not meant to be a full specification of it. A proper understanding of the EVM emulation requires reading the corresponding comments in the contracts code.
Prerequisites
This document requires that the reader is aware of ZKsync Era internal design. General docs: Developer reference
The emulator related changes actively use some features of EraVM, including:
- Kernel space and user space addresses. Everything with address < 2^16 (kernel space) is considered as system contract with some special capabilities.
- Difference between system and non-system calls. Call to the contract in kernel space can be explicitly marked as system call. Some methods in system contracts allow only system calls to prevent accidental use of various system functions.
- Fat pointers. EraVM has different memory model, actively using pointers instead of copying memory. So calldata / returndata usually not a copy, but just create an immutable pointer to some region of memory. These pointers can be manipulated (but not the memory behind them) - for example, by shrinking the memory area or clearing the pointer completely.
- Verbatim instructions and other compiler-specific instructions. In some cases we want to use some EraVM-specific functionality in Solidity or Yul. These languages do not have suitable instructions, and for this reason we use
verbatiminstructions (note: it has different meaning compared to usual Yul) or pseudocalls to predefined system addresses. In both cases, zksolc replaces these instructions with the corresponding functionality.
The target version of EVM is Cancun.
EVM emulator: differences from EVM (Cancun)
Internals of deploying EVM contract
EVM contracts can be deployed with a transaction without field to (as in Ethereum). In this case data field will be interpreted as init code for the constructor.
Additionally EVM contracts can be deployed from EraVM environment using system call to the following functions in ContractDeployer system contract:
createEVM-CREATE-like behaviorcreate2EVM-CREATE2-like behavior
They use the same address derivation schemes as corresponding EVM opcodes. To derive the deployed contract’s address for EOAs we use the main nonce for this operation, while for contracts we use their deployment nonce. You can read more about the two types of nonces in the NonceHolder system contract’s documentation.
❗ Note, that these two functions are not used (and can’t be used!) from the EVM environment. EVM smart contracts can’t perform system calls. EVM opcodes CREATE and CREATE2 should be used instead.
EvmEmulator internally uses precreateEvmAccountFromEmulator and createEvmFromEmulator functions to guarantee the same creation flow as in EVM.
Once the address for the deployed EVM contract is derived, next steps are:
- Set the dummy bytecode hash, marked as EVM one, onto the derived address. This will ensure that the
EvmEmulatorbytecode will be invoked during the constructor call. - Execute the constructor branch of the
EvmEmulator. After obtaining the initCode from the calldata, the interpreter interprets it as a normal EVM bytecode. - EvmEmulator constructor returns to the ContractDeployer EVM gas left and final bytecode, which should be deployed.
After creation, the deployedBytecode is saved and any call to the created contract will use the EVM emulator, which loads and executes the corresponding EVM bytecode.
New type of versioned code hash
In EraVM we use special versioned hash format for interacting with bytecodes: it is a 32-byte value with the following structure (indexed in bytes):
- hash[0] — version (0x01 for EraVM)
- hash[1] — whether the contract is being constructed
- hash[2..3] — big endian length of the bytecode in 32-byte words. This number must be odd.
- hash[4..31] — the last 28 bytes of the sha256 hash of the bytecode.
For each native EraVM contract with address A this version hash is stored under the key A inside the AccountCodeStorage system contract. Whenever a call is performed to an address A, the EraVM will read its versioned bytecode hash, check its correct versioned format and “unpack” the bytecode that corresponds to that versioned hash inside the code memory page.
Also that versioned hash value is used as extcodehash value in EraVM context (but not in the EVM context!).
In order to support EVM bytecode, we introduced a new hash version for EVM contracts (0x02):
- hash[0] — version (0x02 for EVM)
- hash[1] — whether the contract is being constructed
- hash[2..3] — big endian length of the raw EVM bytecode in bytes.
- hash[4..31] — the last 28 bytes of the sha256 hash of the padded EVM bytecode.
Versioned hash value is not used as extcodehash value of EVM contracts in EVM context.
Besides the version, these formats are different in the fact that the first version stored the length of the bytecode in 32-byte words, while the second one does it in bytes. This was done mostly for historical reasons during the development of this version. However, it perfectly fits the maximal allowed bytecode size for an EVM contract (i.e. 24,576 bytes can easily fit into the 2^16 - 1 bytes).
EraVM now has the following logic whenever a contract with address A is called:
The first 3 steps are the same as pre-EVM emulator:
- It reads the versioned hash of the bytecode under the key
Ainside the AccountCodeStorage system contract. - If it is empty, it invokes DefaultAccount.
- If it has version 1, it treats it as a native EraVM contract, and uses the preimage for this versioned hash as EraVM bytecode for the contract.
But now we have the new path: if it has version 2, it interprets it as a EVM contract, and uses the bytecode of EvmEmulator as the EraVM bytecode of the contract.
Note, that while for native contracts the knowledge of the preimage for the versioned hash is crucial (since it is the bytecode that will be used), for bytecodes with version 2 it does not really matter since EvmEmulator is the bytecode that will be used. This is why when we are constructing a contract, we put a temporary “dummy” versioned hash, the job of which is only to ensure that the EvmEmulator is the one executing its logic.
Support for null to address in contract creation transactions
Before we did not allow null to be a valid address for type 0-2 transactions. This was not needed since EVM-like CREATE was not supported. With EVM emulator, we allow CREATE operations from EOA, similar to Ethereum. These have _transaction.reserved[1] field as non-zero.
EraVM → EVM calls internal overview
Whenever a EraVM contract calls an EVM one (note that, the first contract to be ever executed is bootloader written in EraVM code, so execution of EVM contracts always starts by being called by a EraVM one), the following steps happen:
- Once the EraVM sees that the callee has versioned hash with version 2, it uses
EvmEmulatoras the “EraVM” bytecode for this contract’s frame. Note, thatthisaddress is the address of the contract itself, i.e. all thesstoreoperations will be performed against the storage of the interpreted contract. - The only public function provided by
EvmEmulatoris fallback, so the execution will start there. - We calculate the amount of EVM gas that is given to this frame. Note, that since each EVM opcode has to be emulated by EraVM, each EVM gas necessarily costs several EraVM one (ergs). We currently use a linear ratio to calculate the amount of received EVM gas.
- Then, the emulation starts as usual and the
returndatais returned via standard EraVM means.
EVM → EraVM calls internal overview
Whenever a EVM contract calls an EraVM one it is treated as simple native EraVM call. The EVM gas passed from EVM environment is converted into ergs using a fixed ratio.
Ensuring the same behavior within EVM context
In the previous sections we’ve discussed on how to deploy an EVM contract and how to call one. Next we will discuss some special aspects of emulation.
❗ remember, that our EVM is emulated and for each EVM frame there is a corresponding EraVM one
Static calls
The isStatic context is set off by EraVM for calls to EVM contracts. Emulator gets info whether context is static or non-static from call flags. This is needed because EvmGasManager need to perform writes to transient storage to emulate cold/warm access mechanics for accounts and storage slots.
Thus, it is entirely up to the emulator to ensure that no other state changes occur in the static execution mode.
Context parameters
While most of the context parameters (this/msg.sender/msg.value, etc) are used as is, some have to be explicitly maintained by the EvmEmulator:
gas(as EVM gas rules need to be applied)is_static(more on it in the section about static context)- The entire set of warm/cold slots and addresses is maintained by the
EvmGasManagersystem contract.
Managing storage
For managing storage we reuse the same primitives that EraVM provides:
SSTORE/SLOAD,TSTORE/TLOADare done using the same opcodes as EraVM- Whenever there is a need to revert a frame, we reuse the same
REVERTopcode as used by EraVM.
EvmGasManager
Managing hot/cold storage slots & accounts
Whenever an account is accessed for the first time on EVM, the users are charged extra for the I/O costs incurred by it. Also, additional costs are incurred for state growth (when a slot goes from 0 to some other values).
To support the same behavior as on EVM, we maintain a registry of whether a slot or account is warm or cold. This registry is located in the EvmGasManager system contract. In order to ensure that this registry gets erased after each transaction, transient storage is used for it.
By default, the following addresses are considered hot:
- Called EVM contract
- msg.sender (caller of the EVM contract)
- tx.origin
- coinbase
- precompiles
EVM frames
As already mentioned, for warm/cold storage/account management to work, the isStatic context has to be put off. However, we need to somehow preserve the knowledge about the fact that the context is static. Also, we need to ensure that EVM contracts get the exact correct gas amount if called by an EVM contract.
Thus, whenever an EVM call happens, the following functions in EvmGasManager are called by the emulator:
- (Parent frame, before the call)
pushEVMFrame. It sets info about new EVM frame to the transient storage including amount of EVMgasin that frame as well as theisStaticcontext flag. - (Child frame, start of the execution) Whenever an EVM contract is called, it calls
EvmGasManager.consumeEvmFrame. If new EVM frame was pushed previously, it will return info about that frame and mark it as consumed. Returned info contains EVM gas andisStaticflag. - In case of revert. (Parent frame, right after the call) When an EVM call finishes with revert,
EvmGasManager.resetEVMFrameis used. Note, that if there is a revert of the parent frame for some reason before/duringEvmGasManager.resetEVMFrame, the frame will be “popped” implicitly since all the changes of the parent frame will be reverted, includingEvmGasManager.pushEVMFrame.
Calldata & returndata internals
EVM <> EraVM
EraVM contracts are expected to know nothing about the EVM emulation and so when a EraVM contract calls an EVM one, it provides just normal calldata “as-is”. The same happens when an EVM contract finishes the call when the caller was a EraVM contract: the returndata is returned “as-is” without any further modifications.
EVM <> EVM
Whenever an EVM contract calls another one, it passes the calldata “as-is”. The “correct” EVM gas and the isStatic flags are passed inside the EVMGasManager as mentioned above.
However, returning data is more complicated. Whenever an EVM contract needs to return the data and the caller was another EVM contract, the tuple of (gas_left, true_returndata) is returned.
Out-of-ergs situation
The actual cost of executing instructions differs from the fixed ratio between the EVM gas and the EraVM gas. For this reason, situations are possible in which emulator has enough EVM gas to continue execution, but encounters out-of-ergs panic. In this case we simply propagate special internal kind of panic and revert the whole EVM frames chain.
❗ EVM emulation can only be executed completely, up to returning from the EVM context (incl. EVM reverts), or completely rolled back.
This does not happen when calling native contracts. For this reason, the possible out-of-ergs panic must be taken into account when calling native contracts from EVM environment. Technically, this problem is one of the versions of classic gas-griefing vulnerabilities in EVM contracts, if not handled appropriately.
Caveats about EVM contract deployment internals
We want to support the same logic for EVM contract deployment as Ethereum. This, for instance, includes that a failed deploy should still increase the nonce of a contract, which is not the case on Era EraVM: differences-with-ethereum nonces.
For this, for EVM<>EVM deployments have two big steps: precheck and deploy.
The flow of EVM <> EVM deployment is the following:
- The EVM emulator checks the memory offsets are valid. Also it checks that size of initCode is valid and charges dynamic gas costs. In case of error creator frame is reverted consuming all remaining EVM gas.
- The EVM emulator checks that the
valueis valid. Otherwise creation considered as failed, all passed EVM gas refunded. Caller frame is not reverted. - The EVM emulator calls the
ContractDeployer.precreateEvmAccountFromEmulator. This call derives new contract address and performs collision check. If it fails, creation is considered as failed, all passed EVM gas consumed. Caller frame is not reverted. - The EVM emulator creates a new
EVMFrame, and calls theContractDeployer.createEvmFromEmulator. This call should fail only if constructor of the new contract was reverted. - The
ContractDeployersets a dummy version 2 hash on the deployed address to ensure that when it will be called, theEvmEmulatorwill be activated. - The
EvmEmulator’s constructor is invoked. The initCode is passed inside the calldata.
Then, there are three cases
- If the execution of the initCode is successful, the
EvmEmulatorwill pad the new bytecode to the correct form for the code oracle and return to the ContractDeployer system contract together with remaining EVM gas. This will publish the deployed contract’s bytecode and set the correct code hash for the account. - If the execution is not successful, the standard
revertwill be used and propagated. If the deployer is an EVM contract, the pair of(gas_left, returndata)will be returned. - If the execution failed due to
out-of-ergs, aborting panic will be propagated.
Notes on the architecture of the EvmEmulator
Memory layout
The EVM emulator has the following areas in memory:
- First 23 slots are used as scratch space. They are dedicated for temporary data, e.g. when emulator needs to make a call to some other contract.
- Next 9 slots are used to cache fixed context values.
- Next slot is used to store the size of the last returndata
- Next 1024 slots are dedicated for the EVM stack.
- Next slot is used to store the bytecode size of executing contract
- Next
MAX_POSSIBLE_ACTIVE_BYTECODEbytes are used to store active bytecode. This value is 24576 for deployed contracts and 24576*2 for initCode in constructor. - Next slot is empty. It is needed to simplify PUSH N opcodes
- Next slot is used to store the size of memory used in EVM
- All the memory after that is used as the EVM memory, i.e. all
mload/mstoreoperations that are done by the user are performed at that location.
For returndata we keep returned fat pointer as active and copy from it if needed.
Managing returndata & calldata
For calldata we just reuse the standard calldata available inside the interpreter.
However for returndata the situation is a bit harder. Let’s imagine the following scenario:
- The EVM contract performs a call to some contract. Now the returndata is
R. - Then the user tries to read a storage slot. This means that the interpreter will have to call
EvmGasManager.warmSlot. Now, as far as the EraVM code of the interpreter is concerned, the returndata isR2.
If a user inside the EVM will ask to provide the returndata, we need to provide R and not R2. That’s why we use the active pointer feature of the zksolc compiler and we store the “correct” EVM returndata in the active pointer, allowing us to ensure that the returndata will always behave the same as on EVM.
Aborting the whole EVM execution frames chain
If any EVM emulator frame returns with unexpected amount of returndata (e.g. revert(0, 0) or out-of-ergs) it will be treated by caller EVM frame as abort signal and propagated. Thus, the whole EVM calls chain should revert.
Limitations
EraVM <> EVM delegatecalls
Calls between EraVM and EVM calls are supported, but delegatecalls are not. Since it would compromise the features that only should be allowed for the interpreter itself (e.g. warming slots). Our VM limitations doesn’t allow us to enable cross-VM delegate calls at this step.
Other differences from EVM and limitations
More detailed info about differences from EVM and limitations: Differences from EVM (Cancun)
General differences from Ethereum
This feature allows EVM emulation on top of EraVM. This mode is not fully equivalent to native EVM and is limited by the EraVM design. This page describes the known differences between emulation and EVM (Cancun).
Gas behavior differences
- EVM emulation is executed on top of EraVM and all transactions start in EraVM environment. So gas and gaslimit values signed in the transaction correspond to the native EraVM gas, not EVM gas. For that reason presigned/keyless transactions created for Ethereum may be not compatible with ZK Chains. For detailed info: Gas emulation.
- Our “Intrinsic gas costs” are different from EVM.
- We do not implement the gas refunds logic from EVM. Because users pay for EraVM gas and EVM gas is virtual, we use EraVM gas refunds logic instead of EVM one. It does not affect contracts behavior (refunds happen in the end of transaction).
- We do not charge EVM gas for tx calldata.
- Access lists are not supported (EIP-2930).
Limitations
DELEGATECALLbetween EVM and native EraVM contracts will be reverted.- Calls to empty addresses in kernel space (address < 2^16) will fail.
GASLIMITopcode returns the same fixed constant as EraVM and should not be used.
Unsupported opcodes:
CALLCODESELFDESTRUCTBLOBHASHBLOBBASEFEE
Precompiles
EVM emulation supports the same precompiles that are supported by EraVM.
Technical differences
These changes are unlikely to have an impact on the developer experience.
Differences:
JUMPDESTanalysis is simplified. It is not checked thatJUMPDESTis not a part ofPUSHinstruction.- No force of call stack depth limit. It is implicitly implemented by 63/64 gas rule.
- Account storage is not destroyed during contract deployment.
- If the deployer’s nonce is overflowed during contract deployment, all passed gas will be consumed. EVM refunds all passed gas to the caller frame.
- Nonces are limited by size of
u128, notu64 - During creation of EVM contract by EOA or EraVM contract, emulator does not charge additional
2gas for every 32-byte chunk ofinitcodeas specified in EIP-3860 (since performJUMPDESTanalysis is simplified). This cost is charged if contract is created by another EVM contract (to keep gas equivalence). - Code deposit cost is charged from constructor frame, not caller frame. It will be changed in the future.
- Only those accounts that are accessed from an EVM environment become warm (including origin, sender, coinbase, precompiles). Anything that happens outside the EVM does not affect the warm/cold status of the accounts for EVM.
EVM gas emulation overview
The gas model can be one of the most tricky topics regarding EVM emulation since there are two interacting executions are supported at the same time. This document is intended to explain in more detail how the emulation of the EVM gas works.
EVM emulation execution flow
From the point of view of EraVM, the EVM emulator is (almost) a regular EraVM contract. This contract is predefined and can be changed only during protocol upgrades. When an EVM contract is called, EraVM invokes the emulator code. The emulator loads the corresponding EVM bytecode and interprets it.
Thus, the emulation is executed on top of EraVM, uses EraVM opcodes and, most importantly, pays for EraVM operations in native gas (ergs).
⚠️ To avoid confusion, native EraVM gas will be referred to as “ergs” further in the text.
This means that ergs are used to pay for all operations on EraVM (and therefore on ZK Chains). Gas and gaslimit values signed in user’s transactions are specified in ergs. All refunds are also made by the virtual machine in ergs.
EVM gas model emulation
Full EVM gas equivalence is necessary to provide an EVM-compatible environment and meet the assumptions made in contracts. However, the cost of EraVM operations differs, and EVM emulation requires multiple EraVM operations for each EVM operation. As a result, we emulate the EVM gas model.
As mentioned in the previous section, the EVM environment is virtual: it operates on top of EraVM and incurs costs for execution in EraVM ergs. The EVM emulator, however, has its own internal gas accounting system that corresponds to the EVM gas model. Each EVM opcode consumes a predefined amount of gas, according to the EVM specification. And if there is insufficient gas for an operation, the frame will be reverted.
⚠️ EVM gas is used only for compatibility in the EVM emulation mode. Underlying virtual machine is not aware about EVM gas and uses native ergs.
Ergs to gas conversion rate for gas limit
EVM gas units are not equivalent to EraVM ergs. And both the EVM and EraVM do not provide mechanisms for an EOA or contract to specify how to convert gas from one unit to another. For practical use in the emulator, a predefined constant is used to convert gas limit from one unit to another.
⚠️ Current EraVM -> EVM gas limit conversion ratio is 5:1.
This means that if a user made a call to an EVM contract with 100,000 ergs, the EVM emulator will start execution with 20,000 EVM gas. At the same time, underlying EraVM will have all 100,000 ergs available for use and will refund any unused ergs at the end of transaction.
In the other direction, when calling an EraVM contract from EVM context, if 20,000 gas is provided, the emulator will try to pass 100,000 ergs (or less, if amount of ergs left is not enough).
Out-of-ergs situation
Because EVM gas is virtual and it is not equivalent to EraVM ergs, situations are possible in which emulator has enough EVM gas to continue execution, but encounters out-of-ergs panic from EraVM. In this case we simply propagate special internal kind of panic and revert the whole EVM frames chain.
⚠️ EVM emulation can only be executed completely, up to returning from the EVM context (incl. EVM reverts), or completely rolled back.
This fact should be taken into account by smart contract developers:
❗It is highly discouraged to use try-catch patterns with unknown contracts in EVM environment❗
Technically, this problem is similar to classic gas-griefing issues in EVM contracts, if not handled appropriately.
EVM predeploys
Some important EVM contracts can be deployed to predefined addresses if EVM emulation is enabled on the chain. It can be done using DeployEvmPredeploys.s.sol script.
List of contracts:
- Create2 proxy
0x4e59b44847b379578588920cA78FbF26c0B4956C - Create2 deployer
0x13b0D85CcB8bf860b6b79AF3029fCA081AE9beF2 - ERC2470 singleton factory
0xce0042B868300000d44A59004Da54A005ffdcf9f - Safe Singleton Factory
0x914d7Fec6aaC8cd542e72Bca78B30650d45643d7 - Multicall3
0xcA11bde05977b3631167028862bE2a173976CA11 - Create2 proxy
0x7A0D94F55792C434d74a40883C6ed8545E406D12
Upgrade history
Gateway upgrade changes
Introduction & prerequisites
This document assumes that the reader has general knowledge of how ZKsync Era works and how our ecosystem used to be like at the moment of shared bridge in general.
For more info about the previous one, you can reach out to the following documentation:
Code4rena Documentation Smart contract Section
Changes from the shared bridge design
This section contains some of the important changes that happened since the shared bridge release in June. This section may not be fully complete and additional information will be provided in the sections that cover specific topics.
Bridgehub now has chainId → address mapping
Before, Bridgehub contained a mapping from chainId => stateTransitionManager. The further resolution of the mapping
should happen at the CTM level. For more intuitive management of the chains, a new mapping
chainId => hyperchainAddress was added. This is considered more intuitive since “bridgehub is the owner of all the
chains” mentality is more applicable with this new design.
The upside of the previous approach was potentially easier migration within the same CTM. However, in the end it was decided that the new approach is better.
Migration
This new mapping will have to be filled up after upgrading the bridgehub. It is done by repeatedly calling the
setLegacyChainAddress for each of the deployed chains. It is assumed that their number is relatively low. Also, this
function is permissionless and so can be called by anyone after the upgrade is complete. This function will call the old
CTM and ask for the implementation of the chainId.
Until the migration is done, all transactions with the old chains will not be working, but it is a short period of time.
baseTokenAssetId is used as a base token for the chains
In order to facilitate future support of any type of asset a base token, including assets minted on L2, now chains will
provide the assetId for their base token instead. The derivation & definition of the assetId is expanded in the CAB
section of the doc.
Migration & compatibility
Today, there are some mappings of sort chainId => baseTokenAddress. These will no longer be filled for new chains.
Instead, only assetId will be provided in a new chainId => baseTokenAssetId mapping.
To initialize the new baseTokenAssetId mapping the following function should be called for each chain:
setLegacyBaseTokenAssetId. It will encode each token as the assetId of an L1 token of the Native Token Vault. This
method is permissionless.
For the old tooling that may rely on getters of sort getBaseTokenAddress(chainId) working, we provide a getter method,
but its exact behavior depends on the asset handler of the setLegacyBaseTokenAssetId, i.e. it is even possible that
the method will revert for an incompatible assetId.
L2 Shared bridge (not L2AssetRouter) is deployed everywhere at the same address
Before, for each new chain, we would have to initialize the mapping in the L1SharedBridge to remember the address of the l2 shared bridge on the corresponding L2 chain.
Now, however, the L2AssetRouter is set on the same constant on all chains.
L2SharedBridgeLegacy
Note, that for the chains that contained the L2SharedBridge before the upgrade, it will be upgraded to the
L2SharedBridgeLegacy code. The L2AssetRouter will have the same address on all chains, including old ones.
StateTransitionManager was renamed to ChainTypeManager
CTM was renamed to CTM (ChainTypeManager). This was done to use more intuitive naming as the chains of the same “type” share the same CTM.
Hyperchains were renamed to ZK chains
For consistency with the naming inside the blogs, the term “hyperchain” has been changed to “ZK chain”.
Changes in the structure of contracts
While fully reusing contracts on both L1 and L2 is not always possible, it was done to a very high degree as now all
bridging-related contracts are located inside the l1-contracts folder.
Priority tree
Migrating Priority Queue to Merkle Tree
In the currently deployed system, L1→L2 transactions are added as a part of a priority queue, i.e. all of them are stored 1-by-1 on L1 in a queue-like structure.
Note, that the complexity of chain migrations in either of the directions depends on the size of the priority queue.
However, the number of unprocessed priority transactions is potentially out of hands of both the operator of the chain
and the chain admin as the users are free to add priority transactions in case there is no transactionFilterer
contract, which is the case for any permissionless system, such as ZKsync Era.
If someone tries to DDoS the priority queue, the chain can be blocked from migration. Even worse, for GW→L1 migrations, inability to finalize the migration can lead to a complete loss of chain.
To combat all the issues above, it was decided to move from the priority queue to a priority tree, i.e. only the incremental merkle tree is stored on L1, while at the end of the batch the operator will provide a merkle proof for the inclusion of the priority transactions that were present in the batch. It does not impact the bootloader, but rather only how the L1 checks that the priority transactions did indeed belong to the chain
Custom DA layers
Custom DA layer support was added.
Major changes
In order to achieve CAB, we separated the liquidity managing logic from the Shared Bridge to Asset Handlers. The basic
cases will be handled by Native Token Vaults, which are handling all of the standard ERC20 tokens, as well as ETH.
L1<>L2 token bridging considerations
- We have the L2SharedBridgeLegacy on chains that are live before the upgrade. This contract will keep on working, and
where it exists it will also be used to:
- deploy bridged tokens. This is so that the l2TokenAddress keeps working on the L1, and so that we have a predictable address for these tokens.
- send messages to L1. On the L1 finalizeWithdrawal does not specify the l2Sender. Legacy withdrawals will use the legacy bridge as their sender, while new withdrawals would use the L2_ASSET_ROUTER_ADDR. In the future we will add the sender to the L1 finalizeWithdrawal interface. Until the current method is deprecated we use the l2SharedBridgeAddress even for new withdrawals on legacy chains. This also means that on the L1 side we set the L2AR address when calling the function via the legacy interface even if it is a baseToken withdrawal. Later when we learn if it baseToken or not, we override the value.
- We have the finalizeWithdrawal function on L1 AR, which uses the finalizeDeposit in the background.
- L1→L2 deposits need to use the legacy encoding for SDK compatibility.
- This means the legacy finalizeDeposit with tokenAddress which calls the new finalizeDeposit with assetId.
- On the other hand, new assets will use the new finalizeDeposit directly
- The originChainId will be tracked for each assetId in the NTVs. This will be the chain where the token is originally native to. This is needed to accurately track chainBalance (especially for l2 native tokens bridged to other chains via L1), and to verify the assetId is indeed an NTV asset id (i.e. has the L2_NATIVE_TOKEN_VAULT_ADDR as deployment tracker).
Upgrade process in detail
You can read more about the upgrade process itself here.
The upgrade process to the new version
Gateway system introduces a lot of new contracts and so conducting so to provide the best experience for ZK chains the multistage upgrade will be provided. The upgrade will require some auxiliary contracts that will exist only for the purpose of this upgrade.
Previous version
The previous version can be found here.
The documentation for the previous version can be found here.
However, deep knowledge of the previous version should not be required for understanding. But this document does require understanding of the new system, so it should be the last document for you to read.
Overall design motivation
During design of this upgrade we followed two principles:
- Trust minimization. I.e. once the voting has started, no party can do damage to the upgrade or change its course. For instance, no one should be able to prevent a usable chain from conducting the upgrade to the gateway.
- Minimal required preparation for chains. All of the required contracts for the upgrade (e.g. rollup L2DA validator, etc) will be deployed during the upgrade automatically. This allows to minimize risks of mistakes for each individual chain.
There are four roles that will be mentioned within this document:
- “Governance” — trusted entity that embodies the whole decentralized voting process for ZK chain ecosystem.
- “Ecosystem admin” — relatively trusted role for non-critical operation. It will be typically implemented as a multisig, that is approved by the governance and can only do limited operations to facilitate the upgrade. It can not alter the content of the upgrade nor it should be able to somehow harm chains by weaponizing the upgrade.
- “Chain admin” — an admin of a ZK chain. An entity with limited ability to govern their own chain (they can choose who are the validators of the chain, but can not change the general behavior of the their chain).
- “Deployer”. This role may not be mentioned, but it is implicitly present during the preparation stage. This is a hot wallet that is responsible for deploying the implementation of new contracts, etc. The governance should validate all its actions at the start of the voting process and so no trust is assumed from this wallet.
Ecosystem preparation stage
This stage involves everything that is done before the voting starts. At this stage, all the details of the upgrade must be fixed, including the chain id of the gateway.
More precisely, the implementations for the contracts will have to be deployed. Also, all of the new contracts will have
to be deployed along with their proxies, e.g. CTMDeploymentTracker, L1AssetRouter, etc. Also, at this stage, the
bytecodes of L2 contracts are considered fixed, i.e. they should not change.
Ensuring Governance ownership
Some of the new contracts (e.g. CTMDeploymentTracker ) have two sorts of admins: the admin of the their proxy as well
the owner role inside the contract. Both should belong to governance (the former is indirectly controlled by
governance via a ProxyAdmin contract).
The governance needs to know that it will definitely retain the ownership of these contracts regardless of the actions of their deployer. There are multiple ways this is ensured:
- For
TransparentUpgradaeableProxythis is simple: we can just transfer the ownership in one step to theProxyAdminthat is under control of the governance. - For contracts that are deployed as standalone contracts (not proxies), then if we possible we provide the address of the owner of in the constructor.
- For proxies and for contracts for which transferring inside the constructor is not option, we would transfer the
ownership to a
TransitionaryOwnercontract. This is a contract that is responsible for being a temporary owner until the voting ends and it can do only two things: accept ownership for a contract and atomically transfer it to the governance. This is a workaround we have to use since most of our contracts implementOwnable2Stepand so it is not possible to transfer ownership in one go.
PS: It may be possible that for more contracts, e.g. some of the proxies we could’ve avoided the TransitionaryOwner
approach by e.g. providing the governance address inside of an initializer. But we anyway need the TransitionaryOwner
for ValidatorTimelock, so we decided to use it in most places to keep the code simpler. Also, some contracts will use
Create2AndTransfer contract that deploys a contract and immediately transfers ownership to the governance.
L2SharedBridge and L2WETH migration
In the current system (i.e. before the gateway upgrade), the trusted admin of the L1SharedBridge is responsible for setting the correct L2SharedBridge address for chains (note that the links points to the old code). This is done with no additional validation. The system is generally designed to protect chains in case when a malicious admin tries to attack a chain. There are two measures to do that:
- The general assumption is that the L2 shared bridge is set for a chain as soon as possible. It is a realistic assumption, since without it no bridging of any funds except for the base token is possible. So if at an early stage the admin would put a malicious l2 shared bridge for a chain, it would lose its trust from the community and the chain should be discarded.
- Admin can not retroactively change L2 shared bridge for any chains. So once the correct L2 shared bridge is set, there is no way a bad admin can harm the chain.
The mapping for L2SharedBridge will be used as a source for the address of L2SharedBridgeLegacy contract address
during the migration.
To correctly initialize the L2NativeTokenVault inside the gateway upgrade, we will need the address of the L2 Wrapped
Base Token contract
as well
(note that the link is intentionally for the current codebase to show that these are deployed even before the upgrade).
The data to execute the upgrade with is gathered on L1, so we need to create a mapping on L1 from
chainId => l2WrappedBaseToken. This is what the L2WrappedBaseTokenStore contract for.
Some chains already have L2WrappedBaseToken implementation deployed. It will be the job of the admin of the contract
to prepopulate the contract with the correct addresses of those. The governance will have to double check that for the
existing chains this mapping has been populated correctly before proceeding with the upgrade.
Since we do not want to stop new chain creation while the voting is in progress, the admin needs to have the ability to
add both new L2SharedBridges and the new L2WrappedBaseToken addresses to the mappings above. The following
protections are put in place:
- In case the trusted admin maliciously populated the addresses for any chains that were created before the voting started, the governance should just reject the voting
- In case the trusted admin maliciously populated the addresses for a chain after the voting has ended, the same
assumptions as the ones described for L2SharedBridge apply, i.e. the chain should have its
L2SharedBridgeandL2WrappedBaseTokendeployed asap after the creation of the chain, in case the admin did something malicious, they should immediately discard the chain to prevent loss of value.
Publishing bytecodes for everyone
Before a contract can be deployed with a bytecode, it must be marked as “known”. This includes system contracts. This caused some inconveniences during previous upgrades:
- For each chain we would have to publish all factory dependencies for the upgrade separately, making it expensive and risk-prone process.
- If a chain forgets to publish bytecodes for a chain before it executes an upgrade, there is little way to recover without intervention from the Governance.
This upgrade the different approach is used to ensure safe and riskless preparation for the upgrade:
- All bytecodes that are needed for this upgrade must be published to the
BytecodesSuppliercontract. - The protocol upgrade transaction will have all the required dependencies in its factory deps. During the upgrade they
will be marked as known automatically by the system. The operator of a chain needs to grab the preimages for those
from events emitted by the
BytecodesSupplier. - It will be the job of the governance to verify that all the bytecodes were published to this contract.
Voting stage
Things to validate by the governance
- The L1/L2 bytecodes are correct and the calldata is correct.
- That the correct L2SharedBridge are populated in L1SharedBridge (note that it is a legacy contract from the current system that becomes L1Nullifer in the new upgrade) and that L2WrappedBaseTokenStore has been populated correctly.
- That the ownership is correctly transferred to governance.
- That the bytecodes were published correctly to the
BytecodeSuppliercontract.
Things to sign by the governance
The governance should sign all operations that will happen in all of the consecutive stages at this time. There will be no other voting. Unless stated otherwise, all the governance operations in this document are listed as dependencies for one another, i.e. must be executed in strictly sequential order.
Stage 1. Publishing of the new protocol upgrade
Txs by governance (in one multicall)
- The governance accepts ownership for all the contracts that used
TransitionaryOwner. - The governance publishes the new version by calling
function setNewVersionUpgrade. - The governance sets the new
validatorTimelock. - The governance calls
setChainCreationParamsand sets the new chain creation params to ensure that the chain creation fails. - The governance should call the
GovernanceUpgradeTimer.startTimer()to ensure that the timer for the upgrade starts. It will give the ecosystem’s chains a fixed amount of time to upgrade their chains before the old protocol version becomes invalid.
Impact
The chains will get the ability to upgrade to the new protocol version. They will be advised to do so before the deadline for upgrade runs out.
Also, new chains wont be deployable during this stage due to step (4).
Chains, whether upgraded or not, should work as usual as the new L2 bridging ecosystem is fully compatible with the old L1SharedBridge.
Chain Upgrade flow
Let’s take a deeper look at how upgrading of an individual chain would look like.
Actions by Chain Admins
As usual, the ChainAdmin should call upgradeChainFromVersion. What is unusual however:
- ValidatorTimelock changes and so the admin should call the new ValidatorTimelock to set the old validators there.
- The new DA validation mechanism is there and so the ChainAdmin should set the new DA validator pair.
- If a chain should be a permanent rollup, the ChainAdmin should call the
makePermanentRollup()function.
It is preferable that all the steps above are executed in a multicall for greater convenience, though it is not mandatory.
This upgrade adds a lot of new chain parameters and so these should be managed carefully.
Upgrade flow in contracts
Usually, we would perform an upgrade by simply doing a list of force deployments: basically providing an array of the contracts to deploy for the system. This array would be constant for all chains and it would work fine.
However in this upgrade we have an issue that some of the constructor parameters (e.g. the address of the
L2SharedBridgeLegacy) are specific to each chain. Thus, besides the standard parts of the upgrades each chain also has
ZKChainSpecificForceDeploymentsData populated. Some of the params to conduct those actions are constant and so
populate the FixedForceDeploymentsData struct.
If the above could be composed on L1 to still reuse the old list of (address, bytecodeHash, constructorData) list,
there are also other rather complex actions such as upgrading the L2SharedBridge to the L2SharedBridgeLegacy
implementation that require rather complex logic.
Due to the complexity of the actions above, it was decided to put all those into the
L2GatewayUpgrade
contract. It is supposed to be force-deployed with the constructor parameters containing the
ZKChainSpecificForceDeploymentsData as well as FixedForceDeploymentsData. It will be forcedeployed to the
ComplexUpgrader’s address to get the kernel space rights.
So most of the system contracts will be deployed the old way (via force deployment), but for more complex thing the
L2GatewayUpgrade will be temporarily put onto ComplexUpgrader address and initialize additional contracts inside the
constructor. Then the correct will be put back there.
So entire flow can be summarized by the following:
- On L1, when
AdminFacet.upgradeChainFromVersionis called by the Chain Admin, the contract delegatecalls to the GatewayUpgrade contract. - The
GatewayUpgradegathers all the needed data to compose theZKChainSpecificForceDeploymentsData, while theFixedForceDeploymentsDatais part is hardcoded inside the upgrade transaction. - The combined upgrade transaction consists of many forced deployments (basically tuples of
(address, bytecodeHash, constructorInput)) and one of these that is responsible for the temporaryL2GatewayUpgradegets itsconstructorInputset to contain theZKChainSpecificForceDeploymentsData/FixedForceDeploymentsData. - When the upgrade is executed on L2, it iterates over the forced deployments, deploys most of the contracts and then
executes the
L2GatewayUpgrade. L2GatewayUpgradewill deploy the L2 Bridgehub, MessageRoot, L2NativeTokenVault, L2AssetRouters. It will also deploy l2WrappedBaseToken if missing. It will also upgrade the implementations the L2SharedBridge as well as the UpgradaeableBeacon for these tokens.
Stage 2. Finalization of the upgrade
Txs by governance (in one multicall)
- call the
GovernanceUpgradeTimerto check whether the deadline has passed as only after that the upgrade can be finalized. - set the protocol version deadline for the old version to 0, i.e. ensuring that all the chains with the old version wont be able to commit any new batches.
- upgrade the old contracts to the new implementation.
- set the correct new chain creation params, upgrade the old contracts to the new one
Txs by anyone
After the governance has finalized the upgrade above, anyone can do the following transactions to finalize the upgrade:
For each chainId:
Bridgehub.setLegacyBaseTokenAssetIdBridgehub.setLegacyChainAddress
For each token:
- register token inside the L1NTV
For each chain/token pair:
- update chain balances from shared bridge for L1NTV
The exact way these functions will be executed is out of scope of this document. It can be done via a trivial multicall.
Impact
The ecosystem has been fully transformed to the new version.
Security notes
Importance of preventing new batches being committed with the old version
The new L1AssetRouter is not compatible with chains that do not support the new protocol version as they do not have
L2AssetRouter deployed. Doing bridging to such chains will lead to funds being lost without recovery (since formally
the L1->L2 transaction won’t fail as it is just a call to an empty address).
This is why it is crucial that on step (2) we revoke the ability for outdated chains to push new batches as those
might’ve been spawned using the L1AssetRouter.
V27 EVM emulation upgrade
Upgrade process
The V27 upgrade happened after the gateway preparation upgrade, but before the gateway was deployed. As such the upgrade process did not involve the Gateway parts (upgrading the CTM on GW, etc), it was an L1-only upgrade.
Additionally this was not a bridge upgrade, as the bridge and ecosystem contracts didn’t have new features, so L1<>L2 bridging was not affected. This meant that only the system components, the Verifiers, Facets and L2 contracts needed to be upgraded.
The upgrade process was as follows:
- deployed new contract implementations.
- published L2 bytecodes
- generated upgrade data
- forceDeployments data on L2. Contains all new System and L2 contracts.
- new genesis diamondCut (which contains facetCuts, and genesis forceDeployments, as well as init data)
- upgradeCut (which contains facetCuts, and upgrade forceDeployments, as well as upgrade data)
- prepared ecosystem upgrade governance calls:
- stage 0:
- paused gateway migrations (needed on CTM even though GW was not yet deployed)
- stage 1:
- upgraded proxies for L1 contracts.
- CTM:
- set new ChainCreationParams (-> contains new genesis upgrade cut data)
- set new version upgrade (-> contains new upgrade cut data)
- stage 2:
- unpaused gateway migrations
- stage 0:
Read more here: Upgrade process document
Changes
New features
- EVM emulation, system contracts and bootloader
- service transaction on Mailbox
- verifiers: Fflonk and plonk Dual verifiers
- identity precompile
- new TUPP contract ServerNotifier
- ChainTypeManager: add setServerNotifier ( used for GW migration)
Bug fixes
- GW send data to L1 bug in Executor
- safeCall tokenData on L2.
- Token registration
- Bridgehub: registerLegacy onlyL1 modifier
Token registration
- L1Nullifier → small check added in token registration
- L1AssetRouter: → small check in token registration
- L1NTV: token registration
- L2AssetRouter: token registration check
- L2NTV: token registration
Changed without need for upgrade
- AssetRouterBase → casting, no need
- L1ERC20Bridge → comment changes, don’t change
- CTMDeploymentTracker: changed error imports only, do not upgrade.
- Relayed SLDA validator version, deployed on GW, nothing to upgrade.
Intro to ZKsync’s ZK
This page is specific to our cryptography. For a general introduction, please read: https://docs.zksync.io/build/developer-reference/rollups.html
As a ZK rollup, we want everything to be verified by cryptography and secured by Ethereum. The power of ZK allows for transaction compression, reducing fees for users while inheriting the same security.
ZK Proofs allow a verifier to easily check whether a prover has done a computation correctly. For ZKsync, the prover will prove the correct execution of ZKsync’s EVM, and a smart contract on Ethereum will verify the proof is correct.
In more detail, there are several steps.
- Witness generation: witness generation can be perceived as part of the process where the user (prover) generates proof of transaction validity. For instance, when a user initiates a transaction, a corresponding witness is generated, which serves as proof that the transaction is valid and adheres to the network’s consensus rules. The zero-knowledge aspect ensures that the witness reveals no information about the transaction’s specifics, maintaining user privacy and data security. New transactions are proved in batches. These batches will be processed and sent to the circuits.
- Circuits: Our virtual machine needs to prove that the execution was completed correctly to generate proofs correctly. This is accomplished using circuits. In order for proofs to work, normal code logic must be transformed into a format readable by the proof system. The virtual machine reads the code that will be executed and sorts the parts into various circuits. These circuits then break down the parts of code, which can then be sent to the proof system.
- Proof system: We need a proof system to process the ZK circuit. Our proving system is called Boojum.
Here are the different repositories we use:
- Boojum: Think of this as the toolbox. It holds essential tools and parts like the prover (which helps confirm the circuit’s functionality), verifier (which double-checks everything), and various other backend components. These are the technical bits and pieces, like defining Booleans, Nums, and Variables that will be used in the circuits.
- zkevm_circuits: This is where we build and store the actual circuits. The circuits are built from Boojum and designed to replicate the behavior of the EVM.
- zkevm_test_harness: It’s like our testing ground. Here, we have different tests to ensure our circuits work correctly. Additionally, it has the necessary code that helps kickstart and run these circuits smoothly.
What is a circuit
ZK circuits get their name from Arithmetic Circuits, which look like this (see picture). You can read the circuit by starting at the bottom with the inputs, and following the arrows, computing each operation as you go.

The prover will prove that the circuit is “satisfied” by the inputs, meaning every step is computed correctly, leading to a correct output.
It is very important that every step is actually “constrained”. The prover must be forced to compute the correct values. If the circuit is missing a constraint, then a malicious prover can create proofs that will pass verification but not be valid. The ZK terminology for this is that an underconstrained circuit could lead to a soundness error.
What do ZKsync’s circuits prove
The main goal of our circuits is to prove correct execution of our VM. This includes proving each opcode run within the VM, as well as other components such as precompiles, storage, and circuits that connect everything else together. This is described in more detail in Circuits
More details
The process of turning code into constraints is called arithmetization. Our arithmetization is based on a variation of “Plonk”. The details are abstracted away from the circuits, but if you’d like to learn more, read about Plonk in Vitalik’s blog or the Plonky2 paper.
More details of our proving system can be found in the Redshift Paper.
Getting Started
Our ZK code is spread across three repositories:
Boojum contains the low level ZK details.
zkevm_circuits contains the code for the circuits.
zkevm_test_harness contains the tests for the circuits.
To get started, run the basic_test from the era-zkevm_test_harness:
rustup default nightly-2023-08-23
cargo update
cargo test basic_test  --release -- --nocapture
This test may take several minutes to run, but you will see lot’s of information along the way!
ZK Terminology
Arithmetization
Arithmetization refers to a technique used in zero-knowledge proof systems, where computations are represented in such a way that they can be efficiently verified by a prover and a verifier. In simpler terms, it is a way to convert computations into polynomial equations so that they can be used in cryptographic proofs.
Builder
The builder helps set up the constraint system. The builder knows the placement strategy for each gate, as well as the geometry and other information needed for building the constraint system.
Circuit
An arithmetic circuit is a mathematical construct used in cryptography to encode a computational problem. It is comprised of gates, with each gate performing an arithmetic operation, for example, such as addition or multiplication. These circuits are essential for encoding statements or computations that a prover wants to prove knowledge of without revealing the actual information.
Constraint
A constraint is a rule or restriction that a specific operation or set of operations must follow. ZKsync uses constraints to verify the validity of certain operations, and in the generation of proofs. Constraints can be missing, causing bugs, or there could be too many constraints, leading to restricted operations.
Constraint degree
The “constraint degree” of a constraint system refers to the maximum degree of the polynomial gates in the system. In simpler terms, it’s the highest power of polynomial equations of the constraint system. At ZKsync, we allow gates with degree 8 or lower.
Constraint system
Constraint system is a mathematical representation consisting of a set of equations or polynomial constraints that are constructed to represent the statements being proved. The system is deemed satisfied if there exist specific assignments to the variables that make all the equations or constraints true. Imagine it as a list of “placeholders” called Variables. Then we add gates to the variables which enforce a specific constraint. The Witness represents a specific assignment of values to these Variables, ensuring that the rules still hold true.
Geometry
The geometry defines the number of rows and columns in the constraint system. As part of PLONK arithmetization, the witness data is arranged into a grid, where each row defines a gate (or a few gates), and the columns are as long as needed to hold all of the witness data. At ZKsync, we have ~164 base witness columns.
Log
We use the word “log” in the sense of a database log: a log stores a list of changes.
Lookup table
Lookup table is a predefined table used to map input values to corresponding output values efficiently, assisting in validating certain relations or computations without revealing any extra information about the inputs or the internal computations. ****Lookup ****tables are particularly useful in ZK systems to optimize and reduce the complexity of computations and validations, enabling the prover to construct proofs more efficiently and the verifier to validate relationships or properties with minimal computational effort. For example, if you want to prove a certain number is between 0 and 2^8, it is common to use a lookup table.
Proof
A proof can refer generally to the entire proving process, or a proof can refer specifically to the data sent from the prover to the verifier.
Prover
In our ZKsync zk-rollup context, the prover is used to process a set of transactions executing smart contracts in a succinct and efficient manner. It computes proofs that all the transactions are correct and ensures a valid transition from one state to another. The proof will be sent to a Verifier smart contract on Ethereum. At ZKsync, we prove state diffs of a block of transactions, in order to prove the new state root state is valid.
Satisfiable
In the context of ZK, satisfiability refers to whether the witness passes - or “satisfies” - all of the constraints in a circuit.
State Diffs
State Diffs, or State Differentials, are the differences in accounts before and after processing transactions contained in a block. For example, if my ETH Balance changes from 5 ETH to 6 ETH, then the state diff for my account is +1 ETH.
Variables
Variables are placeholders in the constraint system until we know the specific witness data. The reason we would want placeholders is because we might want to fill in which constraints we need, before knowing the actual input data. For example, we might know we need to add two numbers and constrain the sum, before we know exactly which two numbers will be in the witness.
Verifier
The Verifier is a smart contract on Ethereum. It will receive a proof, check to make sure the proof is valid, and then update the state root.
Witness
Witness refers to the private, secret information or set of values that the prover possesses and aims to demonstrate knowledge of, without revealing the actual information to the verifier. The witness is the input to the circuit. When we have a circuit, the valid “witness” is the input that meets all the constraints and satisfies everything.
Worker
A worker refers to our multi-threaded proving system. Proving may be “worked” in parallel, meaning that we can execute some operations, like polynomial addition, in parallel threads.
Boojum function: check_if_satisfied
Note: Please read our other documentation and tests first before reading this page.
Our circuits (and tests) depend on a function from Boojum called check_if_satisfied. You don’t need to understand it to run circuit tests, but it can be informative to learn more about Boojum and our proof system.
First we prepare the constants, variables, and witness. As a reminder, the constants are just constant numbers, the variables circuit columns that are under PLONK copy-permutation constraints (so they are close in semantics to variables in programming languages), and the witness ephemeral values that can be used to prove certain constraints, for example by providing an inverse if the variable must be non-zero.
Next we prepare a view. Instead of working with all of the columns at once, it can be helpful to work with only a subset.
.png)
Next we create the paths_mappings. For each gate in the circuit, we create a vector of booleans in the correct shape. Later, when we traverse the gates with actual inputs, we’ll be able to remember which gates should be satisfied at particular rows by computing the corresponding selector using constant columns and the paths_mappings.
.png)
Now, we have to actually check everything. The checks for the rows depend on whether they are under general purpose columns, or under special purpose columns.
General purpose rows:
For each row and gate, we need several things.
- Evaluator for the gate, to compute the result of the gate
- Path for the gate from the paths_mappings, to locate the gate
- Constants_placement_offset, to find the constants
- Num_terms in the evaluator
- If this is zero, we can skip the row since there is nothing to do
- Gate_debug_name
- num_constants_used
- this_view
- placement (described below)
- evaluation function
.png)
Placement is either UniqueOnRow or MultipleOnRow. UniqueOnRow means there is only one gate on the row (typically because the gate is larger / more complicated). MultipleOnRow means there are multiple gates within the same row (typically because the gate is smaller). For example, if a gate only needs 30 columns, but we have 150 columns, we could include five copies fo that gate in the same row.
Next, if the placement is UniqueOnRow, we call evaluate_over_general_purpose_columns. All of the evaluations should be equal to zero, or we panic.
.png)
If the placement is MultipleOnRow, we again call evaluate_over_general_purpose_columns. If any of the evaluations are non-zero, we log some extra debug information, and then panic.
.png)
This concludes evaluating and checking the generalized rows. Now we will check the specialized rows.
.png)
We start by initializing vectors for specialized_placement_data, evaluation_functions, views, and evaluator_names. Then, we iterate over each gate_type_id and evaluator.
.png)
If gate_type_id is a LookupFormalGate, we don’t need to do anything in this loop because it is handled by the lookup table. For all other cases, we need to check the evaluator’s total_quotient_terms_over_all_repetitions is non-zero.
.png)
Next, we get num_terms, num_repetitions, and share_constants, total_terms, initial_offset, per_repetition_offset, and total_constants_available. All of these together form our placement data.
.png)
.png)
Once we know the placement_data, we can keep it for later, as well as the evaluator for this gate.
.png)
We also will keep the view and evaluator name. This is all the data we need from our specialized columns.
To complete the satisfiability test on the special columns, we just need to loop through and check that each of the evaluations are zero.
.png)
.png)
Now we have checked every value on every row, so the satisfiability test is passed, and we can return true.
Boojum gadgets
Boojum gadgets are low-level implementations of tools for constraint systems. They consist of various types: curves, hash functions, lookup tables, and different circuit types. These gadgets are mostly a reference from franklin-crypto, with additional hash functions added. These gadgets have been changed to use the Goldilocks field (order 2^64 - 2^32 + 1), which is much smaller than bn256. This allows us to reduce the proof system.
Circuits types
We have next types with we use for circuits:
Num (Number):
#![allow(unused)]
fn main() {
pub struct Num<F: SmallField> {
    pub(crate) variable: Variable,
    pub(crate) _marker: std::marker::PhantomData<F>,
}
}
Boolean:
#![allow(unused)]
fn main() {
pub struct Boolean<F: SmallField> {
    pub(crate) variable: Variable,
    pub(crate) _marker: std::marker::PhantomData<F>,
}
}
U8:
#![allow(unused)]
fn main() {
pub struct UInt8<F: SmallField> {
    pub(crate) variable: Variable,
    pub(crate) _marker: std::marker::PhantomData<F>,
}
}
U16:
#![allow(unused)]
fn main() {
pub struct UInt16<F: SmallField> {
    pub(crate) variable: Variable,
    pub(crate) _marker: std::marker::PhantomData<F>,
}
}
U32:
#![allow(unused)]
fn main() {
pub struct UInt32<F: SmallField> {
    pub(crate) variable: Variable,
    pub(crate) _marker: std::marker::PhantomData<F>,
}
}
U160:
#![allow(unused)]
fn main() {
pub struct UInt160<F: SmallField> {
    pub inner: [UInt32<F>; 5],
}
}
U256:
#![allow(unused)]
fn main() {
pub struct UInt256<F: SmallField> {
    pub inner: [UInt32<F>; 8],
}
}
U512:
#![allow(unused)]
fn main() {
pub struct UInt512<F: SmallField> {
    pub inner: [UInt32<F>; 16],
}
}
Every type consists of a Variable (the number inside Variable is just the index):
#![allow(unused)]
fn main() {
pub struct Variable(pub(crate) u64);
}
which is represented in the current Field. Variable is quite diverse, and to have “good” alignment and size we manually do encoding management to be able to represent it as both copyable variable or witness.
The implementation of this circuit type itself is similar. We can also divide them into classes as main and dependent:
Such type like U8-U512 decoding inside functions to Num
Let’s demonstrate this in a Boolean example:
#![allow(unused)]
fn main() {
impl<F: SmallField> CSAllocatable<F> for Boolean<F> {
    type Witness = bool;
    fn placeholder_witness() -> Self::Witness {
        false
    }

    #[inline(always)]
    fn allocate_without_value<CS: ConstraintSystem<F>>(cs: &mut CS) -> Self {
        let var = cs.alloc_variable_without_value();

        Self::from_variable_checked(cs, var)
    }

    fn allocate<CS: ConstraintSystem<F>>(cs: &mut CS, witness: Self::Witness) -> Self {
        let var = cs.alloc_single_variable_from_witness(F::from_u64_unchecked(witness as u64));

        Self::from_variable_checked(cs, var)
    }
}
}
As you see, you can allocate both with and without witnesses.
Hash function
In gadgets we have a lot of hash implementation:
- blake2s
- keccak256
- poseidon/poseidon2
- sha256
Each of them perform different functions in our proof system.
Queues
One of the most important gadgets in our system is queue. It helps us to send data between circuits. Here is the quick explanation how it works:
#![allow(unused)]
fn main() {
Struct CircuitQueue{
 head: HashState,
 tail: HashState,
 length: UInt32,
 witness: VecDeque<Witness>,
}
}
The structure consists of head and tail commitments that basically are rolling hashes. Also, it has a length of
the queue. These three fields are allocated inside the constraint system. Also, there is a witness, that keeps actual
values that are now stored in the queue.
And here is the main functions:
#![allow(unused)]
fn main() {
fn push(&mut self, value: Element) {
 // increment length
 // head - hash(head, value)
 // witness.push_back(value.witness)
}

fn pop(&mut self) -> Element {
 // check length > 0
 // decrement length
 // value = witness.pop_front()
 // tail = hash(tail, value)
 // return value
}

fn final_check(&self) -> Element {
 // check that length == 0
 // check that head == tail
}
}
So the key point, of how the queue proofs that popped elements are the same as pushed ones, is equality of rolling
hashes that stored in fields head and tail.
Also, we check that we can’t pop an element before it was pushed. This is done by checking that length >= 0.
Very important is making the final_check that basically checks the equality of two hashes. So if the queue is never
empty, and we haven’t checked the equality of head and tail in the end, we also haven’t proven that the elements we
popped are correct.
For now, we use poseidon2 hash. Here is the link to queue implementations:
The difference is that we actually compute and store a hash inside CircuitQueue during push and pop operations. But
in FullStateCircuitQueue our head and tail are just states of sponges. So instead of computing a full hash, we just
absorb a pushed (popped) element.
Circuit testing
This page explains unit tests for circuits. Specifically, it goes through a unit test of ecrecover. The tests for other circuits are very similar.
Many of the tests for different circuits are nearly identical, for example:
- test_signature_for_address_verification (ecrecover)
- test_code_unpacker_inner
- test_demultiplex_storage_logs_inner
- and several others.
If you understand one, you will quickly be able to understand them all.
Let’s focus on ecrecover. Ecrecover is a precompile that, given your signature, can compute your address. If our circuit works correctly, we should be able to recover the proper address, and be able to prove the computation was done correctly.
.png)
The test begins by defining the geometry, max_variables, and max_trace_len. This data will be used to create the constraint system. Next, we define a helper function:
.png)
To help run the test, we have a helper function called configure that returns a builder. The builder knows all of the gates and gate placement strategy, which will be useful for setting up the constraint system.
.png)
The constraint system is almost ready! We still need to add the lookup tables for common boolean functions:
.png)
Now the constraint system is ready! We can start the main part of the test!
.png)
Here we have hard coded a secret key with its associated public key, and generate a signature. We will test our circuit on these inputs! Next we “allocate” these inputs as witnessess:
.png)
We have to use special integer types because we are working in a finite field.
.png)
The constants here are specific to the curve used, and are described in detail by code comments in the ecrecover_precompile_inner_routine.
Finally we can call the ecrecover_precompile_inner_routine:
.png)
Lastly, we need to check to make sure that 1) we recovered the correct address, and 2) the constraint system can be satisfied, meaning the proof works.
.png)
Circuits
General description
The main circuit is called MainVM. It is the one where all the main logic happens.
It consists of multiple cycles, where on each iteration we take a next opcode and try to execute it the following way:
#![allow(unused)]
fn main() {
if opcode == Add {
 // do addition
}
if opcode == SRead {
 // do storage read
}
...
}
You may notice that Add instruction is much simpler than the SRead one. When you work with circuits you still need
to execute every opcode.
That’s why we can use the following approach:
#![allow(unused)]
fn main() {
if opcode == Add {
 // do addition
}
if opcode == SRead {
 storage_queue.push((address, value));
 // proof storage read in other circuit
}
...
}
So instead of proving SRead we just push a proving request, that will be sent to another circuit, that will prove it.
That’s how we can make our prover structure more optimized and flexible.
For now, we have 13 base layer circuits:
They mostly communicate by queues (the diagram of communication is below).
Public Input structure
Public Input (PI) is some piece of data, that is revealed to the verifier. Usually, it consists of some inputs and outputs.
The main challenge for base layer circuits is the ability to prove unlimited amount of execution. For example, our
MainVm circuit can handle execution of $x$ opcodes. Then, if some transaction causes execution of more than $x$
opcodes, we won’t be able to prove it. That’s why every circuit could be extended to multiple instances. So you can
always use $n$ MainVm instances to handle up to $nx$ opcode executions.
All circuits have the following PI structure:
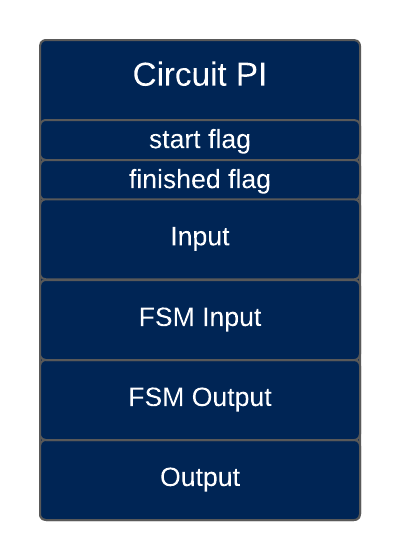
| start flag | Boolean that shows if this is the first instance of corresponding circuit type |
|---|---|
| finished flag | Boolean that shows if this is the last instance of corresponding circuit type |
| Input | Structure that contains all inputs to this type of circuit (every instance of one circuit type has the same input) |
| FSM Input and FSM Output | The field has the same structure. It represents the inner state of circuit execution (the first fsm_input is empty, the second fsm_input equals the first fsm_output and so on…) |
| Output | Structure that contains all outputs of this type of circuit (the last instance contains the real output, the output field of the others is empty) |
The code implementation can be found here.
In terms of Arithmetization we don’t allocate all these fields like public input variables. A more efficient approach
would be computing commitment of type [Num<F>; 4] with poseidon2 and then allocating these 4 variables as public
inputs.

The equality of corresponding parts in different circuits is done during aggregating base layer circuits. Aggregating is done by recursion level circuits that also verify base layer proofs. For now this is out of our scope, so we will focus only on base layer.
How do all the base layer circuits fit together
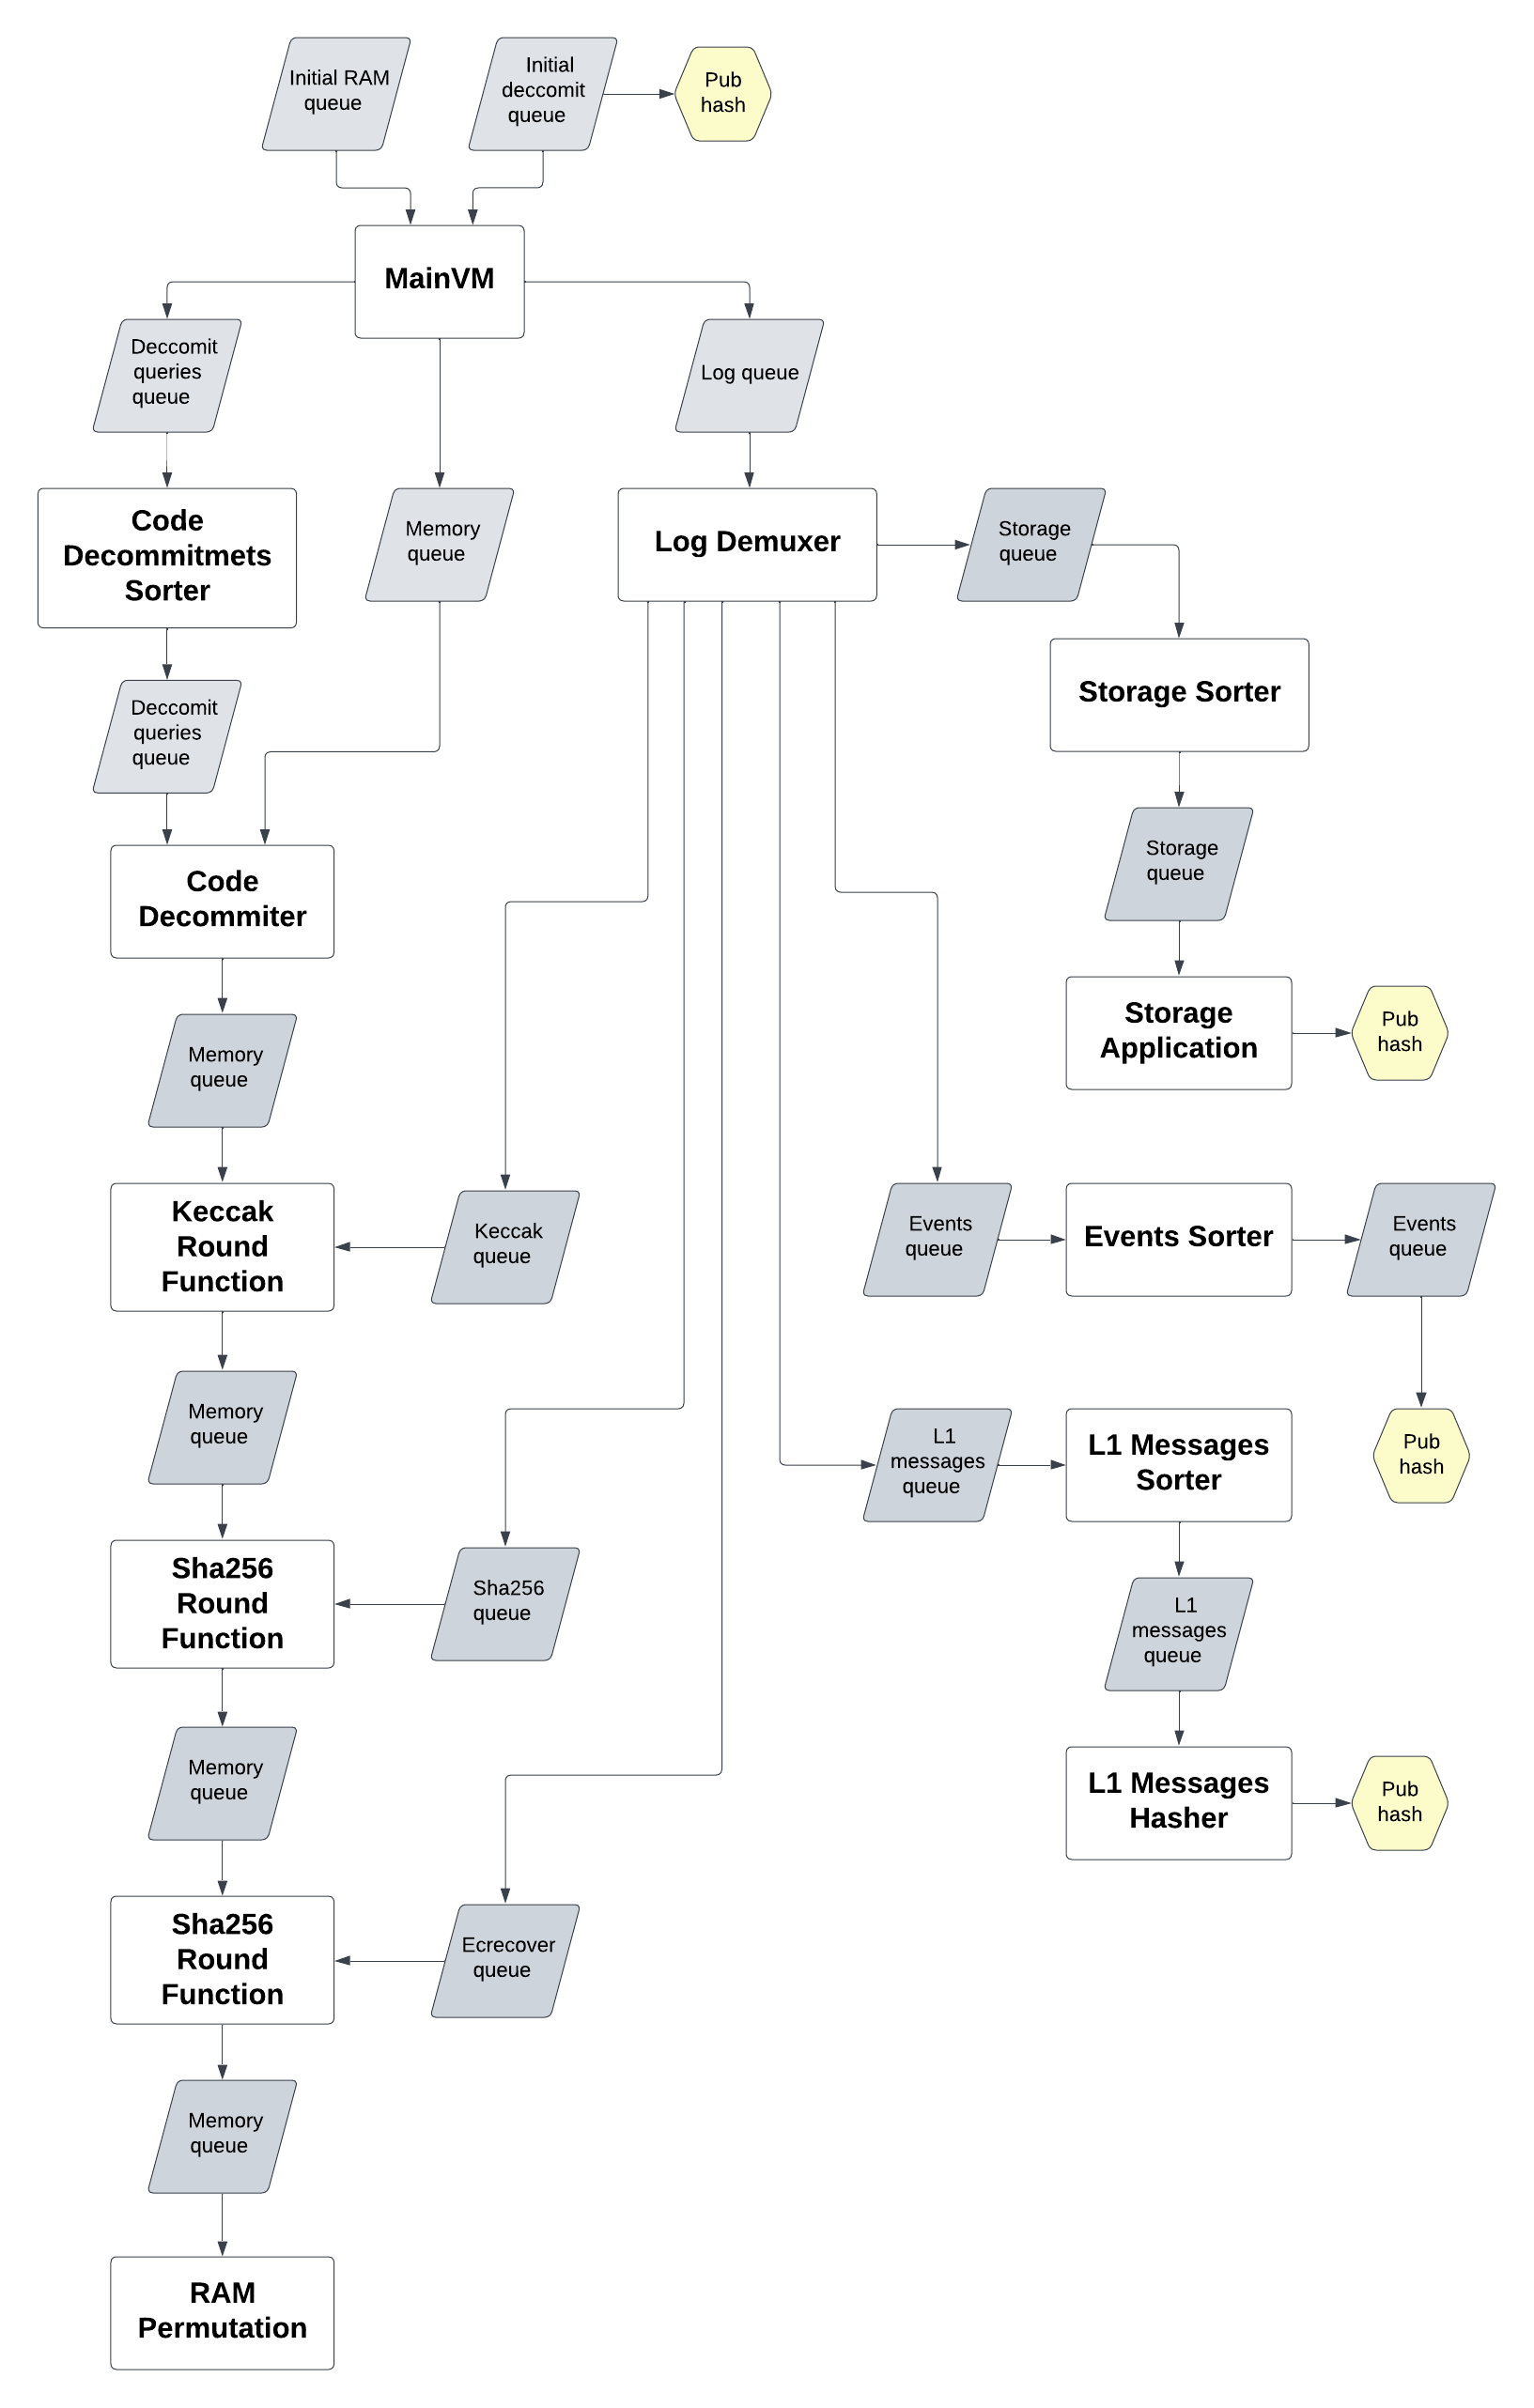
All base layer circuits inner parts
There are a couple of circuits that do queue sorting. Here is the page that describes the algorithm: Sorting
Era VM
ZkSync Virtual Machine primer
Unlike EVM, zkEVM is a register machine. EVM instructions operate on a stack. Instead, zkEVM operates primarily on sixteen registers and memory like most modern computers. That simplifies zero-knowledge proofs, which largely rely on building arithmetic circuits.
This document describes zkEVM assembly language, then the aspects of VM related to smart-contracts. Its purpose is not to be a complete reference, but to guide you through the main ideas.
VM architecture
The native type for zkEVM is a 256-bits wide unsigned integer, we call it a word.
Contracts are sequences of instructions. To support the execution of contracts, VM provides the following transient state:
- registers: 16 general-purpose registers:
r0,r1, …,r15.
r0is a special constant register: reading it yields 0, storing to it is ignored. - flags: three distinct boolean registers LT (less-than), EQ (equals, the result is zero) and GT (greater-than). Instructions may set or clear flags depending on computation results.
- data stack: holds $2^{16}$ words, is free to use.
- heap: for data that we want to pass around between functions and contracts. Heap is bounded, accesses are only free inside the bound, and we have to pay for growing the bound.
- code memory: stores code of currently running contracts. May also be used as a constant pool.
VM is aware of two data types:
- raw integers
- pointers (to fragments of other contracts’ heaps).
Registers and data stack are tagged: VM keeps track of whether they hold pointers or raw integer values. Some instructions will only accept operands tagged as pointers.
Heap and storage are not tagged, so if we store a pointer to the heap, its tag is lost.
Contracts have key-value storages, where keys and values are untagged 256-bit integers. Instructions can change persistent contract storage.
VM is capable of both near calls (to the code within the same contract) and far calls (to other contracts).
Let us now gradually introduce the VM functionality guided by the instruction set.
Basic instructions
Contract code consists of instructions, they are executed sequentially.
Instructions usually operate with registers. For example, an instruction add may look like that:
; this is a comment
add 5, r2, r8  ; store (5 + r2) to r8
Or like that:
add 5, r0, r8 ; store (5 + 0) to r8
Notice that register r0 is used to feed constant zero values to instructions; this allows to use add X, r0, Y to
copy a value X to Y .
Commonly, instructions accept two inputs and one output operands, following the schema:

The first operand can be taken from:
- registers
- an immediate 16-bit value, like in the example above
add 5, r2, r8. To use bigger numbers put them as constants in the code memory, see section Code Addressing. - directly from the code memory
- stack in various ways, e.g.
add stack=[2], r2, r8takes the first element from the stack memory area, by an absolute address 2. - code memory
Only registers can be the source of the second operand.
add r0, 5, r8  ; error: 5 is an immediate value,
               ; but only register is allowed as second operand
There is usually at most one output operand. Similarly, the first output operand can be stored to registers or stack. If there is a second output operand, it can only be stored to a register.
Instructions are executed one after another, and every instruction has a gas cost measured in gas. A program that runs out of gas panics and none of its side effects are performed.
Every contract may have at most $2^{16}$ instructions.
Arithmetic instructions
Besides add, zkEVM implements sub for subtraction, and/ or / xor for bitwise logics, shl/ shr for logical
shifts, rol/ ror for circular shifts. These instructions follow the same format, e.g.:
shl r1, r4, r3 ; right shift r1 by value of r4, store result in r3
Instructions mul and div are particular: they have two output operands:
mul r1, r2, r3, r4stores the low 256 bits of r1r2 in r3, high 256 bits of r1r2 in r4div r1, r2, r3, r4stores the quotient inr3and remainder inr4.
Modifiers
Most instructions support modifiers that alter their behaviour. The modifiers are appended to the name of the
instruction, separated by a dot e.g. sub.s . Three basic modifier types are: set_flags , predicates, and swap.
Set flags
By default, most instructions preserve flags.
sub r1, r2, r3 ; r3 <- (r1 - r2), no flags are affected
The instruction sub is implemented so that it sets EQ if the result is zero (that is, if r1 == r2). But in this
case, even if r1-r2 is zero, the EQ flag is not set, because we did not allow it explicitly. We allow instruction to
set flags by appending a “set flags” modifier to them, like that:
sub! r1, r2, r3 ; r3 <- (r1 - r2); EQ = 1
You can learn more in the formal specification.
Predicates
Another type of modifiers allows transforming any instruction into a predicated, conditional instruction. Predicated instructions are only executed if flags satisfy their condition.
Recall the three flags: LT, EQ and GT.
For example, this sub instruction is only executed if EQ is set:
sub.if_eq r1, r2, r5
Here is how we can execute jump to a label .label_if_equals only if r1 == r2 :
sub! r1, r2, r3 ; r3 <- (r1 - r2); EQ = 1 if r1 == r2
jump.if_eq .label_if_equals
If the condition is not satisfied, we skip the instruction, but still pay its basic cost in gas.
Here is a full list of available predicates:
if_gtif_eqif_ltif_ge(short for “GT or EQ”)if_le(short for “LT or EQ”)if_not_eqif_gt_or_eq
You can learn more in the formal specification.
Swap
Recall that instructions may only accept data from stack as their first operand. What if we need the second operand from
stack? For commutative operation, like add , mul, or and, the order of operands does not matter and we can just
write add x,y,z instead of add y,x,z. However, for operations like sub or div we implement a special “swap”
modifier which exchanges the operand values before executing the instruction. This is useful to work around the
restriction that the second source operand has to be a register.
For example:
sub   r1, r2, r3 ; r3 <- r1 - r2
sub.s r1, r2, r3 ; r3 <- r2 - r1
Finally, here is an example of an instruction adorned with all possible modifiers:
sub.s.if_lt! r8, r4, r12
Here is a breakdown of modifiers:
.if_lt: is only executed if the LT flag is set.s: computesr4 - r8instead ofr8 - r4!: sets flags
$$ \begin{aligned} LT &\leftarrow r_4 < r_8 \ EQ &\leftarrow r_4 - r_8 = 0 \ GT &\leftarrow r_4 > r_8 \end{aligned} $$
Other modifiers are instruction-specific. They are described in full in the instruction reference.
Calls and returns
The jump instruction allows to continue execution from a different place, but it does not allow to return back. An
alternative is using calls; zkEVM supports calling code inside the contract itself (near calls) as well as calling other
contracts (far calls).
Far calls
Far calls are the equivalent of calls in EVM.
Each call gets its own stack, heap, code memories, and allocated gas.
It is impossible to allocate more than 63/64 of the currently available gas to a far call.
Calls can revert or panic (on executing an illegal instruction for example), which undoes all the changes to storage and events emitted during the call, and burns all remaining gas allocated to this call.
Suppose we far called a contract $C$. After the execution of $C$, the register r1 holds a pointer to the return value,
allowing a read-only access to a fragment of $C$’s heap. Alternatively, r1 can hold a pointer to the heap of some
other contract that $C$ called internally. More on that in Pointers section.
Delegate calls. Beside normal far_call, there is a variant far_call.delegate. Delegate calls are a variation of
far calls allowing to call a contract with the current storage space.
For example, suppose we have contracts A,B,C. Contract A calls B normally, then B delegates to C. Then C’s code is
executed in a context of B’s storage, as if contract A called contract C. If C returns normally, the execution will
proceed from the next instruction of B after delegate call. In case of revert or panic in C, all the usual rules
apply.
Mimic calls. The last variant of far calls is far_call.mimic; it is inaccessible to users and only allowed in
system contracts.
Any of far call variants can be additionally marked as .static to call a contract in static mode — see section
Static Mode.
Return, revert, panic
There are three types of situations where control returns to the caller:
- Return: a normal way of returning to the caller when no errors occurred. The instruction is
ret. - Revert: a recoverable error happened. Unspent gas is returned to the caller, which will execute the exception handler.
The instruction is
revert. - Panic: an irrecoverable error happened. Same as revert, but unspent gas is burned. The instruction is
ret.panic.
Near calls
Instruction near_call reg, address passes the control to a different address inside the same contract, like jump.
Additionally, it remembers the context of execution in a special call stack (it is different from data stack and not
accessible to assembly programmers).
Here is an example of calling function f .
.text

; here will be the code of exception handler
eh:

; caller function
main:
near_call r2, @f, @eh ; refer to labels in code using '@' symbol

; callee function
f:
ret
Additional two arguments:
- label
@ehis the address of exception handler. Functions, like contracts, may revert or panic, which leads to the execution of the exception handler. - register
r2holds how much gas we allocate to the function.
As we see, zkEVM supports allocating ergs not only for far calls, but also for near calls. Passing zero will allocate all available gas. Unlike in far calls, near calls do not limit the amount of gas passed to 63/64 of available gas.
- On revert, unspent gas of the function is returned
- On panic, unspent gas of the function is lost
All near calls inside the contract are sharing the same memory space (heap, stack), and do not roll back the changes to this memory if they fail. They do, however, roll back the changes to storage and events.
Near calls cannot be used from Solidity to their full extent. Compiler generates them, but makes sure that if functions revert or panic, the whole contract reverts of panics. Explicit exception handlers and allocating just a portion of available gas are reserved for low-level code.
Accessing data outside registers
Stack addressing
As we already know, instructions may accept data not only in registers or as immediate 16-bit values, but also on stack.
Data stack is a collection of $2^{16}$ words with a pointer SP. This pointer contains the next address after the topmost stack element, so the topmost element has the address SP-1. Stack grows towards maximal address, i.e. pushing an element to stack increases SP.
On far call, SP starts in a new stack memory at 1024.
Reading from stack
There are several ways of accessing stack cells:
.text
main:

; r0 <- stack word by absolute index (r1+42), unrelated to SP
add stack=[r1+42], r0, r2

; r0 <- stack word by index (SP - (r1 + 42))
add stack[r1+42], r0, r2

; r2 <- stack word by index (SP - (r1 + 42)); additionally, SP += (r1+42)
add stack-=[r1+42], r0, r2
As we see there are three stack address modes for input operands; all of them use (register + offset).
Currently, the last mode is only used in a nop instruction as a way to rewind stack:
; effectively, SP -= reg+imm
nop stack-=[reg+imm]
Writing to stack
Storing results on stack is also possible:
.text
main:

; r1 -> word by absolute index (r2 + 42)
add r1, r0, stack=[r2 + 42]

; r1 ->  word by absolute index SP - (r2 + 42)
add r1, r0, stack[r2 + 42]

; r1 ->  word by absolute index SP + (r2 + 42)
; additionally, SP += r2 + 42
add r1, r0, stack+=[r2 + 42]
Currently, the last mode is only used in a nop instruction as a way to forward stack pointer:
; effectively, SP += reg+imm
nop r0, r0, stack+=[reg+imm]
Code addressing
Sometimes we might need to work with larger immediates that do not fit into 16-bit. In this case we can use the (read-only) code memory as a constant pool and read 256-bit constants from there.
.rodata

datavar:
 .cell 42
 .cell 999
.text
somelabel:

; r2 <- word by index (r0+0)  code memory
add @datavar[0], r0, r2
add @datavar[r2], r0, r2
Note: instructions are 64-bit wide, but when accessing data in code memory, this memory is treated as word-addressable. Therefore, e.g. reading the 0-th 256-bit word from this memory will yield a binary representation of the four first 64-bit instructions in the contract.
There is no distinction between static data and code: code can be read, data can be executed, but instructions that are not correctly encoded will trigger panic.
Contracts always need to be divisible by 32 bytes (4 instructions) because of this addressing mode.
Using heap
Heap is a bounded memory region to store data between near calls, and to communicate data between contracts.
Heap boundary growth
Accessing an address beyond the heap bound leads to heap growth: the bound is adjusted to accommodate this address. The difference between old and new bounds is paid in gas.
Instructions to access heap
Most instructions can not use heap directly. Instructions ld.1 and st.1 are used to load and store data on heap:
; take a 32-bit number from r1, use it as an offset in heap,
; load the word from heap by this offset to r4
ld.1 r1, r4

; take a 32-bit number from r3, use it as an offset in heap,
; store the word from r5 to heap by this offset
st.1 r3, r5
Heap is byte-addressable, but reads and writes operate in words. To read two consecutive words in heap starting at an address A, first, read from A, and then read from A+32. Reading any addresses in between is valid too.
One of the modifiers allows to immediately form a new offset like that:
; same as ld, but additionally r5 <- r1 + 32
ld.1.inc r1, r4, r5
This allows reading several consecutive words in a row:
; reads four consecutive words from heap starting at address in r8
; into registers r1, r2, r3, r4
ld.1.inc r8, r1, r8
ld.1.inc r8, r2, r8
ld.1.inc r8, r3, r8
ld.1.inc r8, r4, r8
In theory, heap can hold nearly $2^{32}$ bytes, but growing a heap so large is not affordable: the maximum gas allocated is $2^{32}-1$.
The topmost 32 bytes of heap are considered forbidden addresses, trying to access them results in panic no matter how much gas is available.
Heap and Auxheap
In zkEVM, there are two heaps; every far call allocates memory for both of them.
Heaps are selected with modifiers .1 or .2 :
ld.1reads from heap;ld.2reads from auxheap.
The reason why we need two heaps is technical. Heap contains calldata and returndata for calls to user contracts, while auxheap contains calldata and returndata for calls to system contracts. This ensures better compatibility with EVM as users should be able to call zkEVM-specific system contracts without them affecting calldata or returndata.
Fat pointers
A fat pointer is the second type of values in zkEVM, beside raw integers.
As we noted, registers and stacks are internally tagged by VM to keep track of the cells containing pointers in their low 128 bits. Only cells with a set pointer tag are considered fat pointers.
Fat pointers are used to pass read-only data between contracts. When choosing how to pass data to a contract (whether when calling or returning from a call) we have a choice:
- pass an existing fat pointer, or
- create a new fat pointer from a fragment of heap/auxheap.
Fat pointers combine two aspects:
- Delimit a fragment accessible to other contract. Accesses outside this fragment through a pointer yield zero.
- Provide an offset inside this fragment. This offset can be increased or decreased.
The restrictions on fat pointers provide allows to pass data between contracts safely and without excessive copying.
Implementation note. Internally, fat pointers hold four 32-bit values:
- bits 0..31 : offset
- bits 32..63: internal memory page ID
- bits 64…95 : starting address of the fragment
- bits 96…127 : length of the fragment
Instructions to manipulate fat pointers
Only special instructions can manipulate fat pointers without automatically clearing its pointer tag.
ptr.add,ptr.submodify the offset inside pointerptr.shrinkreduces the associates fragment, so if we get a fat pointer from contract A, we can then shrink it and pass to another contract B up the call chain, again without copying data.ptr.packallows putting data in the top 128 bit of the pointer value without clearing the pointer tag.
Doing e.g. add r1, 0, r2 on a pointer in r1 clears its tag, and it is now considered as a raw integer.
Instructions ld and [ld.inc](http://ld.inc) (without indices 1 or 2) allow loading data by fat pointers, possibly
incrementing the pointer. It is impossible to write by a fat pointer.
Contracts and storage
All accounts are associated with contracts. There are $2^{160}$ valid account addresses.
In zkEVM, contracts may have multiple functions in them; a contract may execute its functions by using near_call ;
it may call other contracts by using far_call or its variations delegate_call / mimic_call (mimic is reserved for
system contracts).
Size of a contract should be divisible by 32 bytes (4 instructions).
Storage of contracts
Every account has a storage. Storage maps $2^{256}$ keys to values; both keys and values are 256-bit untagged words.
Contracts may write to their own storage by using sstore key, value and read from storage using sload key, dest.
Static mode
Static mode prevents contracts from modifying their storage and emitting events. In static mode, executing an
instruction like sstore sends VM into panic.
To execute a contract C in static mode, use a static modifier: far_call.static. All contracts, called by C
recursively, will also be executed in static mode. VM exits static mode automatically when C terminates.
System contracts
Part of Era’s functionality is implemented through system contracts. These contracts have addresses from 0 to $2^{64}$ and are executed in kernel mode, where they have access to privileged instructions. An example of such instruction is mimic call, a variant of far call where the caller can pretend to be another contract. This is useful for hiding the fact that something is implemented via a system contract but in the hands of users it would mean being able to steal anyone’s tokens.
System contracts implement contract deployment, extensions such as keccak256, decommitting code etc.
Server and VM environment
Decommitter
Decommitter is a module external to zkEVM allowing accessing deployed code by its hash.
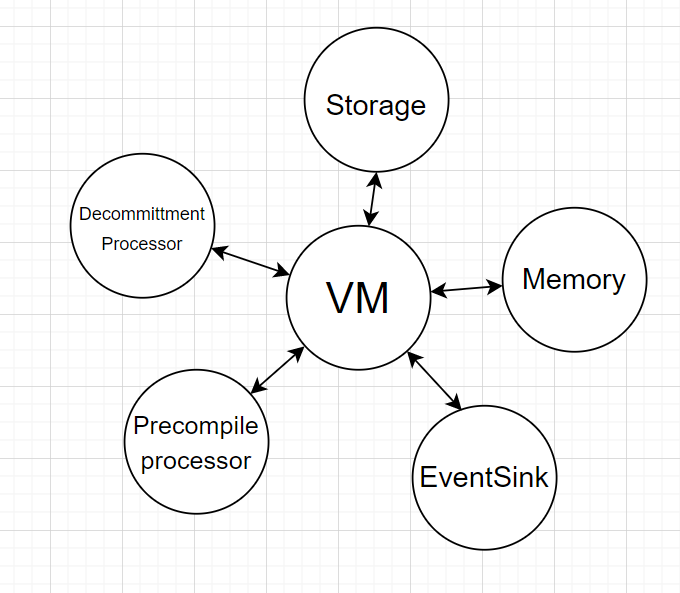
The system contracts at the address $2^{15}+2$ , called Deployer, keeps hashes of code of each contract in its storage. Far calls to a contract with address $C$ perform as follows:
- VM internally accesses the storage of
Deployercontract by key $C$. This storage yields the hash value $H$. - then VM queries the decommitter, providing $H$. Decommitter answers with the contract code.
If decommitter does not have the code for the requested hash, one of two things happen:
- if C is a system contract (i.e. address of $C < 2^{16}$), the call will fail
- otherwise, VM will call the
DefaultAccountcontract.
Server
The VM is controlled by a server. When the server needs to build a new batch, it starts an instance of zkEVM and feeds the transactions to the Bootloader.
zkEVM accepts three parameters:
- Bootloader’s hash. It is used to fetch the bootloader code from decommitter.
- Code hash of
DefaultAccountcontract code. It is used to fetch the default code from Decommitter in case of a far call to a contract without any associated code. - A boolean flag
is_porter_available, to determine the number of shards (two if zkPorter is available, one otherwise).
zkEVM retrieves the code of bootloader from Decommitter and proceeds with sequential execution of instructions on the bootloader’s code page.
Failures and rollbacks
There are three types of behaviour triggered by execution failures.
-
Skipping a malformed transaction. It is a mechanism implemented by the server, external to zkEVM. Server makes a snapshot of zkEVM state after completing every transaction. If the bootloader encounters a malformed transaction, it fails, and the server restarts zkEVM from the most recent snapshot, skipping this transaction.
This behaviour is specific to server/bootloader; the contract code has no ways of invoking it.
-
Revert is triggered by the contract code explicitly by executing
revert. zkEVM saves its persistent state on every near or far call. If the contract code identifies a recoverable error, it may executerevert; then zkEVM rolls the storage and event queues back to the last checkpoint and executes the exception handler. -
Panic is triggered either explicitly by executing
panicor internally when some execution invariants are violated e.g. attempt to use raw integer inptr.addinstruction.On panic, the persistent state of zkEVM is rolled back in the same way as on revert.
Bootloader
Bootloader is a system contract in charge of block construction (sources).
Formally, bootloader is assigned an address BOOTLOADER_SYSTEM_CONTRACT_ADDRESS = $2^{15}+1$, but zkEVM decommits its code directly by its hash.
The heap of the bootloader is special: it acts as an interface between server and zkEVM. Server gradually fills the bootloader’s heap with transaction data, formatted according to an implementation-defined convention.
The bootloader then acts roughly as the following code (not an actual implementation):
contract Bootloader {
  function executeBlock(address operatorAddress, Transaction[2] memory transactions) {
    for (uint256 i = 0; i < transactions.length; i++) {
      validateTransaction(transactions[i]);
      chargeFee(operatorAddress, transactions[i]);
      executeTransaction(transactions[i]);
    }
  }

  function validateTransaction(Transaction memory tx) {
    // validation logic
  }

  function chargeFee(address operatorAddress, Transaction memory tx) {
    // charge fee
  }

  function executeTransaction(Transaction memory tx) {
    // execution logic
  }
}
The bootloader is therefore responsible for:
- validating transactions;
- executing transactions to form a new block;
- setting some of the transaction- or block-wide transaction parameters (e.g.
blockhash,tx.origin).
Server makes a snapshot of zkEVM state after completing every transaction. When the bootloader encounters a malformed transaction, it fails, and the server restarts zkEVM from the most recent snapshot, skipping this transaction. If a transaction is well-formed, zkEVM may still panic while handling it outside the bootloader code. This is a normal situation and is handled by zkEVM in a regular way, through panics.
The exact code of the bootloader is a part of a protocol; its hash is included in the block header.
Context value
A part of the zkEVM state is a 128-bit context value. It implements msg.value standing for the amount of wei sent in
a transaction. In assembly, it is used as follows:
- Execute
context.set_context_u128 regto set the value; - Perform a far call — it captures the context value;
- In a called contract, access the context value through
context.get_context_u128 reg.
Context value can not be set in static mode.
The system contract MsgValueSimulator ensures that whenever this context value is set to C, there are indeed C wei
transferred to the callee.
ZKsync development announcement
This directory will contain announcements that don’t necessarily serve as documentation, but still provide valuable information to be stored long-term.
Current announcements:
- Apr 30, 2025 - Changes in the configuration format
Configuration Format Changes
Overview
As of April 2025, ZKsync nodes are transitioning to the new multi-layered configuration system developed in-house as a Rust library (usable for other apps as well!).
The reasons for this transition are multifold; the main ones include:
- Flexible distribution of configuration sources. Currently, node support either loading configuration only from env variables, or from a predefined set of YAML files, each with a fixed schema. With the new system, it will be possible to arbitrarily distribute params among YAML / JSON files, and/or env variables. Redefinitions will be resolved via well-defined source priorities.
- Unification of parameter naming / schema for env-based and file-based config sources. Currently, some params have a differing name and/or schema depending on the source.
- Reasonable defaults for the majority of config parameters. Currently, the vast majority of parameters are required.
- Auto-generated documentation for config params embedded directly into the node executable.
There are more; see the config system readme for a more complete list of features.
Migration path
Migration to the new system will proceed in stages. On the initial stage, the node CLI options related to the config will not change (i.e., a node will still read the config either from env vars, or from a list of YAML files). The vast majority of the config schema is backward-compatible, both for file-based and env-based formats, with a couple of exceptions described below.
The env-based format is de facto currently deprecated for the main node (the zksync_server binary; launched via zkstack server).
Potential breaking changes in it are not exhaustively tested and will be fixed at best-effort basis.
The initial stage will also not touch env-based config for non-validator / external nodes (zksync_external_node
binary); it will be migrated separately.
Migration is only necessary for existing configurations; config files newly created via (updated) zkstack will have
the necessary changes applied automatically.
Tagged enumerations
The current schema uses “one-of” encoding for enumerations, in which an enumeration is represented as a single-field object with the key corresponding to the variant, and value being the variant payload. With the change, the tagged representation will be used instead, in which the tag is placed in a separate key adjacent to the payload. (Tagged representation works better with prioritized merging.)
All of tagged enumeration migrations other than the da_client.eigen.points_source_(url|path) (described in details
below) are not technically required; a node should pick up the existing “one-of” encoding. Still, these migrations are
strongly recommended for better forward compatibility.
The following enumeration configs are affected.
Object stores
Object store configs at snapshot_creator.object_store, prover.prover_object_store, snapshot_recovery.object_store,
and core_object_store in general.yaml.
As an example, take the following configuration before migration:
core_object_store:
  file_backed:
    file_backed_base_path: artifacts
  max_retries: 10
In the new format, it will look as follows:
core_object_store:
  mode: FileBacked
  file_backed_base_path: artifacts
  max_retries: 10
I.e., the object beneath the file_backed tag is unindented, and the tag itself is transformed to mode: FileBacked.
It is possible to define a config that will be parsed both by old and new node versions; this is recommended for
no-downtime migration.
core_object_store:
  # Read by old node versions
  file_backed:
    file_backed_base_path: artifacts
  # Read by new node versions
  mode: FileBacked
  file_backed_base_path: artifacts
  # Read by both
  max_retries: 10
DA client
DA client configs at da_client in general.yaml and at da in secrets.yaml. Additionally, some clients have
additional enumerations:
- If the Avail DA client is configured,
da_client.availspecifies the client subtype:full_clientorgas_relay. - If the Eigen DA client is configured,
da_client.eigenspecifies the EC points source:points_source_urlorpoints_source_path.
As an example, take the following fragment of general.yaml before migration:
da_client:
avail:
bridge_api_url: https://turing-bridge-api.avail.so/
timeout_ms: 10000
gas_relay:
gas_relay_api_url: https://example.com/
max_retries: 7
In the new format, 2 enumerations will be changed: one at da_client (acquiring tag client) and at
da_client.avail.gas_relay (acquiring tag avail_client_type):
da_client:
bridge_api_url: https://turing-bridge-api.avail.so/
timeout_ms: 10000
avail_client_type: GasRelay
gas_relay_api_url: https://example.com/
max_retries: 7
client: Avail
As in the previous case, it is possible to define a config that will be parsed both by old and new node versions by deep-merging the old and new configs.
An example for the Eigen DA client:
# Before migration
da_client:
eigen:
disperser_rpc: https://disperser-holesky.eigenda.xyz:443
settlement_layer_confirmation_depth: 0
eigenda_eth_rpc: https://holesky.infura.io/v3/CORRECT_HORSE
eigenda_svc_manager_address: 0xD4A7E1Bd8015057293f0D0A557088c286942e84b
wait_for_finalization: true
authenticated: true
points_source_url:
g1_url: https://raw.githubusercontent.com/lambdaclass/zksync-eigenda-tools/6944c9b09ae819167ee9012ca82866b9c792d8a1/resources/g1.point
g2_url: https://raw.githubusercontent.com/lambdaclass/zksync-eigenda-tools/6944c9b09ae819167ee9012ca82866b9c792d8a1/resources/g2.point.powerOf2
---
# After migration
da_client:
client: Eigen
disperser_rpc: https://disperser-holesky.eigenda.xyz:443
settlement_layer_confirmation_depth: 0
eigenda_eth_rpc: https://holesky.infura.io/v3/CORRECT_HORSE
eigenda_svc_manager_address: 0xD4A7E1Bd8015057293f0D0A557088c286942e84b
wait_for_finalization: true
authenticated: true
points:
source: Url
g1_url: https://raw.githubusercontent.com/lambdaclass/zksync-eigenda-tools/6944c9b09ae819167ee9012ca82866b9c792d8a1/resources/g1.point
g2_url: https://raw.githubusercontent.com/lambdaclass/zksync-eigenda-tools/6944c9b09ae819167ee9012ca82866b9c792d8a1/resources/g2.point.powerOf2
da_client.eigen.points_source_(url|path) MUST be transformed, unlike other enumations mentioned in the section.
This is caused by inconsistency between the logical structure of the corresponding config and its serialization schema,
which has been fixed in the new schema.
For secrets.yaml, the change is as follows:
# Before migration
da:
avail:
seed_phrase: correct horse battery staple
---
# After migration
da:
client: Avail
seed_phrase: correct horse battery staple
It is recommended (although not strictly necessary) to also rename da in secrets.yaml to da_client (or copy if
no-downtime migration is required).
Deployment allowlist
Configuration at state_keeper.deployment_allowlist. The tag field name in this case is source:
# Before migration
state_keeper:
deployment_allowlist:
dynamic:
http_file_url: http://deployment_allowlist/
refresh_interval_secs: 60
---
# After migration
state_keeper:
deployment_allowlist:
source: Dynamic
http_file_url: http://deployment_allowlist/
refresh_interval_secs: 60
Other changes
snapshot_recovery.experimental.drop_storage_key_preimagesparameter, if present, should be moved / copied tosnapshot_recovery.drop_storage_key_preimages.- Likewise,
snapshot_recovery.experimental.tree_recovery_parallel_persistence_buffer, if present, should be moved / copied tosnapshot_recovery.tree.parallel_persistence_buffer.
Debugging configuration
To debug configuration parameters, launch the node with the config command, e.g. zksync_server config or
zkstack server -- config if using zkstack. By default, the config command will output help on configuration
params, optionally filtered by the param name. If the --debug flag is specified, param values will be output instead.